
Written by
Yuri ZhangSummary: This enlightening post demystifies the process of how to use Apple Notes on Windows but also empowers users to harness the Apple ecosystem on Windows. Incidentally, iBoysoft Data Recovery retrieves lost note files.
It is justified to use Apple Notes on Windows because the chances are you were used to utilizing Apple OS, but out of certain needs, you switch or add to use Windows afterward. Some important information or ongoing notes are saved in former Apple Notes which need to be connected.
Using Apple Notes on a Windows computer can be done in a few ways despite it being a part of Apple's ecosystem. Here are the most common methods and precautions.
Precautions about using Apple Notes on Windows
On one hand, when accessing Apple Notes on a Windows PC, it's important to consider security and privacy implications. Ensure that your Apple ID credentials are kept secure, and be cautious when accessing iCloud services on public or shared computers.
On the other hand, the features available for editing and managing Apple Notes on Windows may not be identical to those on macOS or iOS devices. Certain advanced features or formatting options may be limited when using third-party apps or web interfaces.
At the same time, pay attention to file format compatibility. If exporting Apple Notes to alternative formats like PDF or text files for access on Windows, consider compatibility issues with formatting, attachments, and other rich content. Some formatting may not be preserved when exporting and importing notes.
Always have a backup of your Apple Notes data, especially when accessing them on a non-Apple platform like Windows. Regularly back up your notes using iCloud or alternative methods to prevent data loss. If unlucky loss occurs, there is a Guide to Recover Deleted Notes on Mac.
Share this to expand your mine of knowledge.
Using iCloud Website to use Apple Notes on Windows
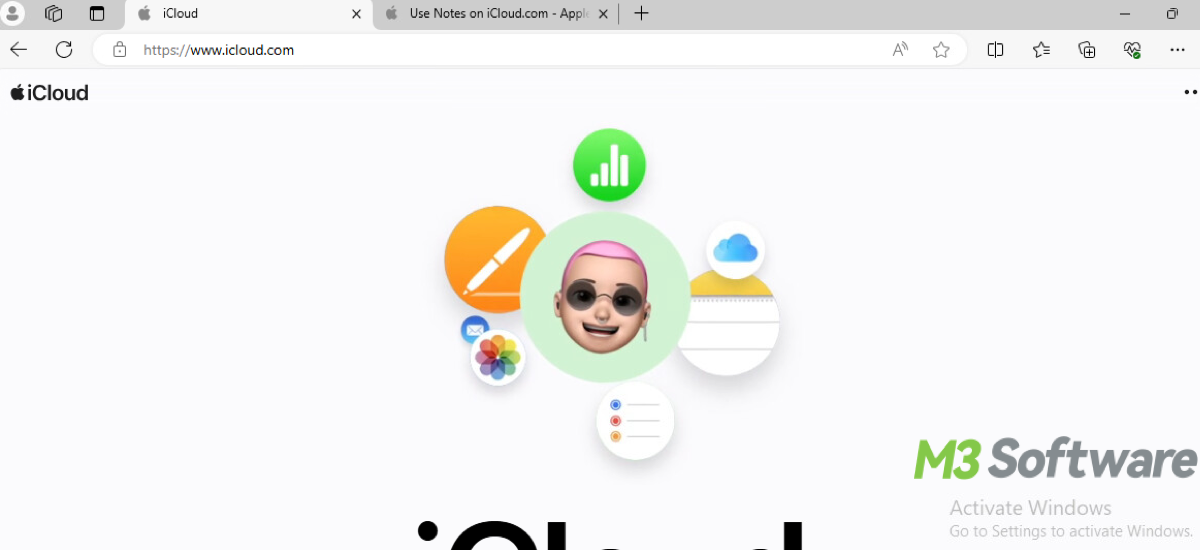
The most straightforward way to access Apple Notes on a Windows PC is through the iCloud website. The first thing to do is to open a web browser on your Windows computer. Then go to iCloud.com. Log in with your Apple ID and click on the Notes app icon. This method allows you to view, edit, and create notes, and any changes you make will sync across all your devices that use the same Apple ID.
iCloud for Windows App
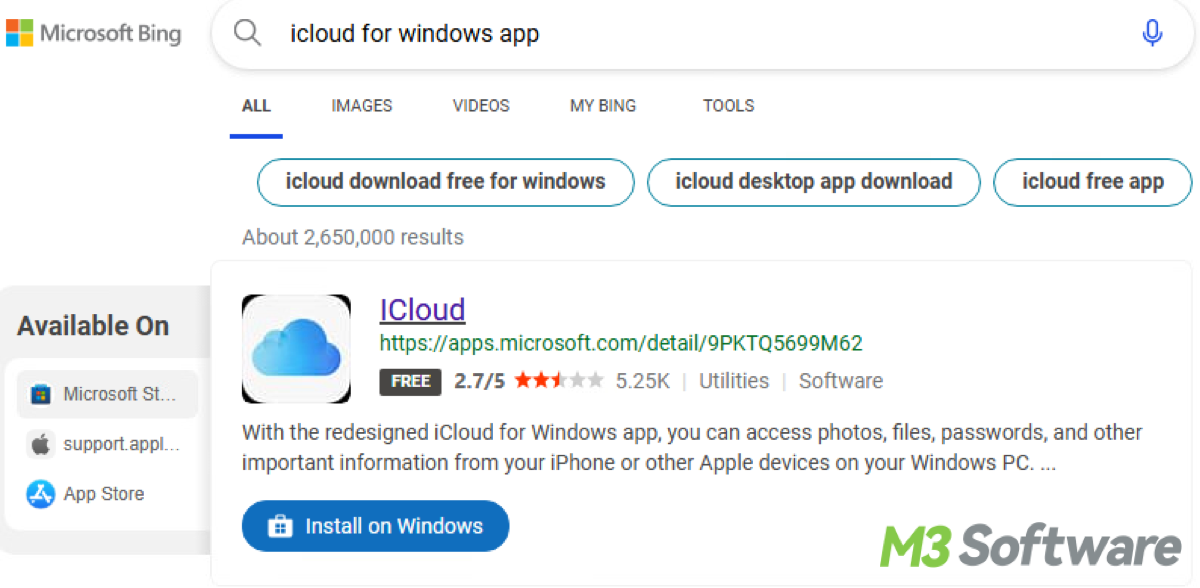
Apple provides an iCloud app for Windows which can help sync some of your iCloud data. Firstly download and install the iCloud for Windows app from the Microsoft Store or Apple's website. Secondly, open the iCloud app and sign in with your Apple ID. Select the iCloud services you want to sync in the end.
Unfortunately, for its last update, it does not directly support the syncing or editing of Apple Notes on Windows. It can be useful for syncing other data like photos, emails, and files. However, it's worth mentioning that the iCloud for Windows app primarily focuses on syncing features such as iCloud Drive, Photos, Mail, Contacts, and Calendar with your Windows PC.
Virtual Machine or Dual Boot Setup
The difference between the virtual machine and a dual boot setup is that the virtual machine is like a container for you to use like an emulator, while the latter actually installs another operation system. Let's dive into the detailed steps for the virtual machine:
- Download virtualization software like VMware or VirtualBox.
- Download the macOS Installation file by finding a macOS ISO or DMG file online.
- Follow the installation instructions for the software.
- Open the virtualization software, create a new virtual machine, and select macOS as the operating system.
- Allocate resources by assigning CPU, RAM, and storage space to your virtual machine.
- Start the virtual machine and install macOS using the ISO or DMG file you downloaded.
- Configure macOS and set up the macOS you like.
- Once set up, you can use macOS and its Notes within the virtual machine on your Windows PC.
Tips: Just remember to use macOS legally and be aware that it might not run as smoothly as on a native Mac.
The choice between the virtual machine and dual boot depends on your computer's performance, the virtual machine can be used together in two systems needing higher capacity. while the dual bootup can only boot one at once with lower performance. Here are detailed steps to set up dual boot.
- Ensure that your Windows PC hardware is compatible with macOS.
- Before proceeding, back up all your important data on both Windows and macOS partitions.
- Download the macOS installer from the App Store on a Mac. Then use a tool like TransMac or Rufus to create a bootable USB drive with the macOS installer on it.
- Use the Disk Management tool in Windows to shrink your existing Windows partition to make space for macOS.
- In your PC's BIOS settings, disable the Secure Boot and Fast Startup options.
- Insert the macOS bootable USB drive into your PC and restart it. Press the appropriate key (usually F12 or Del) to access the boot menu and select the USB drive to boot from.
- Follow the on-screen instructions to install macOS on the partition you created earlier.
- After macOS installation is complete, you'll need to install a bootloader like Clover or OpenCore.
- Boot into macOS and install any necessary drivers for your hardware.
- Restart your PC and test both macOS and Windows to ensure they boot up correctly and then you can use Apple Notes on Windows.
Tips: If you frequently need access to macOS features, you can set up a virtual machine or dual boot configuration on your Windows PC. If you prefer one operating system over the other, you can adjust the boot order in your BIOS settings to make it boot by default, which is optional.
Enable remote access to a Mac to use Apple Notes on Windows
If you have access to a Mac, you can use remote desktop software to control your Mac from your Windows PC.
Remote desktop software 1: Apple Remote Desktop
- Enable screen sharing on your Mac (System Preferences > Sharing > Screen Sharing).
- Install a VNC viewer on your Windows PC (such as RealVNC or TightVNC).
- Connect to your Mac using the VNC viewer.
Remote desktop software 2: TeamViewer
- Install TeamViewer on both your Mac and Windows PC.
- Log in with the same account on both devices.
- Use TeamViewer to remote into your Mac and access Apple Notes.
Remote desktop software 3: Chrome Remote Desktop
- Install Chrome Remote Desktop on both your Mac and Windows PC.
- Set up remote access on your Mac through the Chrome Remote Desktop extension.
- Access your Mac from your Windows PC using Chrome Remote Desktop and use Apple Notes directly.
Spread the information to address other's same issues openly.
How to access Apple Notes on Windows
While Apple Notes is native to iOS and macOS, Windows users often wonder if they can access their notes on their non-Apple devices. Fortunately, accessing Apple Notes on Windows is not only possible but also fast. if you find it inconvenient to use Apple Notes on a Windows PC, there are other choices to turn to other Notes applications compatible with Windows.
Cloud Storage Sync to access Apple Notes on Windows
- Export your notes from Apple Notes (on a Mac or iOS device) as PDFs or text files.
- Upload the exported notes to a cloud storage service like Google Drive, Dropbox, or OneDrive.
- Access the notes from your Windows PC using the corresponding cloud storage app or web interface.
Using Email to Transfer Notes to access Apple Notes on Windows
- Open the Notes app on your Apple device.
- Select the note you want to transfer.
- Use the share option to email the note to yourself.
- Open the email on your Windows computer and access the note.
Manual Copy-Pasting to access Apple Notes on Windows
It may be sluggish, but you can discard trivial notes and keep more important ones by going through the Apple device. For a more hands-on approach, you can manually copy the content of your notes from an Apple device and paste them into a note-taking app (e.g., Microsoft OneNote, Evernote, or even a simple text editor, and others -find more) on your Windows PC.
Using Third-Party Apps to access Apple Notes on Windows
There are a few third-party apps and services that might allow you to access your Apple Notes indirectly by syncing notes through other services.
- Notability: a popular note-taking app available on multiple platforms. You can use it to import your Apple Notes and then access them from a Windows PC through the Notability app or web client.
- Simplenote: another note-taking app that works across platforms. You can manually copy notes from Apple Notes to Simplenote on an Apple device and then access them on Windows.
- Notes Exporter: a specialized tool to export your notes from Apple Notes and import them into another application. Use Notes Exporter on a Mac to export Apple Notes as text files or HTML.
- Automator Scripts: specialized scripts to export your notes from Apple Notes and import them into another application. Run the script to export the notes in a desired format (PDF, text).
Final thoughts
By using these methods, you can access and manage your Apple Notes on a Windows computer effectively. Be noticed that changes made to Apple Notes on Windows may not sync immediately with other devices. There can be some delay in syncing, especially if you're using third-party apps or web interfaces.
Related articles
How to Install Apps on Windows 7/10/11
How to Delete a Folder/Directory/File in Windows 10/11 Fast
Smart Techniques on Batch Renaming Files in Windows
How to Clear Cache on Windows 10 or 11 Gracefully
Comment and share this know-how, we are humbled to accept any suggestions.