
Written by
Wilsey YoungSummary: This article explains why Windows Explorer not showing thumbnails, it also offers several approaches to help users fix this issue. iBoysoft Data Recovery for Windows is highly recommended for restoring accidentally deleted or lost files on Windows.
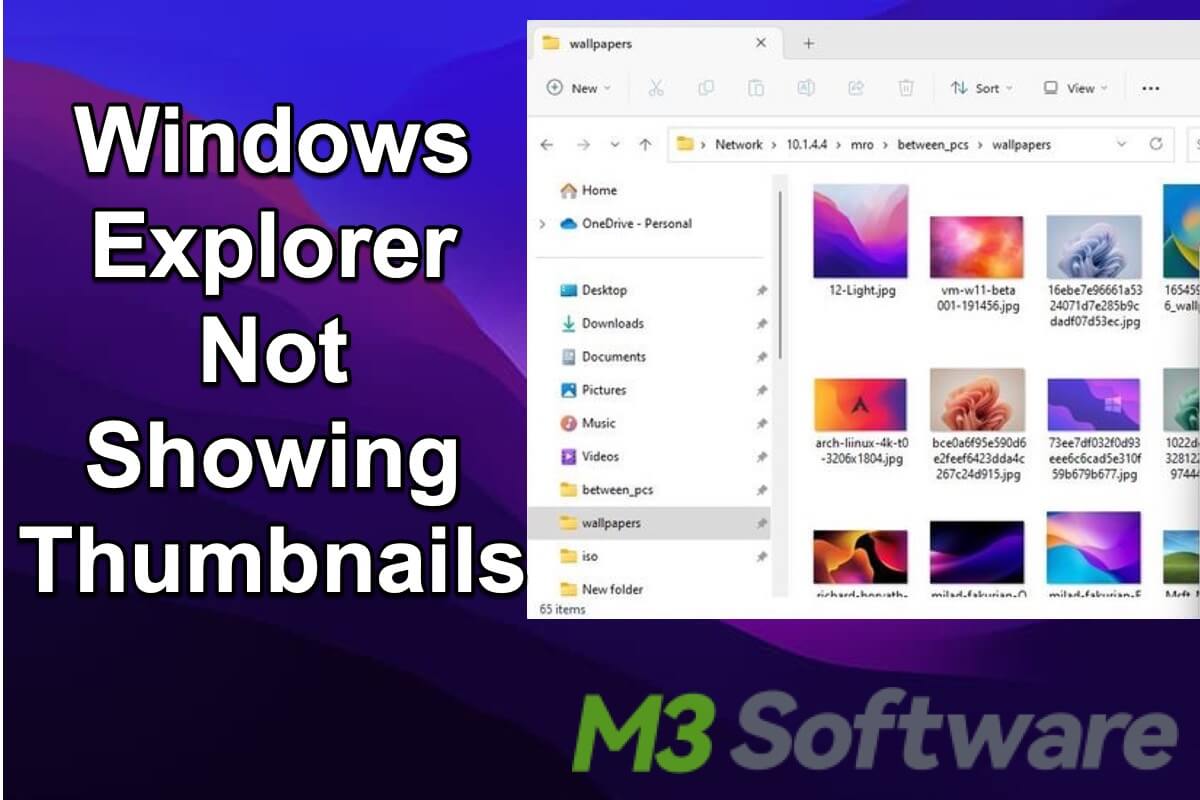
Thumbnail Preview in Windows File Explorer is a humanized design that allows you to easily identify images or video files, saving you time in using other programs to open them up. But sometimes, you may run into Windows Explorer not showing thumbnails, which causes you a lot of trouble when dealing with computer files.
Windows Explorer not showing thumbnails may arise for different reasons, either because of Windows users' operating mistakes or computer system problems. This article begins by explaining why Windows Explorer not showing thumbnails, followed by providing practicable solutions to this issue. You can free download iBoysoft Data Recovery for Windows to rescue your accidentally lost or deleted files on Windows.
Having a basic understanding of Windows File Explorer can improve the user experience on Windows, you can read the article recommended as follows to get more details: Windows File Explorer: What it is and Useful Tips
Solutions to Windows Explorer Not Showing Thumbnails
| Solution | Applicable Scenario | Difficulty Level |
| Restarting File Explorer | There's an error with File Explorer | Easy |
| Changing icon size and viewing style | Incorrect preview settings in File Explorer | Easy |
| Make sure thumbnails are enabled | The thumbnail feature is accidentally disabled | Easy |
| Changing visual effect settings | Incorrect system settings | Medium |
| Clearing thumbnail cache | Insufficient disk space | Medium |
| Restoring File Explorer to default | Incorrect settings in File Explorer | Easy |
| Enabling thumbnail via Local Group Policy Editor | The thumbnail feature is not enabled | Medium |
| Run System File Checker | Error with system files | Easy |
You can click the buttons below to share this post with your friends on social media!
Why is Windows Explorer not showing thumbnails?
Locating the real cause of the issue can help you find corresponding solutions quickly. Here are some possible reasons of cause File Explorer not showing thumbnails on Windows.
- The thumbnail is accidentally disabled
- Incorrect preview or system settings
- Insufficient disk space
- Corrupted thumbnail cache files
- Corrupted photos or images
- Error with File Explorer
- Error with system files
Solutions to Windows Explorer not showing thumbnails
Windows Explorer not showing thumbnails is not a big deal on Windows computers, you can keep reading the following content of this article to discover solutions. All step-by-step solutions listed below are implemented in the Windows 10 operating system. If your computer runs Windows 11, those solutions could serve as a great reference.
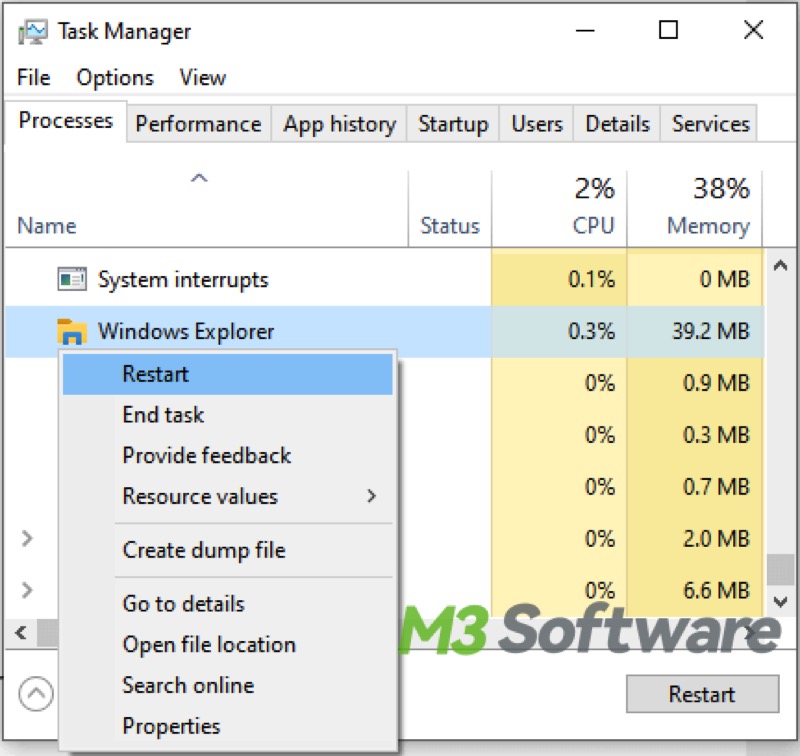
Restarting File Explorer
Restarting File Explorer is usually enough to fix most issues with icons, navigation panes, tabs, and everything related, and it may help you resolve the thumbnail issue.
- Right-click on the taskbar and select “Task Manager”.
- Locate the “Windows Explorer”, right-click on it, and click “Restart”.
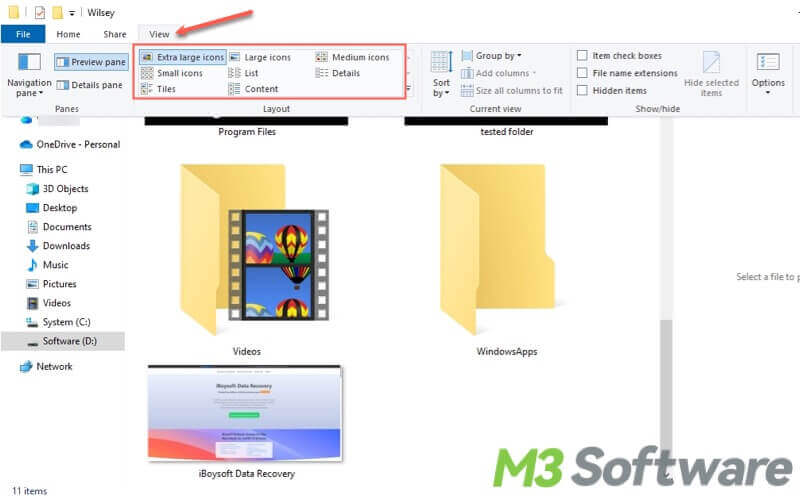
Changing icon size and viewing style
Choosing "Small icons", "List" or "Details" options under the View tab of File Explorer sure lead to Windows Explorer not showing thumbnails, so you need to change the icon size and viewing style of the folder in File Explorer.
- Open a folder in File Explorer and click the “View” tab at the top left.
- You can select “Extra large icons”, “Large icons”, and “Medium icons” options that can display the file's thumbnail.
- “Tiles” and “Content” can also enable the file's thumbnail in the folder.
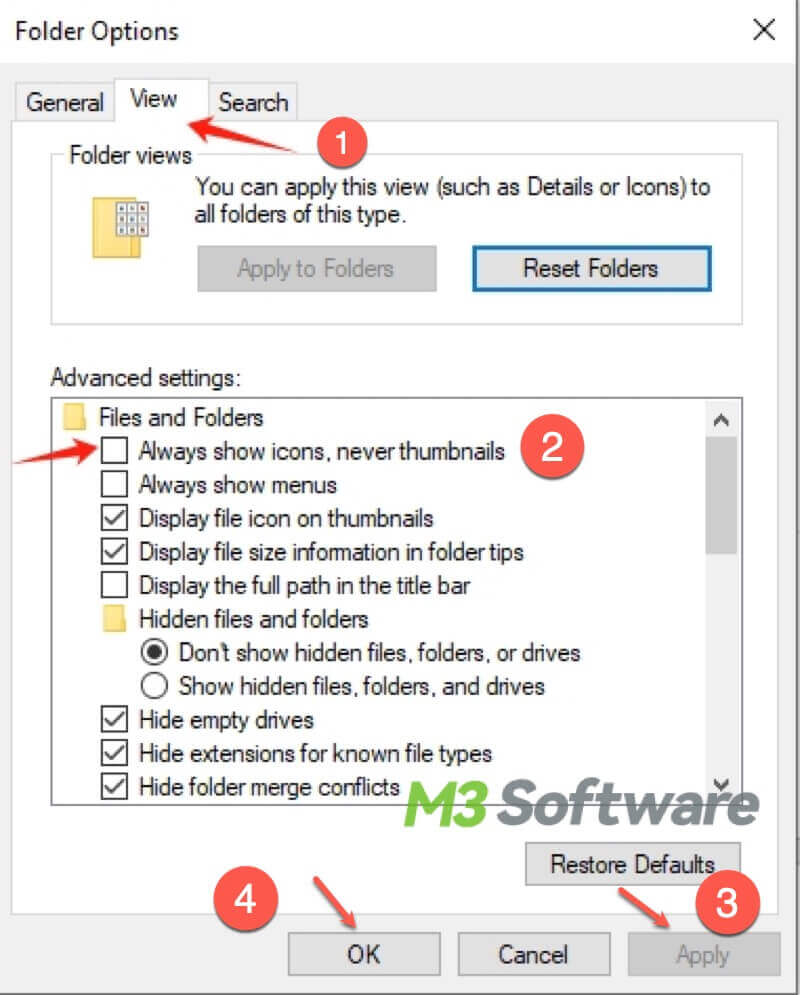
Making sure thumbnails are enabled
Windows Explorer not showing thumbnails usually occurs due to the misoperation of Windows users, who may accidentally disable the File Explorer thumbnail in various situations. Making sure the thumbnails are enabled is the one you should try if File Explorer not showing thumbnails.
- Open File Explorer.
- Click the “View” tab and select the “Options”.
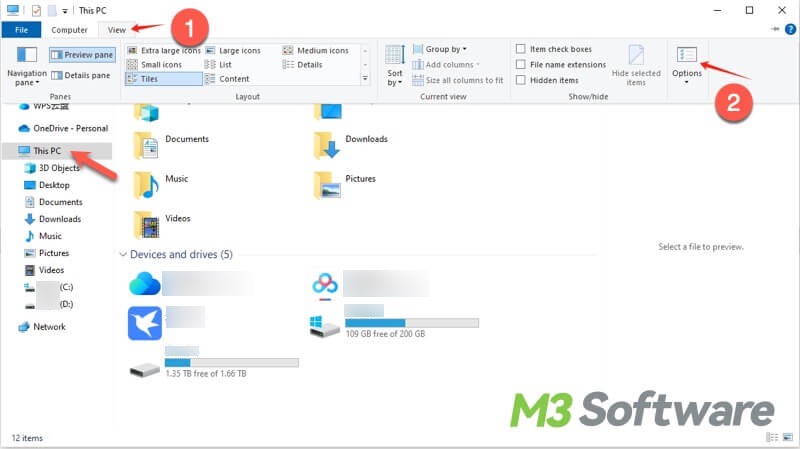
- Go to the “View” tab and uncheck “Always show icons, never thumbnails”.
- Click “Apply” and “OK”.
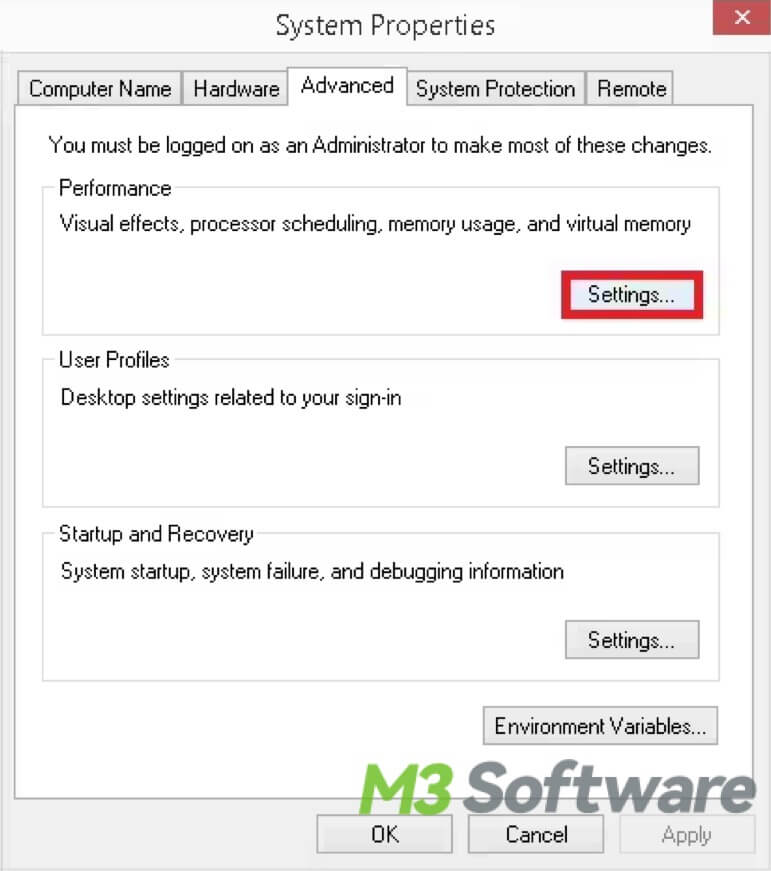
Changing visual effect settings
Windows Explorer not showing thumbnails may be caused by inappropriate visual effect settings on Windows, so changing visual effect settings is worth a try.
- Press “Win+S” to open search bar, type “View advanced system settings”, and click the result to open.
- Click “Settings” under the “Performance” section.
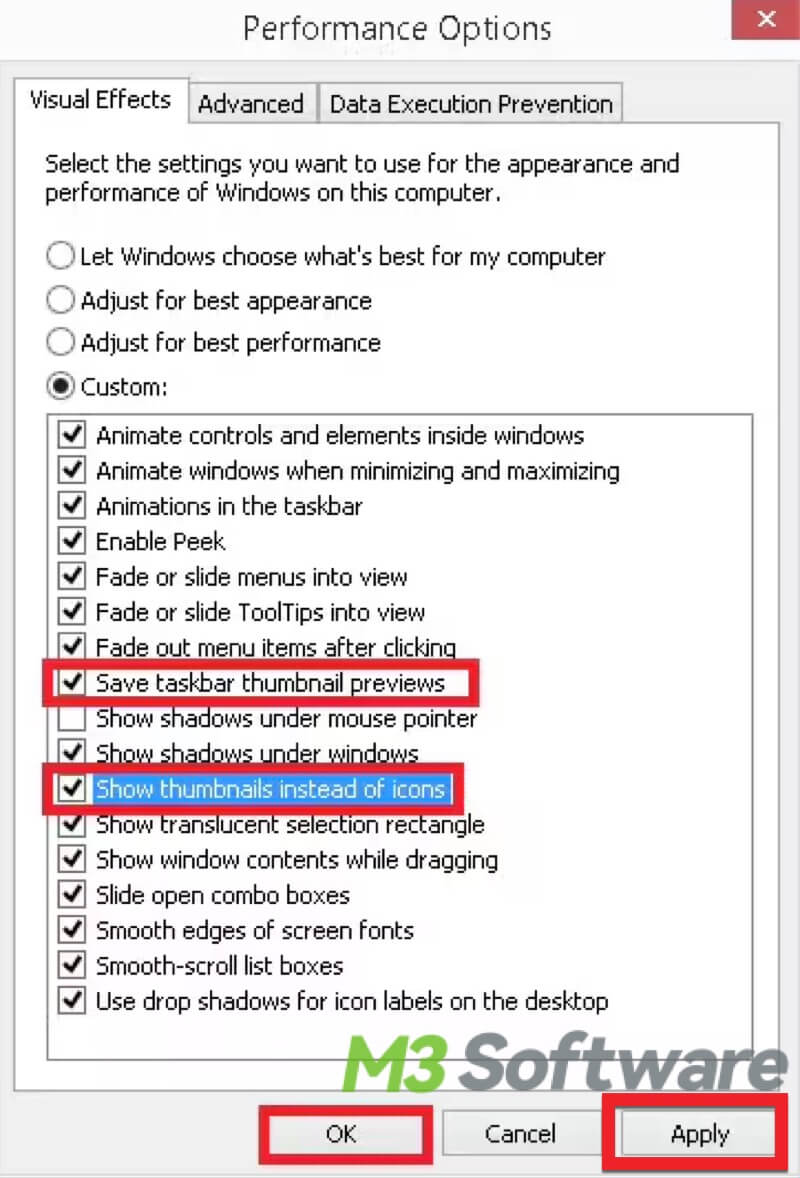
- Tick the checkbox of “Save taskbar thumbnail previews” and “Show thumbnails instead of icons”.
- Click “Apply” and “OK”.
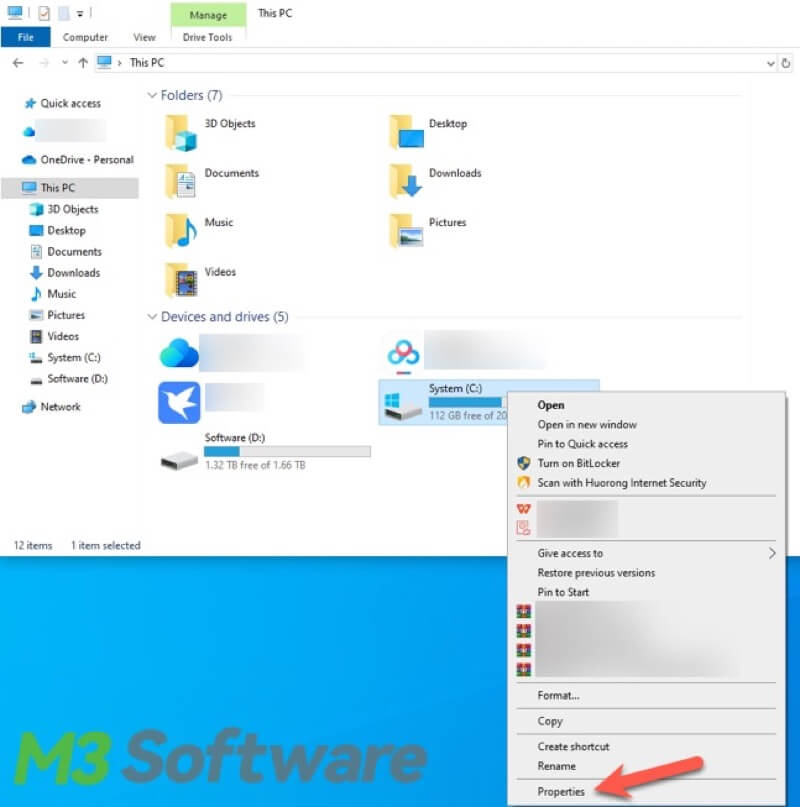
Clearing thumbnail cache
Piled up thumbnail cache or junk files will sometimes stop the File Explorer from displaying the thumbnails. You can clean the thumbnail cache with the Disk Cleanup tool on Windows to fix Windows Explorer not showing thumbnails.
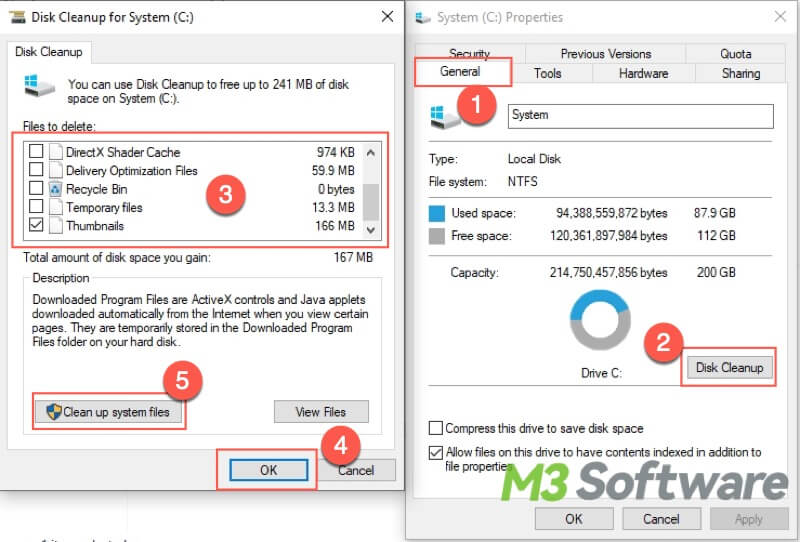
- Open File Explorer and click “This PC” on the left panel.
- Right-click on the drive(usually C drive) and choose “Properties”.
- Click “General” tab and choose “Disk Cleanup”.
- Select the “Thumbnails”, “Recycle Bin” or “Temporary files”. Click “OK” to let the cleanup start.
Now you've learned how to clean the disk on Windows, you can tell your friends how to do it!
Restoring File Explorer to default
Windows Explorer not showing thumbnails may be resulted from improper settings of File Explorer, so if the issue occurs after you made changes to the File Explorer, you can restore File Explorer to default.
- Press “Win+S” keys to open search bar, type “File Explorer Options”, and click it to open.
- Select the “View” tab and click “Restore Defaults”.
- Click “Apply” and “OK”.

Enabling thumbnails via Local Group Policy Editor
You can also enable the thumbnail display settings via Local Group Policy Editor on Windows.
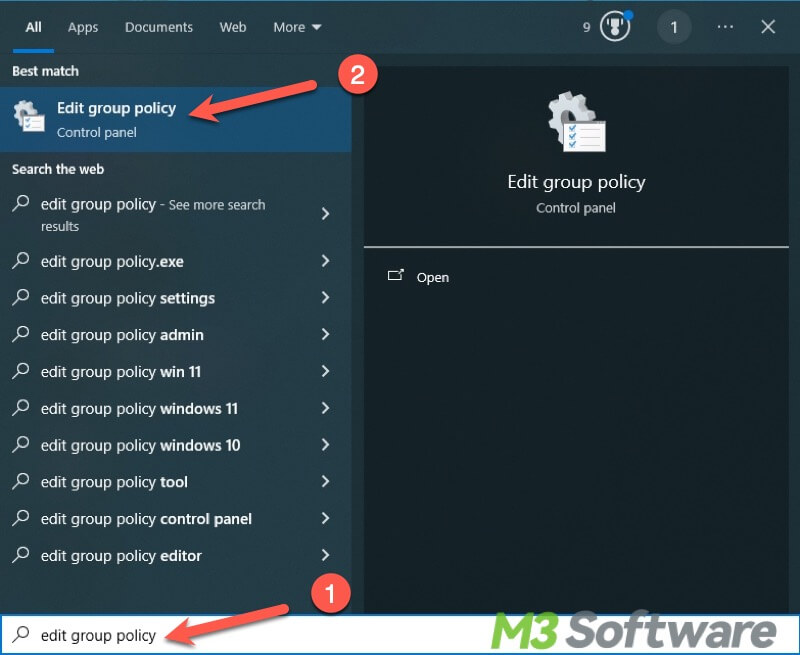
- Type Win+S keys to open search bar, type “edit group policy”, and click it to open.
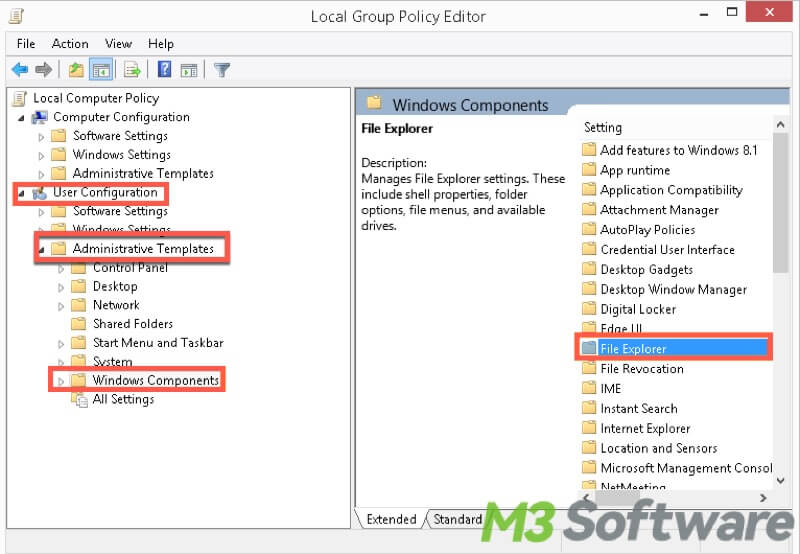
- Navigate to “User Configuration>Administrative Templates>Windows Components>File Explorer”.
- Double-click on “Turn off the display of thumbnails and only displays icons”.
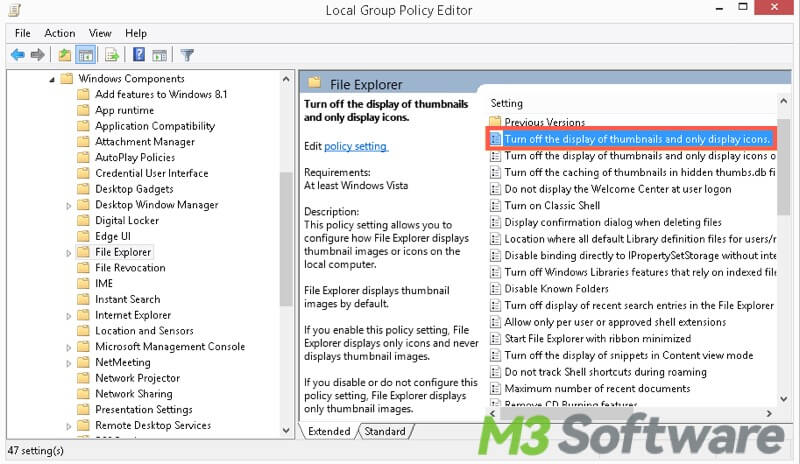
- Select “Disabled”. Click “Apply” and “OK”.
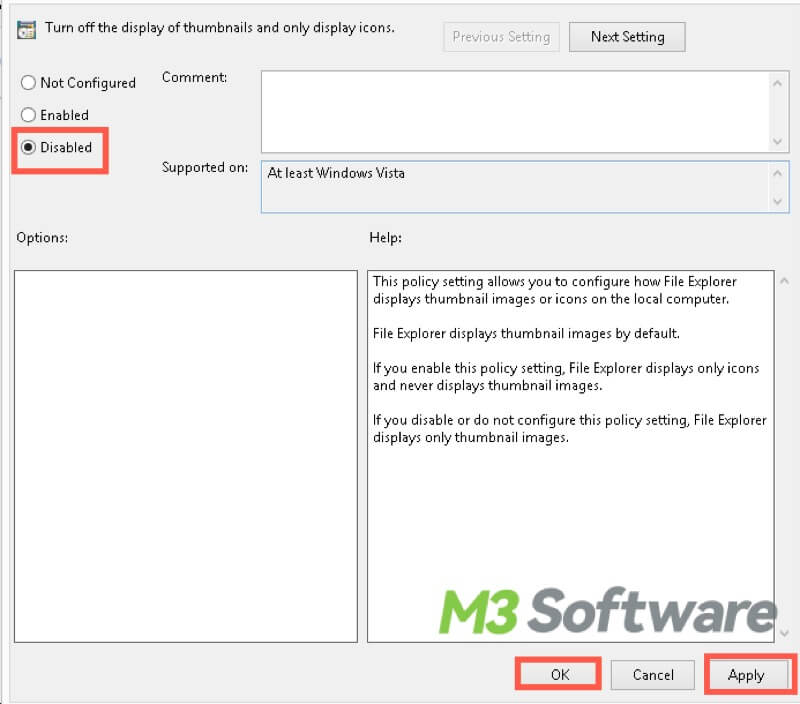
- Close “Local Group Policy Editor” and restart your computer.
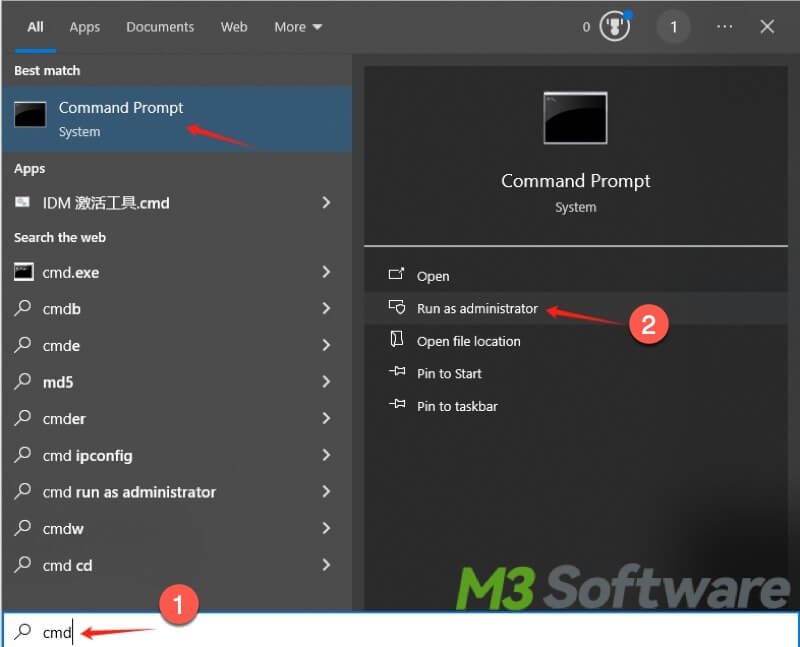
Running System File Checker
System file errors may lead to Windows Explorer not showing thumbnails as well. System file checker(SFC) can scan and fix most system file issues, and you can use Command Prompt(cmd) to run SFC.
- Press Win+S to open the search bar, type “cmd”, and select “Run as administrator”.
- Type sfc /scannow in the command window and hit the “Enter” key.
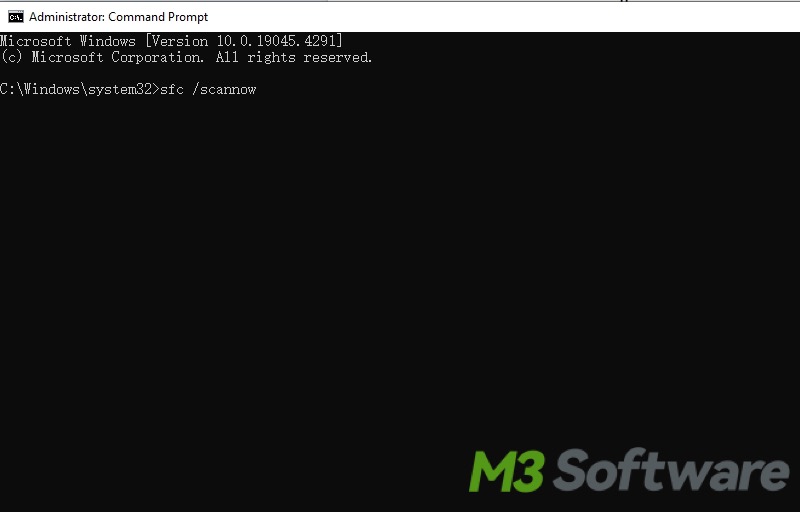
- Check if the thumbnail issue is fixed after the SFC finishes its job.
Bonus Tips: How to recover accidentally deleted or lost files?
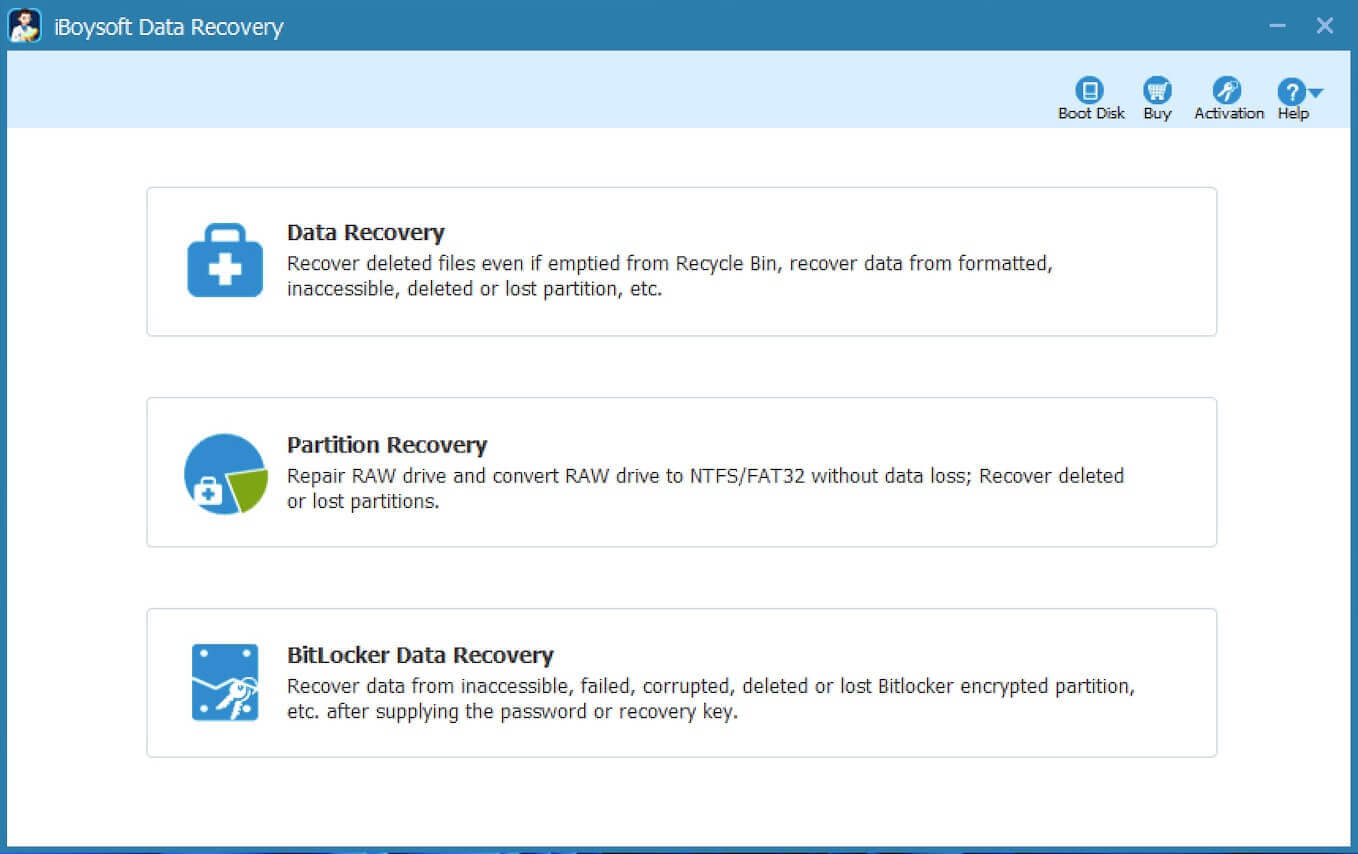
If you encounter any data loss caused by system error or operating mistakes, you can free download iBoysoft Data Recovery for Windows to restore accidentally deleted or lost files. iBoysoft Data Recovery for Windows is a reliable and professional tool with an intuitive interface. It can help you recover lost or deleted files from HDD, SSD, USB flash drive, SD card, and other storage devices. More than 1000 types and formats of files are supported.
Best Mac Deleted File Recovery Software - iBoysoft Data Recovery for Windows
You can follow the steps below to rescue your precious data on the Windows computer:
- Download, install, and launch iBoysoft Data Recovery for Windows.
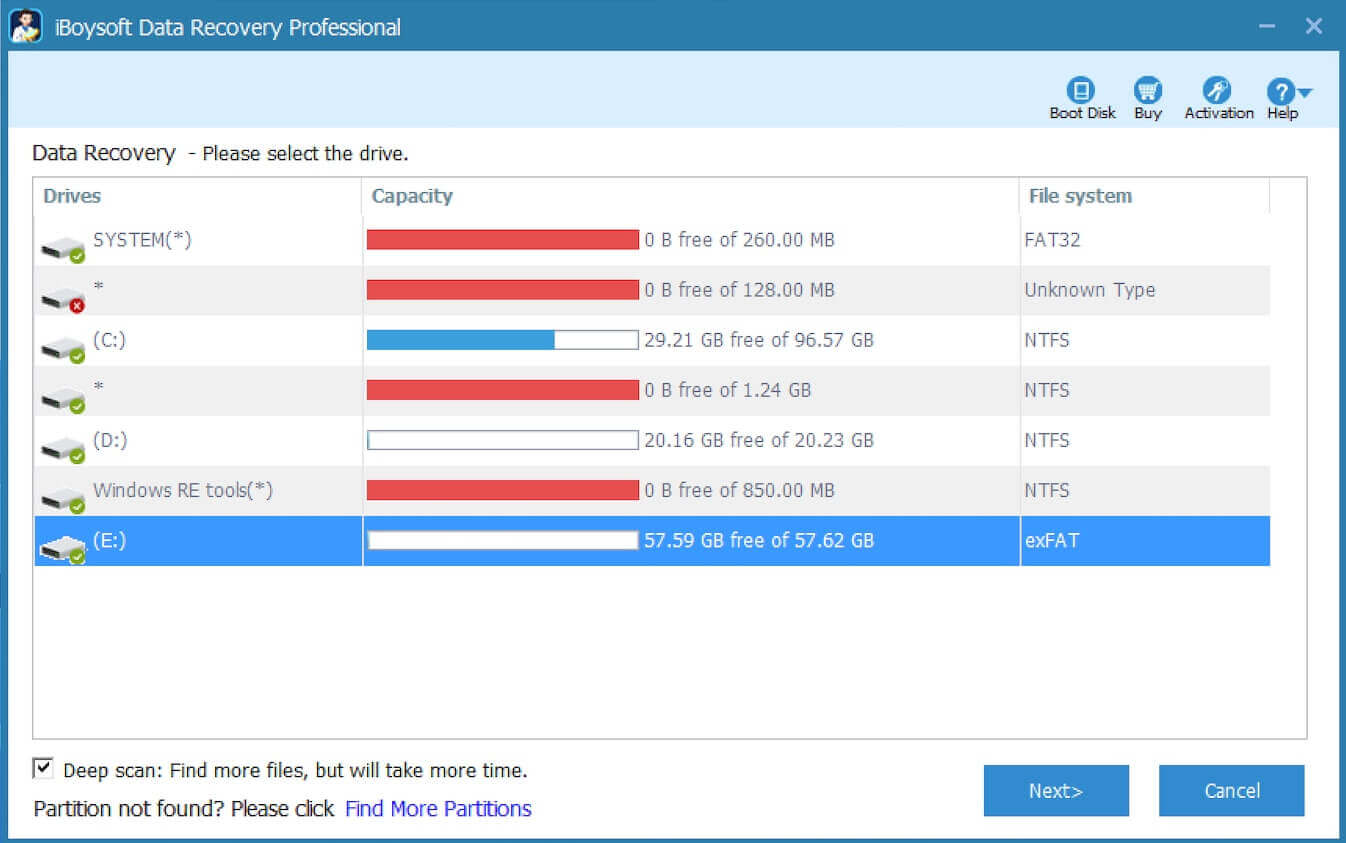
- Select the “Data Recovery” module.
- Select a partition where you want to scan for lost files, and click “Next” to start scanning.
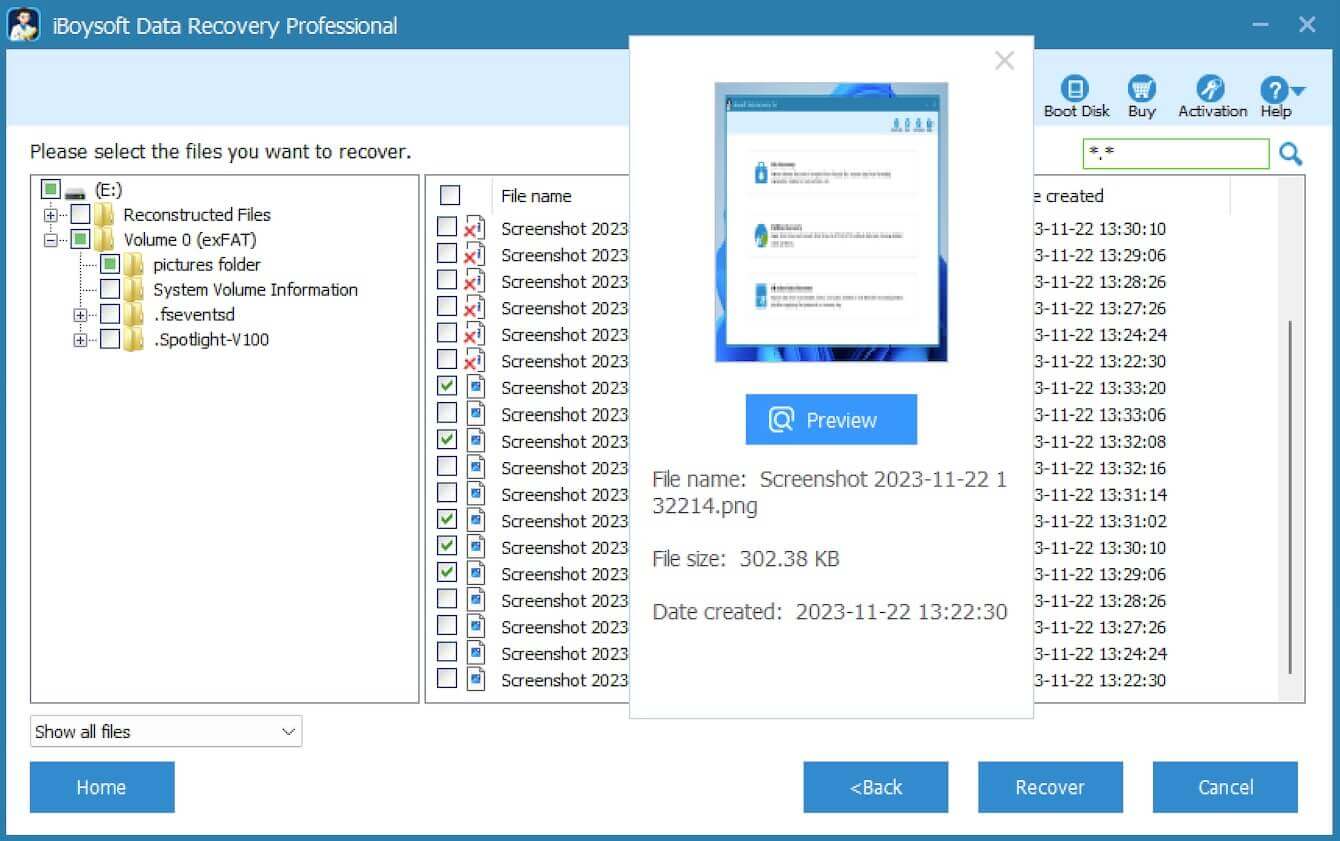
- You can filter and preview the files to see if they are recoverable, tick the files you want, and click the “Recover” button.
You can share this professional data recovery tool for Windows with your friends!