
Written by
Wilsey YoungSummary: This post primarily shows how to recover lost files after macOS update, even if the Mac computer won't boot after an update. Data recovery can be performed using built-in tools or a specialized tool, iBoysoft Data Recovery for Mac. -From m3datarecovery.com
Many users have complained that they lost photos, videos, and documents after updating to macOS 26 Tahoe Beta, macOS 15 Sequoia, macOS 11 Big Sur, or macOS 10.15 Catalina, etc. This post introduces various methods to recover lost/missing files after a macOS update fails. The method to perform data recovery when a Mac computer won't boot is included.
How to recover lost files after macOS update
Crash is the most commonly reported problem after upgrading to macOS 26 Tahoe Beta, macOS 15 Sequoia, macOS 11 Big Sur, or macOS 10.15 Catalina, etc., which may occur at login, when incompatible apps are launched, or when apps are already running. The crash will cause data loss after the macOS update.
You can recover lost files after macOS update by using the built-in tools or a specialized tool introduced below.
Solution 1: Recover lost files after macOS update via the /QuarantineRoot/ folder
During upgrades to macOS Big Sur 11, files and folders stored at the root level of a volume are moved aside to /Library/SystemMigration/History/MigrationUUID/QuarantineRoot/. If files are missing or lost, follow the steps below:
- Open Finder, tap on the "Go" tab in the menu bar, and choose "Go to Folder."
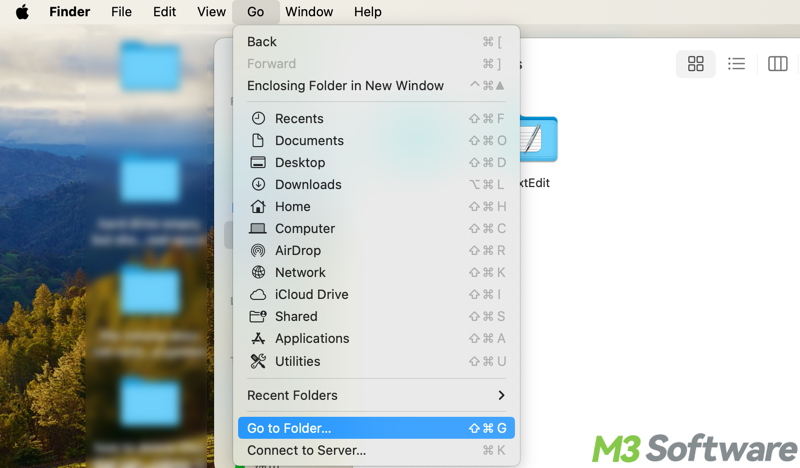
- Enter the following path: /Library/SystemMigration/History/MigrationUUID/QuarantineRoot/
- Click the "Go" button to open it.
Solution 2: Recover lost files after macOS update via the Time Machine backup
If you have used the Time Machine function to create backups of your files, you can restore these files from a Time Machine backup after updating to macOS 26 Tahoe Beta, macOS 15 Sequoia, macOS 11 Big Sur, or macOS 10.15 Catalina, etc.
- Click the Time Machine icon on the status bar and select "Enter Time Machine".
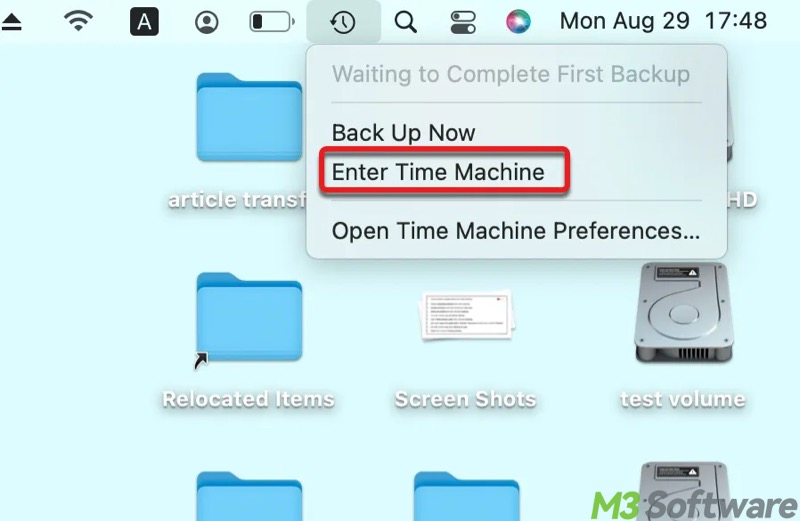
- If the Time Machine icon isn't in the status bar, please click the Apple logo menu on the status bar and choose "System Preferences...", select "Time Machine", and then choose "Show Time Machine in status bar".
- Browse the Time Machine backup folder and use the up/down arrow keys to navigate through time to find the required file.
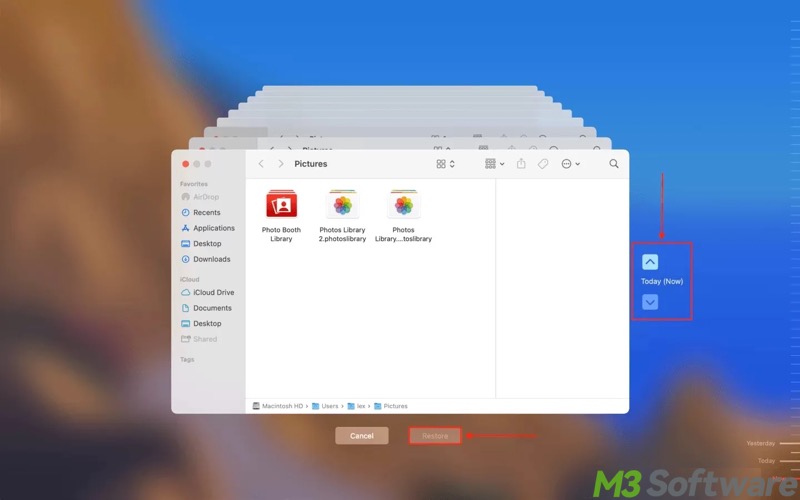
- Select the file that you want to recover and then click "Restore".
You can share the article by tapping on the buttons below
Solution 3: Recover lost files after macOS update via a Mac data recovery software
Suppose you cannot find the lost files in /Library/SystemMigration/History/MigrationUUID/QuarantineRoot/ folder and have not created a Time Machine backup before updating, you may need Mac data recovery software to recover deleted or lost files after updating to macOS 26 Tahoe Beta, macOS 15 Sequoia, macOS 11 Big Sur, or macOS 10.15 Catalina, etc.
iBoysoft Data Recovery for Mac is a professional and user-friendly Mac data recovery software that can recover deleted files even emptied from Trash, recover lost data from a formatted drive, recover lost data from an unreadable drive, recover lost data from an unmountable drive, and recover lost data from a corrupted drive.
In addition, this data recovery tool can recover lost data from APFS drives, recover lost data from deleted/lost APFS volumes, external hard drives, USB drives, flash drives, memory cards, and SD cards.
iBoysoft Data Recovery for Mac is widely compatible with macOS 15 Sequoia/macOS 14 Sonoma/macOS 13 Ventura/macOS 12 Monterey/11 Big Sur/10.15 Catalina/10.14 Mojave/10.13 High Sierra/10.12 Sierra and Mac OS X 10.11/10.10/10.9/10.8.
Note: In order to maximize the chance of getting lost data back, you need to stop using that drive immediately. Every time disk writes happen, they could be overwriting your lost data in Macintosh HD, making it impossible to recover.
- If you have an external drive, please download iBoysoft Data Recovery for Mac to this external drive instead of your Macintosh HD. Otherwise, there is no way to recover lost/missing files once they are overwritten by new data.
- In the iBoysoft Data Recovery for Mac installation window, double-click the iBoysoft Data Recovery for Mac icon to directly run it, instead of dragging iBoysoft Data Recovery to the Applications folder.
- Select the Mactonish HD and click "Search for Lost Data" to scan for lost/missing files.
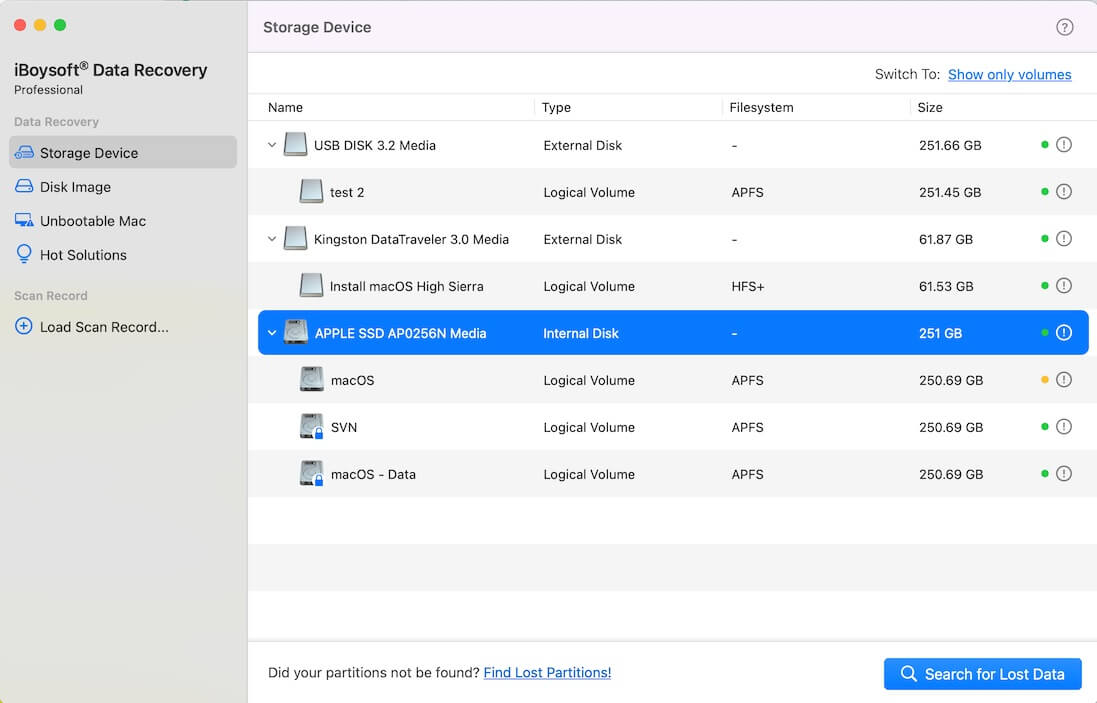
- After the scanning is finished, preview (click the preview button) and check if they can be recovered.
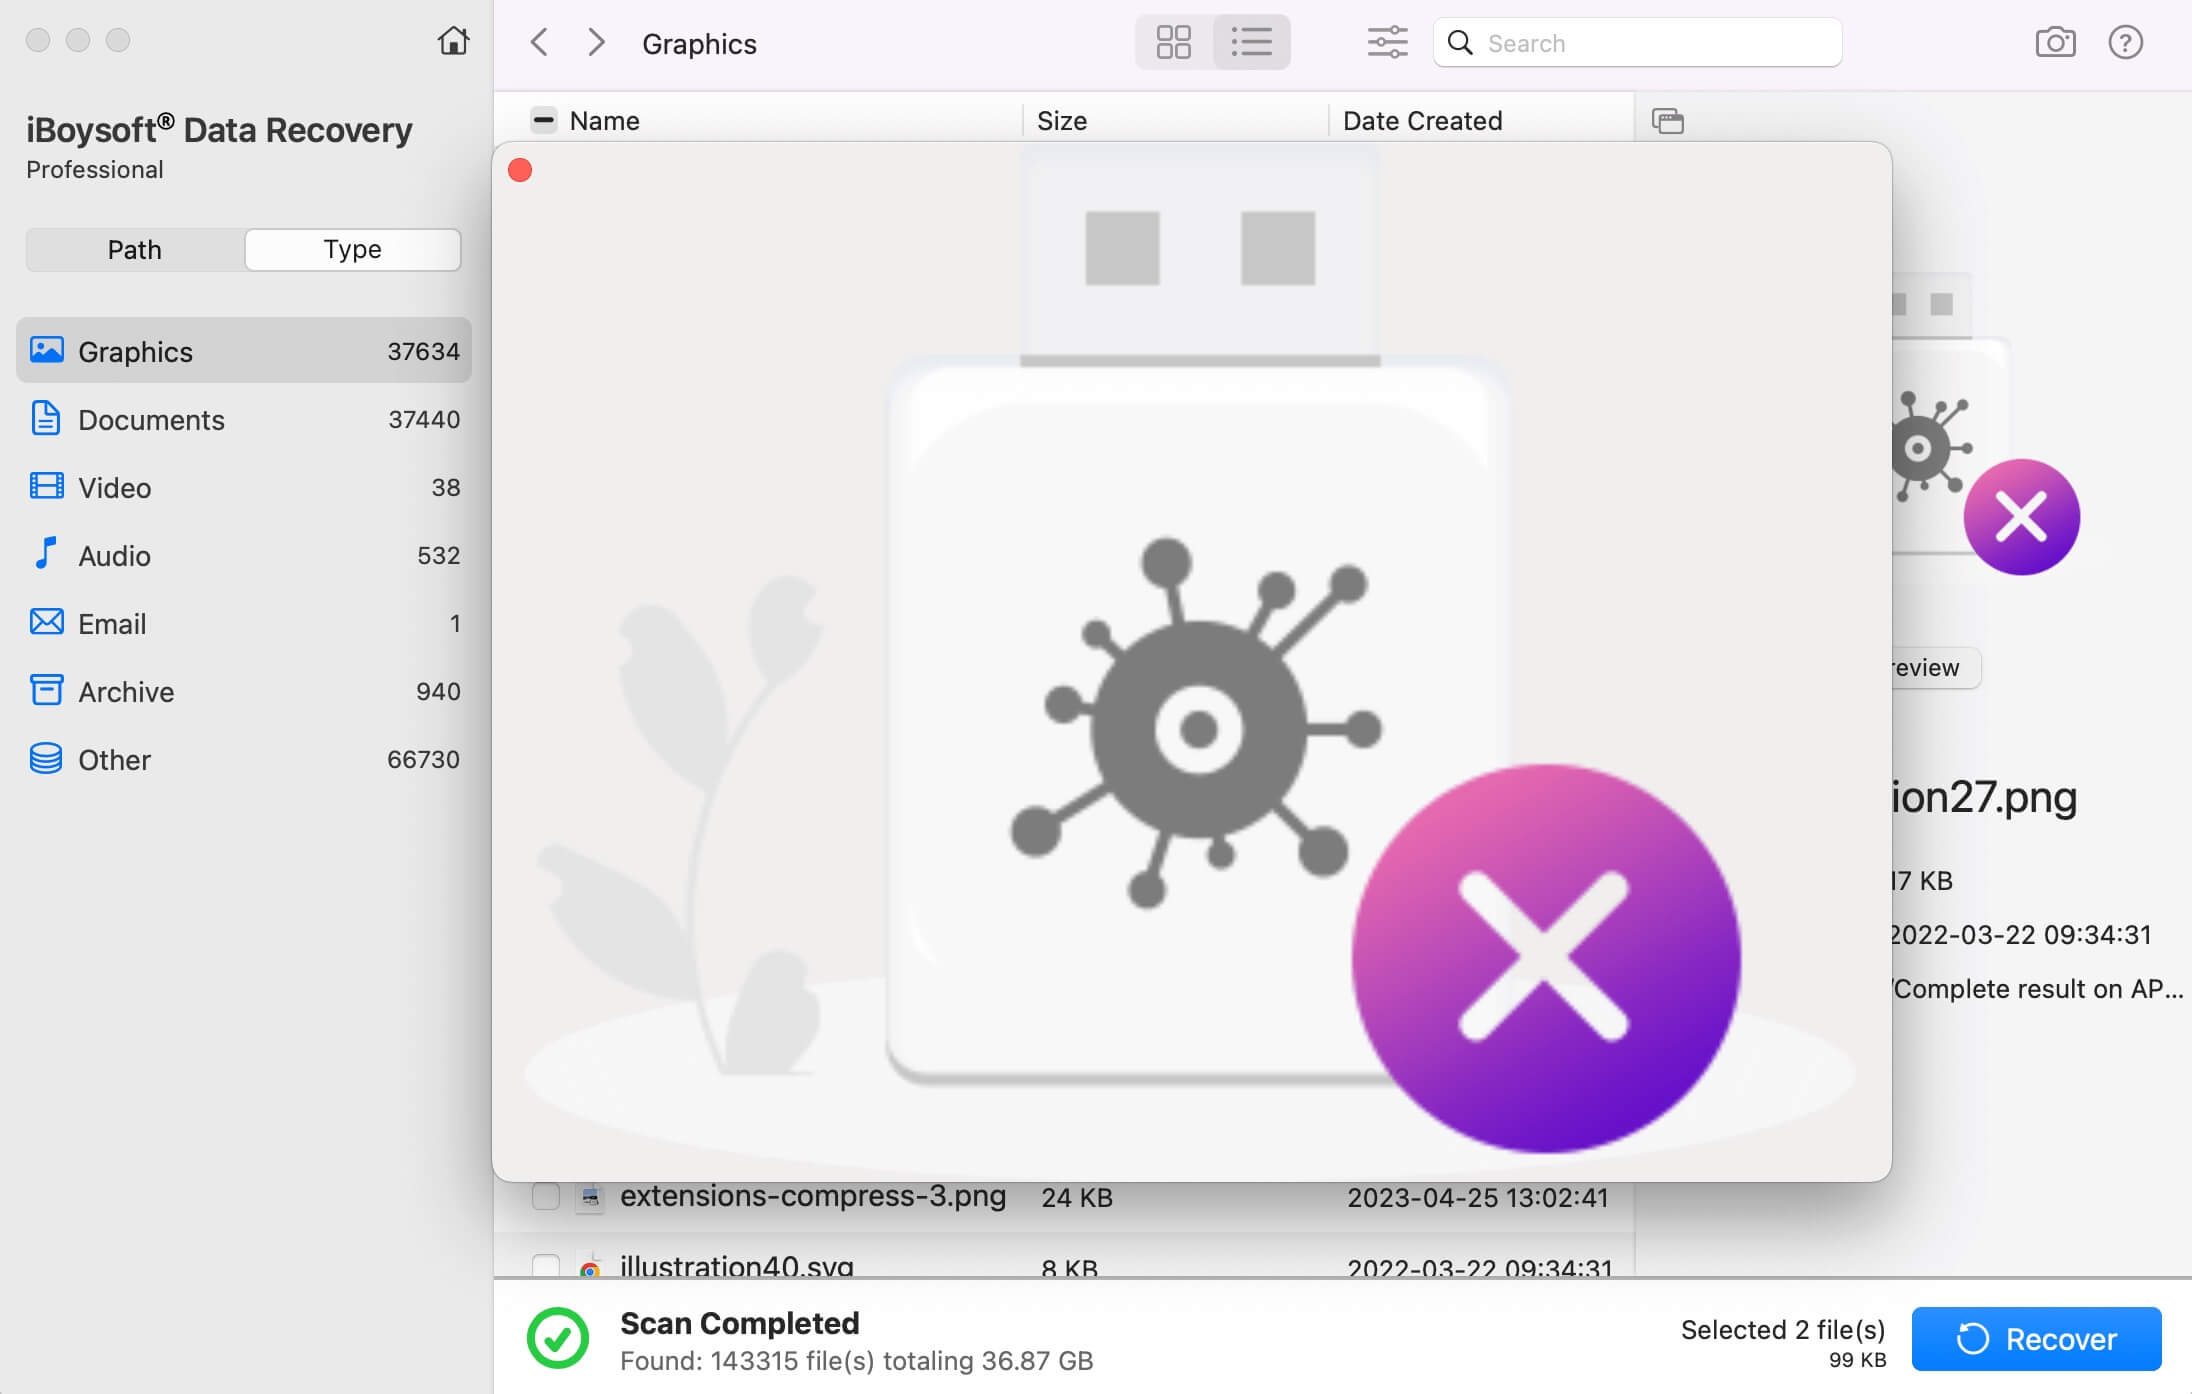
- Select the lost/missing photos, videos, documents, etc., and click "Recover" to start recovering them.
You can share this wonderful data recovery tool with your friends online!
Solution 4: Recover missing files when the Mac won't turn on
If the Mac won't turn on after you fail to update to macOS 26 Tahoe Beta, macOS 15 Sequoia, macOS 11 Big Sur, or macOS 10.15 Catalina, etc., don't panic! iBoysoft Data Recovery for Mac is still a trustworthy tool you can rely on to recover lost or missing files!
Firstly, you need to boot your Mac into macOS recovery mode. For Intel Macs after 2018 with T2 Security Chip:
- Power on your Mac and immediately press down and hold the "Command+Option+Shift+R" keys together on the keyboard.
- Hold these keys until a spinning globe appears on screen. This will boot your Mac into Internet Recovery Mode.
Secondly, follow the steps below to run the iBoysoft Data Recovery for Mac:
Note: Data recovery processes require a stable internet connection for fetching the software from its server. Make sure your Wi-Fi or Internet connection is stable.
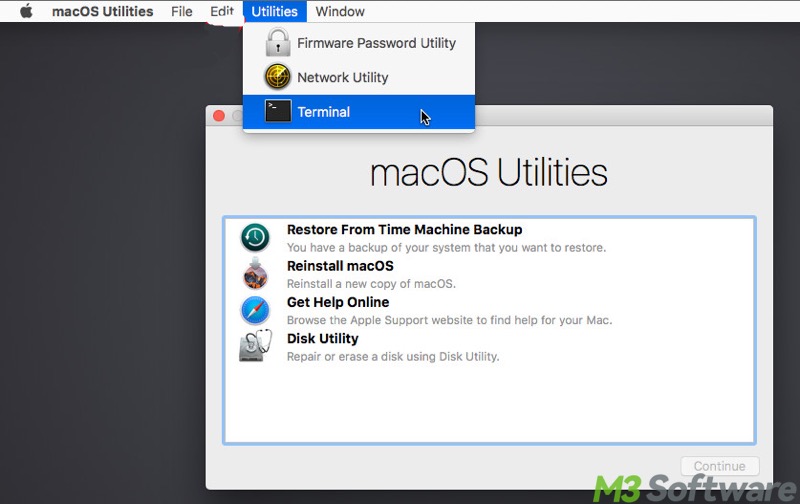
- Go to the Apple menu at the top of your screen and click “Utilities”, and then find “Terminal” and double-click it to open it.
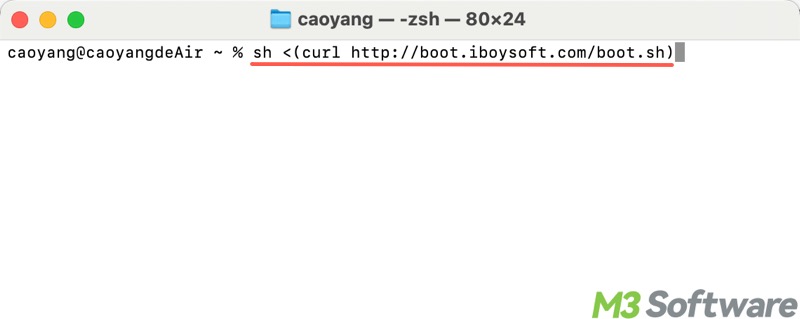
- Run the following command to launch iBoysoft Data Recovery for Mac: sh <(curl http://boot.iboysoft.com/boot.sh)
- After the tool is launched, select the Macintosh HD (or macOS) volume and tap on "Search for Lost Data" to start scanning.
- After the scanning is done, preview the found files and see if they are retrievable.
- Connect an external storage device to your Mac to prevent overwriting.
- Tick the wanted files, click the "Recover" button, and select the device as the location for recovered files.
To use iBoysoft Data Recovery for Mac in macOS Recovery mode without an Internet connection, or for more details about running this tool in macOS recovery mode, please read the following article: How to Run iBoysoft Data Recovery software in macOS Recovery Mode?
Bonus Tips: Maximize the chances of data recovery after macOS update
If you've lost important files after updating to macOS 26 Tahoe Beta, macOS 15 Sequoia, macOS 11 Big Sur, or macOS 10.15 Catalina, etc., the tips below can help increase the likelihood of retrieving your data before starting a recovery process:
Stop using the affected device immediately
Any continued use of the hard disk can overwrite lost data, making it impossible to recover. Therefore, you should avoid writing new files, performing unnecessary operations, or installing software on the same disk.
Watch out for signs of a failing drive
Drives often show warning signs before complete failure, like annoying noises, missing files, excessive heat, or very slow performance. If you notice these symptoms, back up your important files right away, as the drive may soon become corrupted.
Back up your data regularly
The most reliable way to recover files is through an existing backup. Data recovery professionals consistently recommend maintaining frequent backups of your system and essential files. You can use either physical storage devices or cloud-based solutions to ensure you always have a recent copy of your data.
Protect against malware and viruses
Malware can cause data loss. Regularly run trusted antivirus scans to remove threats, and avoid downloading suspicious files or clicking unverified links. Keeping your device secure reduces the chances of data being destroyed.
You can click the following buttons to share the post quickly
FAQs about recover lost files after macOS update
A
A macOS update can cause files to go missing due to issues like file system corruption, changes to user directories, or conflicts during the update process. Files might be hidden, moved, or temporarily inaccessible.
A
Typically, you can recover lost/missing files after a macOS update using the method: 1. Time Machine (If you have set it up). 2. A specialized data recovery tool, like iBoysoft Data Recovery for Mac, is highly recommended for restoring lost or missing files.
A
You can avoid data loss during future macOS updates: 1. Regularly back up with Time Machine. 2. Use iCloud or other services for important files. 3. Create a bootable macOS installer can help reinstall macOS and recover data if needed.