
Written by
Wilsey YoungSummary: This post first lists some possible causes for system restore failure on Windows 10. It also provides several practical solutions to this issue. iBoysoft Data Recovery for Windows is recommended for recovering lost files after System Restore.

System Restore is a special utility on Windows, which allows you to revert the operating system to a previous state, thus the PC's changes made to the system will be undone. Once the system restore is enabled, it monitors your PC's activity, takes snapshots of system files, and saves them as Restore Points.
Therefore, if strange problems happen to your computer, you can resort to System Restore to restore your computer's system to working condition. However, System Restore may fail due to various causes, and normally the error message pops up, saying “System Restore did not complete successfully”.
This article will tell you why System Restore fails and provide some solutions to the System Restore errors. Moreover, iBoysoft Data Recover for Windows is recommended for recovering accidentally lost files after System Restore.
7 Solutions to “System Restore did not complete successfully” on Windows 10:
| Solution | Applicable Scenario | Difficulty Level |
| Restore from another restore point | Problems with system restore point. Error message “System Restore failed to extract the file”. | Easy |
| Disable anti-virus software or Microsoft Defender Antivirus | Interference from antivirus software or Defender Antivirus. Error message “System Restore could not access a file”. | Easy |
| Check on System Protection settings | Interference from System Protection settings. | Easy |
| Restart the Volume Shadow Copy service | Error message “System Restore could not access a file”. | Medium |
| Run CHKDSK in cmd | Insufficient disk space or other disk-related problems. Error message “System Restore failed to extract the file.” | Medium |
| Run System File Checker(SFC) in cmd | Corrupted system files. Error message “System Restore failed to extract the file.” | Medium |
| Run System Restore in Safe Mode | Interference from antivirus software or protection settings. Error message “System Restore failed to extract the file”. | Medium |
You can share the solutions above with your friends who face the same obstacle:
Why does system restore fail?
It is common for Windows users to run into this issue when they try to perform System Restore, and the error message “System Restore did not complete successfully” may be caused by different reasons below:
- System Restore is not enabled
- Insufficient disk space
- Interference from anti-virus or anti-malware software
- Corrupted system files
- System Protection settings interruption
- Hardware problems
- Issues with System Restore point
The reasons mentioned above could cause the System Restore to fail, and there are different error messages related to this issue. The most common messages are:
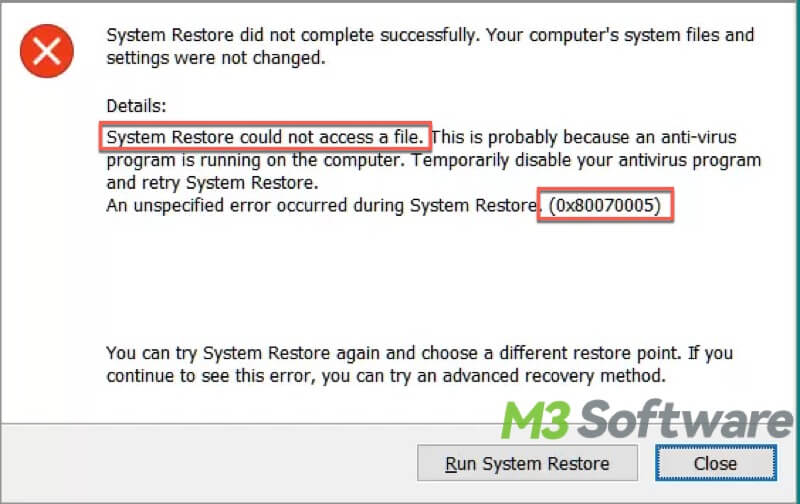
- System Restore could not access a file. With the error code 0x80070005.
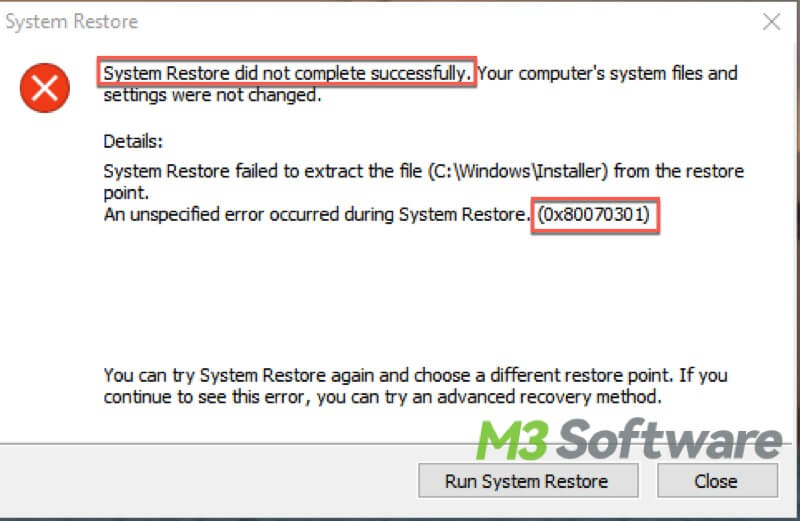
- System Restore failed to extract the file. With the error code 0x80070301.
What to do when system restore fails? (7 Solutions)
It is suggested to locate the fundamental reason that caused the system restore to fail, which can help you fix the issue. You can keep on reading this article and adopt the solutions provided below to help you fix the error message “System Restore did not complete successfully” when System Restore fails.
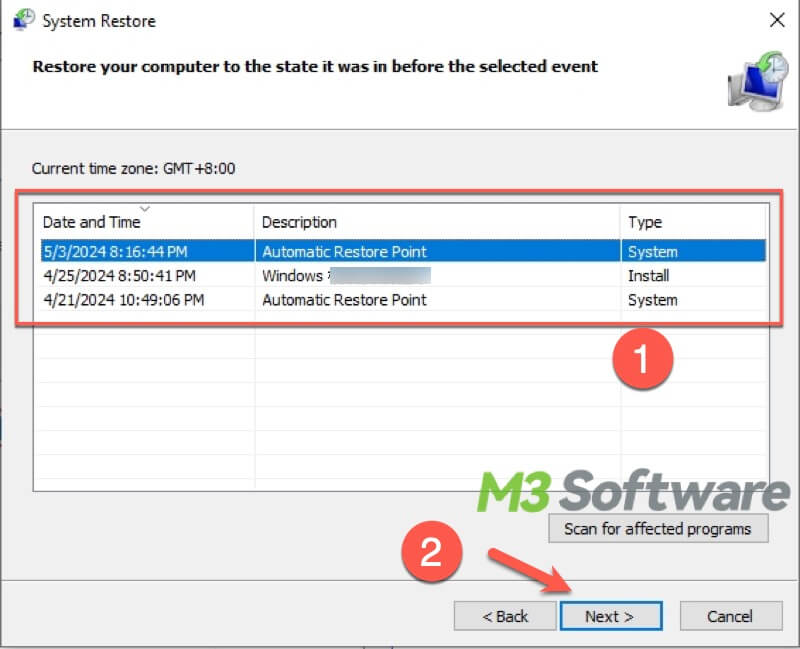
Restore from another restore point
That the corrupted restore point makes the system restore fail is possible, so you can run system restore from a different restore point on the premise that other restore points are available.
Disable(or uninstall) anti-virus software or Microsoft Defender Antivirus
The System Restore may fail due to the interference from anti-virus or preinstalled program Microsoft Defender Antivirus on your computer, and the conflict among them may exist, so the first thing you can try is to disable or uninstall them temporarily. This fix is applicable to the error message “System Restore could not access a file", with error code 0x80070005.
To disable the anti-virus software:
- Locate antivirus software on the taskbar on your Windows computer
- Right-click on the software and choose the corresponding option to exit or close it.
To disable the Microsoft Defender Antivirus, you can follow the steps below:
Microsoft Defender Antivirus is a preinstalled security feature on Windows to protect your computer, and it might be the factor that stops you from using system restore normally.
- Open the “Settings” app in the Start menu. Choose “Update & Security”.
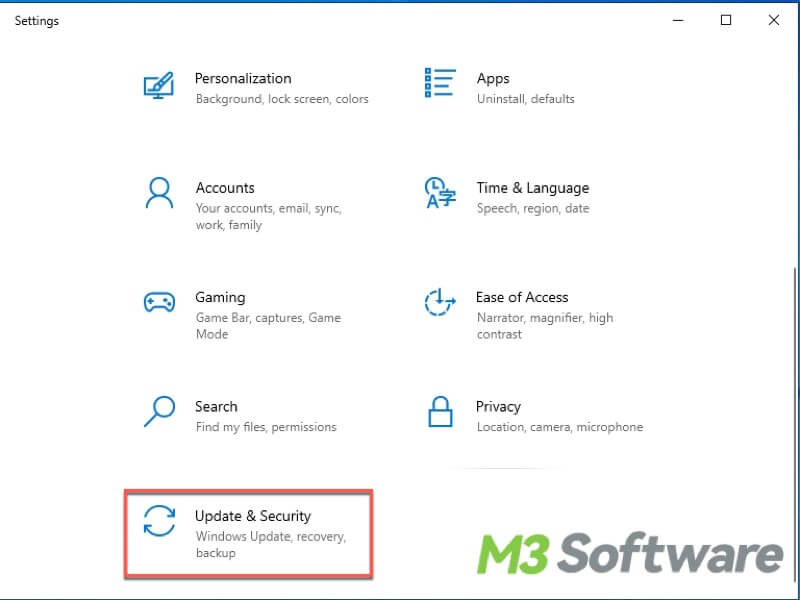
- Select “Windows Security” on the left sidebar, then click on “Virus & threat protection”.
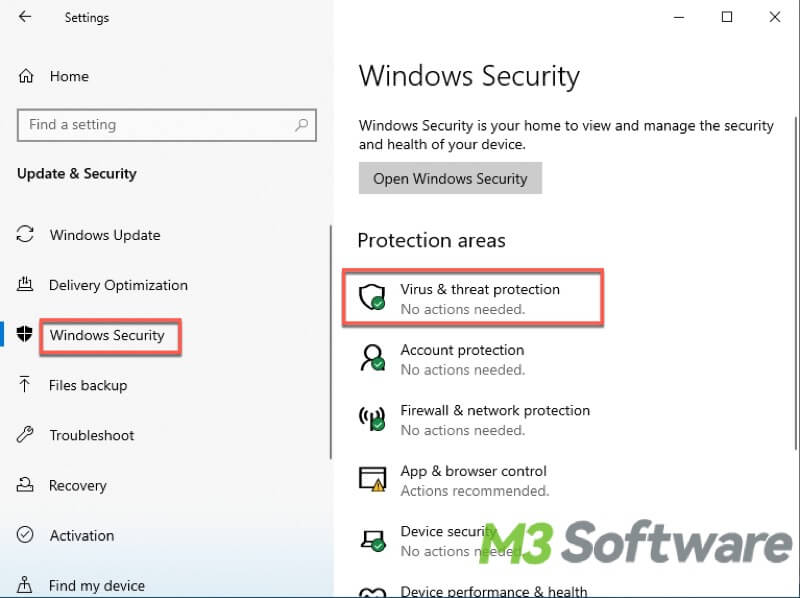
- Choose “Manage settings” under the “Virus & threat protection” settings section.

- Move the switch to the off position to disable Real-time protection.
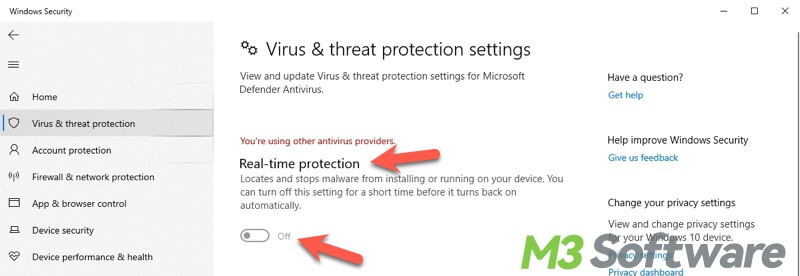
After disabling the defender, you can implement the system restore again to see if the steps above work.
Note: The action above only temporarily disables the protection, which means that Microsoft Defender Antivirus will be activated automatically again once you restart the computer.
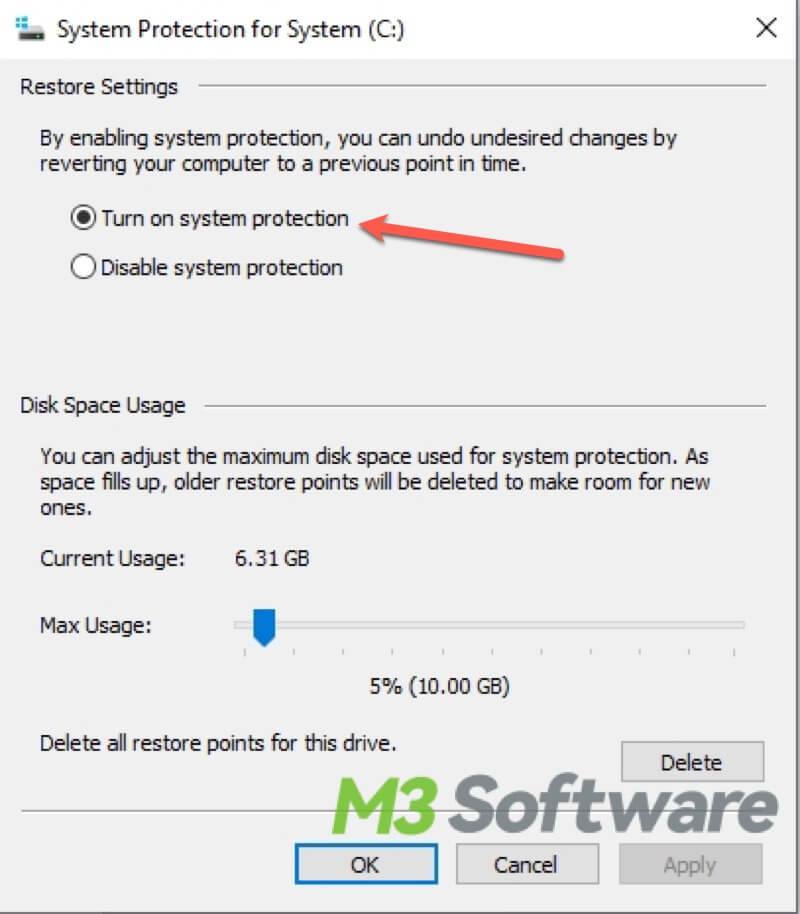
Check on System Protection settings
The error message of system restore may occur when System Protection settings are corrupted, so you can check on the System Protection setting on the computer to see if the system restore still fails.
- Right-click on This PC and select Properties
- You may need to scroll down to find “About” on the left. Click the “System protection”.
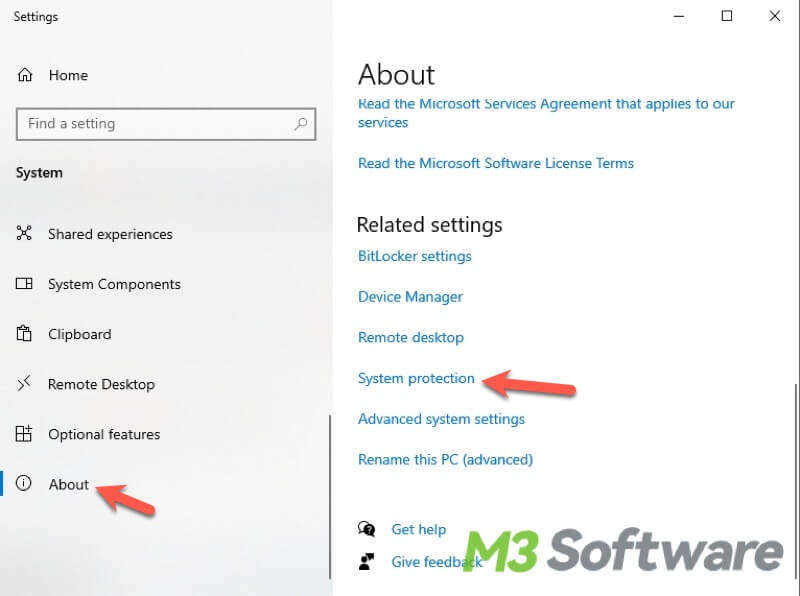
- Check if the Protection column of the system drive(usually the C drive) is set to On.

- If the status is Off, click Configure, choose “Turn on system protection” in the pop-up window, and click Apply and OK.
Restart the Volume Shadow Copy service
Volume Shadow Copy is a service on Windows used to create backup copies or snapshots of computer files and volumes. System restore fails if the service is not enabled, so “system restore failed to extract the file" will be displayed in the error message window. You can follow the steps below to check the service.
- Press the “Win + R” keys to open the Run dialog box, then type “services.msc” and click on “OK”.
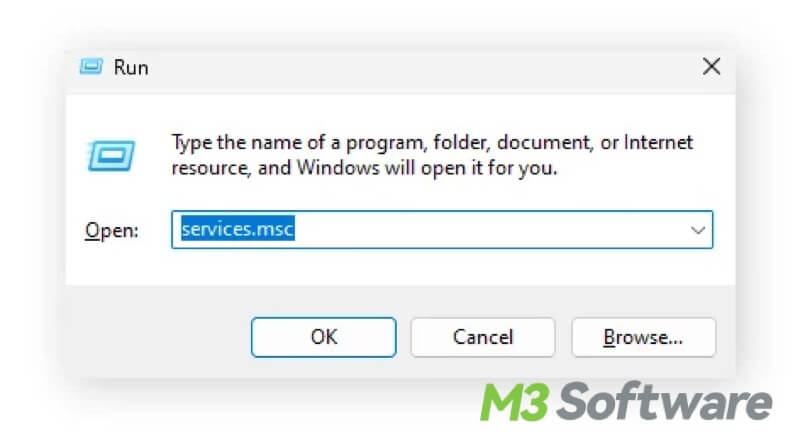
- Scroll down to locate the “Volume Shadow Copy” service. If it is not running, right-click the service and select “Start”.
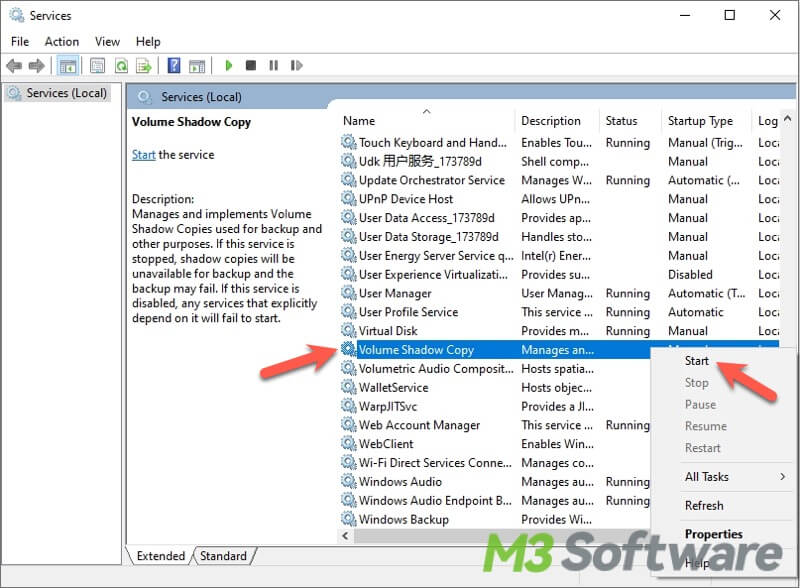
- Now you can try to run the system restore once again to see if the error is solved.
You can share this post with your followers on social platforms!
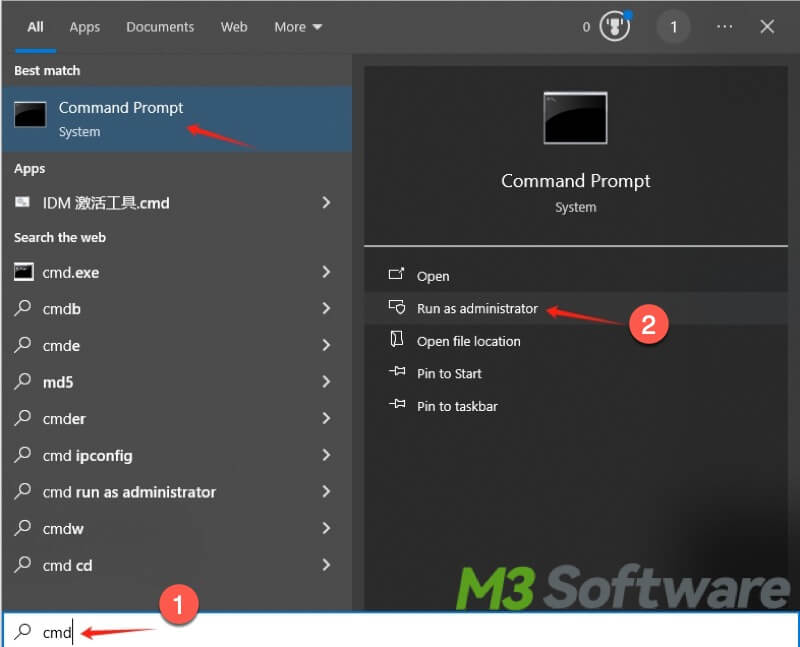
Run CHKDSK in cmd
The hard disk and file system errors on your computer may also lead to the failure of System Restore. CHKDSK is a command that can be used in Command Prompt to scan and fix hard disk errors on Windows. This solution usually matches the popping-up message “System Restore failed to extract the file.”
- Type “cmd” in the search box and select “Run as administrator”.
- Input the command “chkdsk /r” and hit the Enter key, CHKDSK starts scanning and attempts to repair errors found on the hard disk.
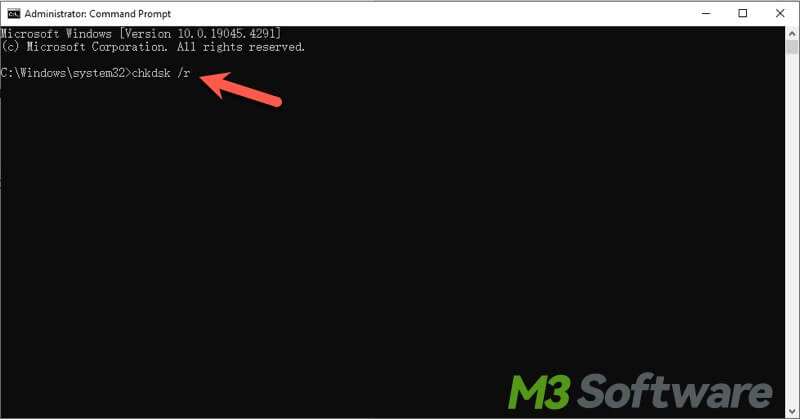
- The scanning and fixing could take a while, you can try system restore once it's done.
Run System File Checker(SFC) in cmd
The corrupted or missing system files could be responsible for System Restore did not complete successfully. Running the System File Checker scan could be a remedy, as SFC scanning could check and repair the corrupted system files. The error message “System Restore failed to extract the file” may be solved with the System File Checker.
- Type “cmd” in the search box and select Run as administrator.
- Type “sfc /scannow” and press the Enter key.
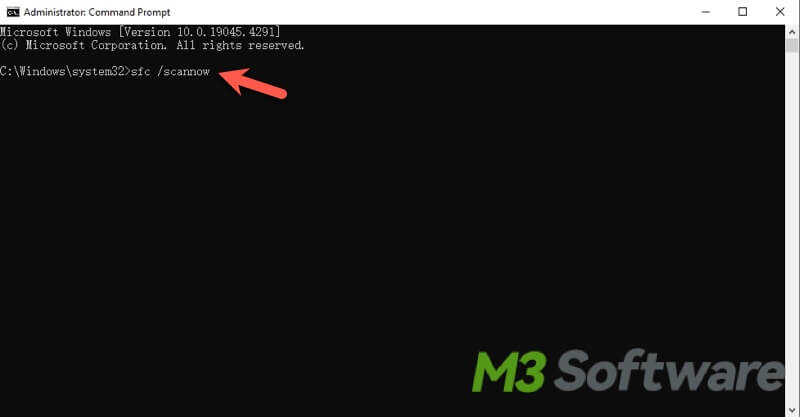
- The SFC will scan and try to repair the corrupted system file.
Run System Restore in safe mode
Safe mode on Windows can create a restricted environment in which only essential programs and services are allowed to run. Safe mode makes it possible to solve the error System restore did not complete successfully, and error message “System Restore failed to extract the file” is expected to be fixed.
The first part guides you through the steps to start Windows in safe mode:
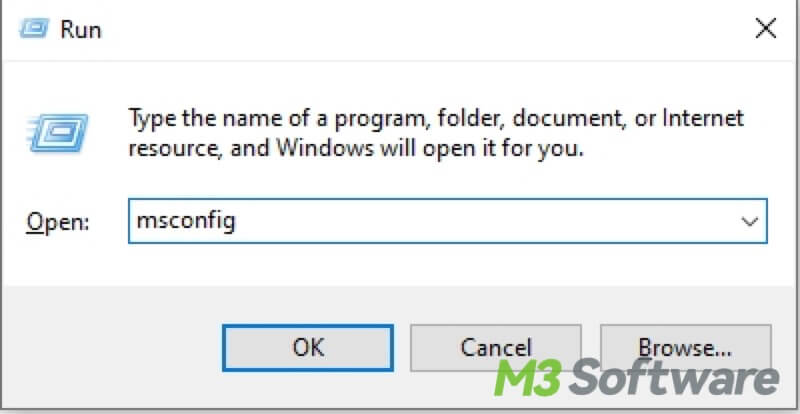
- Press “Win+R” to open the Run dialog box. Type “msconfig” in the box and hit the Enter key.
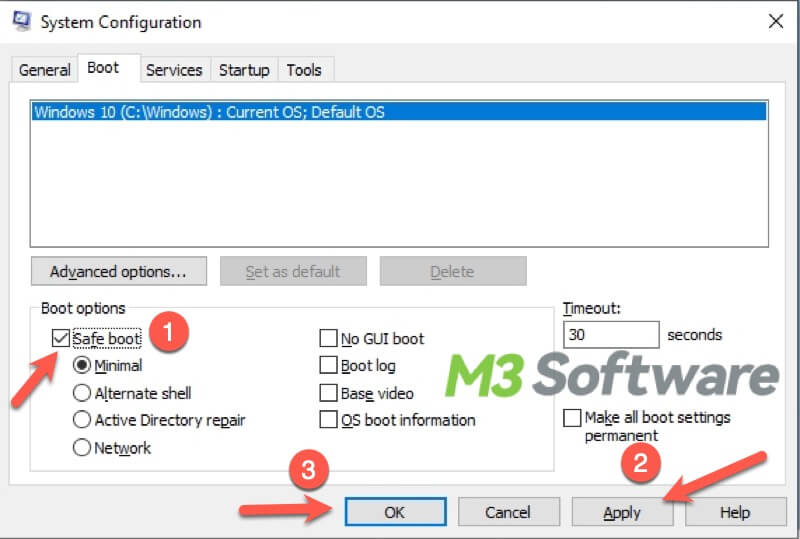
- Choose the Boot tab and tick the Safe boot, then click Apply and OK.
- Restart your computer.
Now, you can follow the steps below to run System Restore:
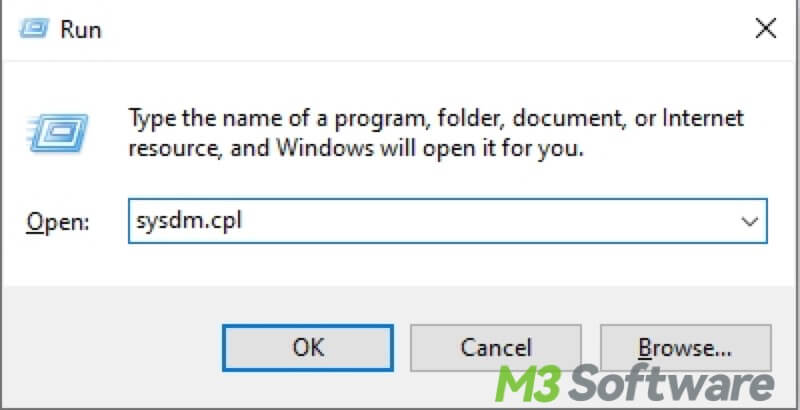
- Press “Win+R” to open the Run box again. Type “sysdm.cpl” in the box and hit the Enter key.
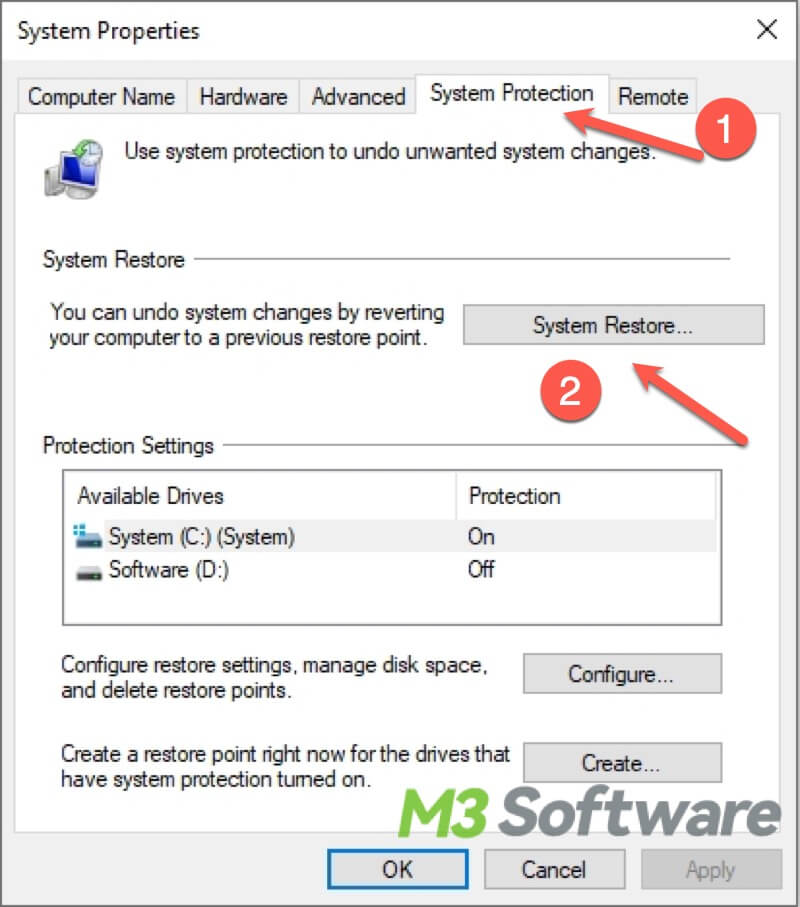
- Switch to the System Protection tab, click on System Restore, and click Next to continue.
- Choose the desired restore point and click Next to follow the wizard to continue the system restore.
How to recover lost files after System Restore
Theoretically, system restore will only remove recently installed apps, drivers, and updates that cause computer problems, and it doesn't affect the user's data and files. However, some Windows users said they had lost their files after System Restore.
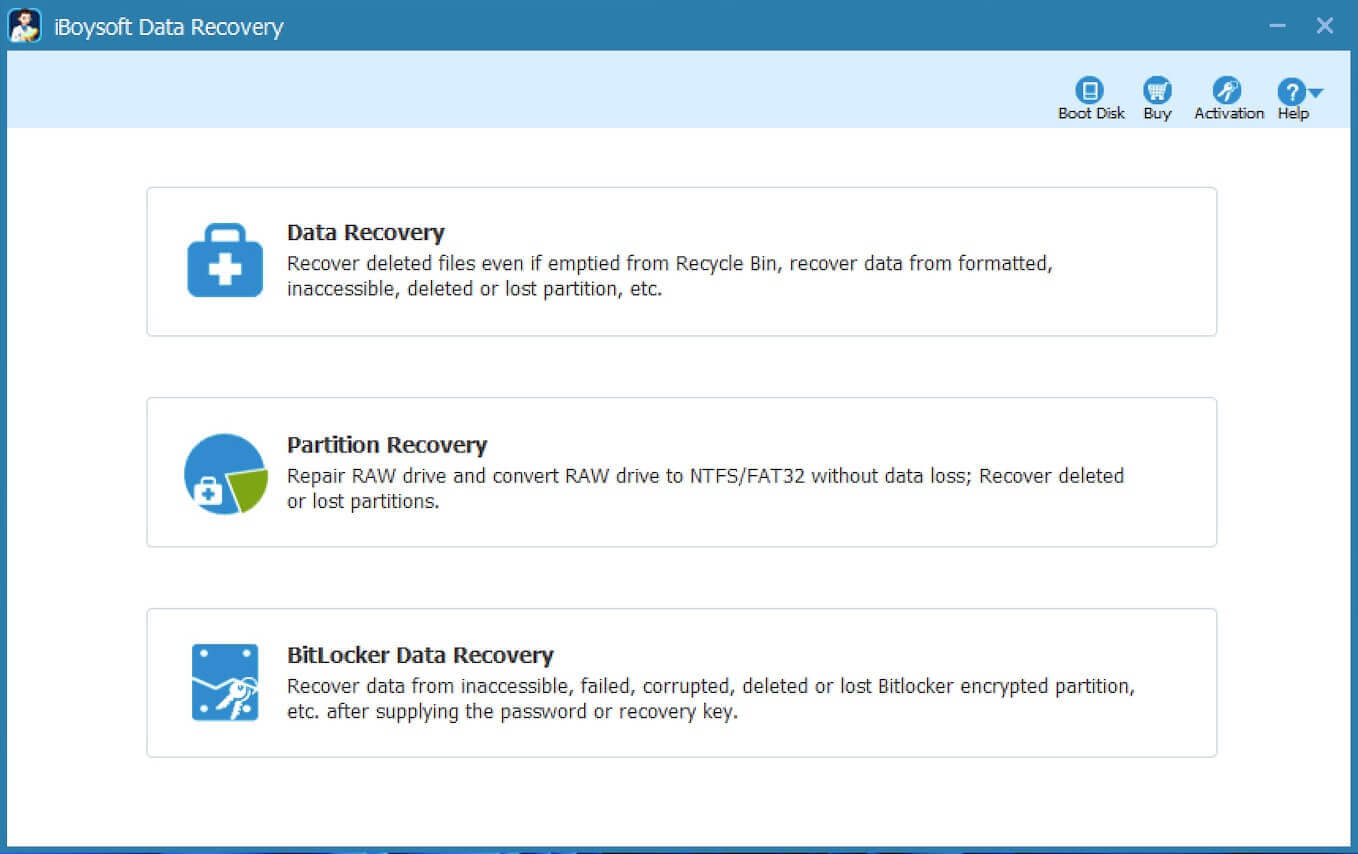
Data loss might happen if system restore fails, and iBoysoft Data Recovery for Windows, a professional and easy-to-use data recovery software, can help you recover lost files in this kind of situation, you can follow the steps below to retrieve files quickly and safely.
- Free download, install, and launch iBoysoft Data Recovery for Windows.
- Choose the Data Recovery module in the main interface.
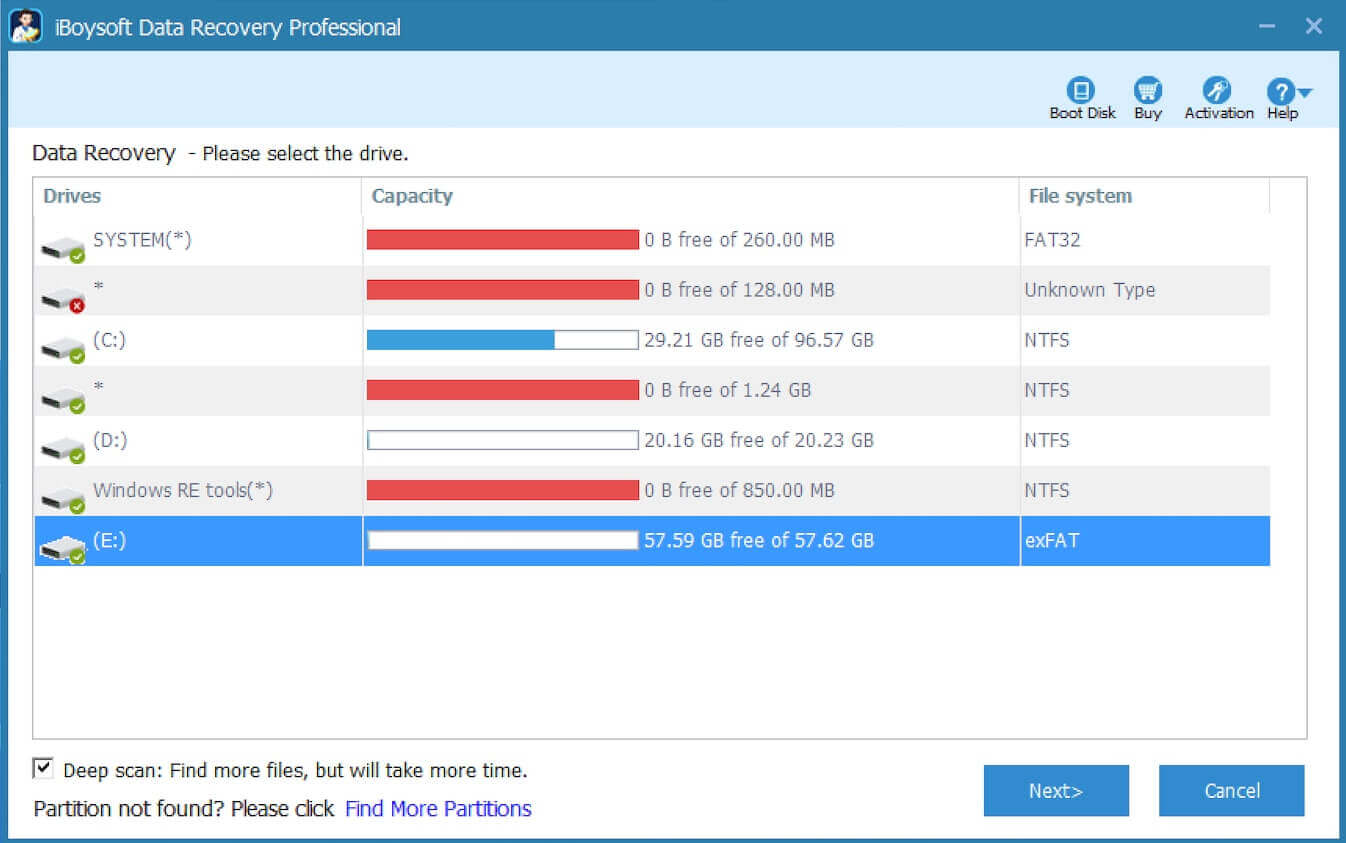
- Select a location and click “Next” to start scanning.
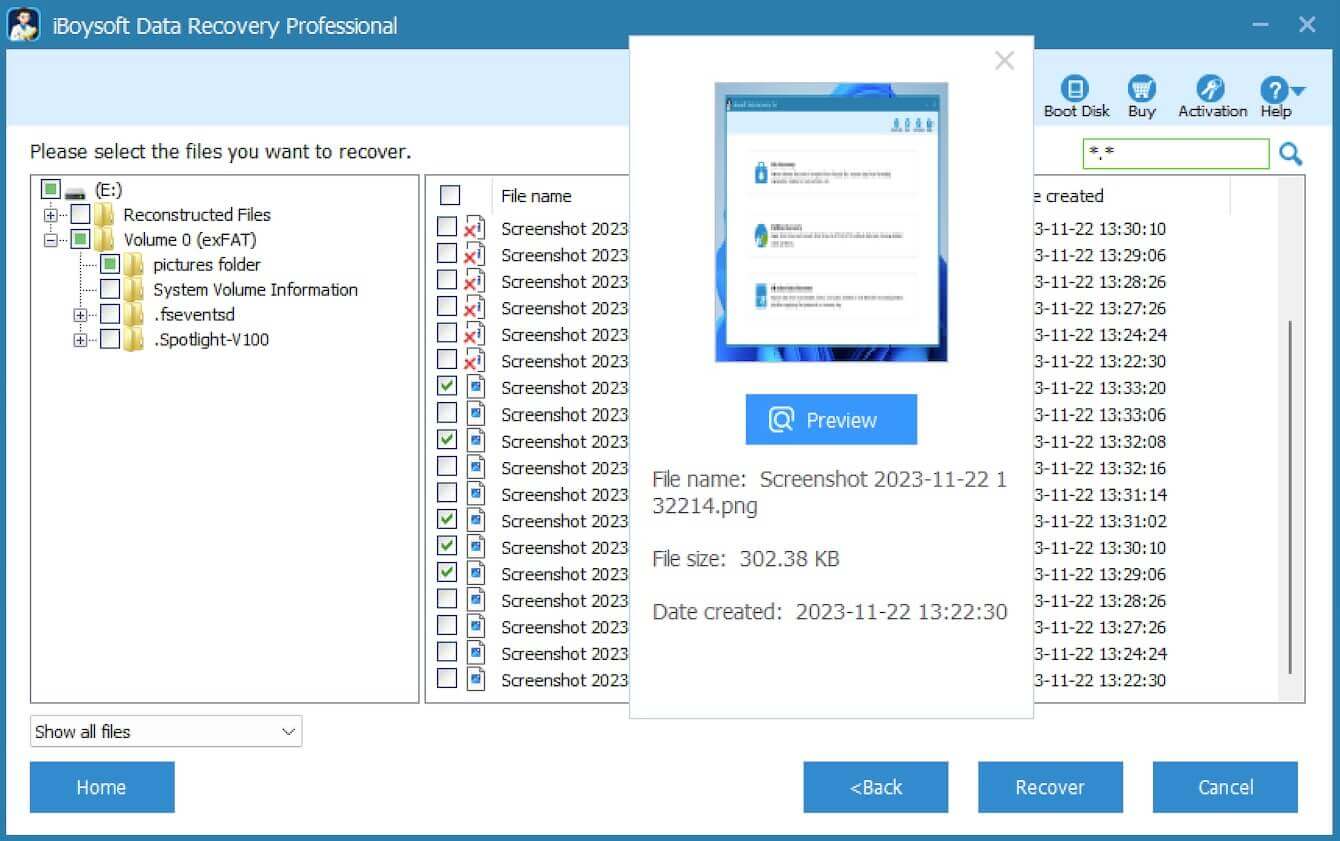
- Preview recoverable files after scanning completes, tick the wanted files, and click “Recover” to save them to a different location.
Conclusion
The error System Restore did not complete successfully is likely to be solved by using some of the methods above, you can try them from easy to difficult. As a side note, these solutions can be used on Windows 11 or other Windows operating systems. Reinstalling Windows is not worth a try, which may lead to more data loss. If you encounter data loss during System Restore, you can free download iBoysoft Data Recovery for Windows to recover lost data or files quickly.
Do you find this article helpful? You can click the buttons below and share it!