
Written by
Wilsey YoungWindows users may encounter the "the exception breakpoint has been reached" on Windows 11 when they try to launch an application or perform certain operations in a program.
Additionally, this error can be attributed to an app update, system update, malware, or faulty software. Therefore, Windows users are likely to run into the error while the Windows PC is shutting down.
This post focuses on the "the exception breakpoint has been reached" error and provides proven solutions.
How to fix the exception breakpoint has been reached Windows 11
This error typically indicates that a software/app/program error or exception has triggered a breakpoint. The possible causes include:
- Corrupted system or app files
- Third-party software bugs
- Incompatible or outdated drivers
- Malware interference
- Memory access violations
Based on the potential reasons we mentioned above, methods to repair are provided below.
Perform a Clean Boot to fix the exception breakpoint has been reached
A Clean Boot starts your system using a minimal set of drivers and startup programs. This helps determine whether a background program or third-party app/software is interfering with Windows and causing issues like "the exception breakpoint has been reached."
If you cannot determine which app/software/program is acting up, follow the steps below to troubleshoot under Clean Boot:
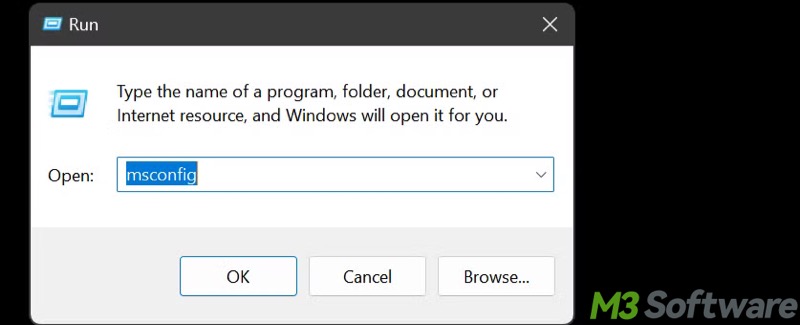
- Press the "Windows+R" keys to launch the "Run" dialog box.
- Input "msconfig" and click "OK."
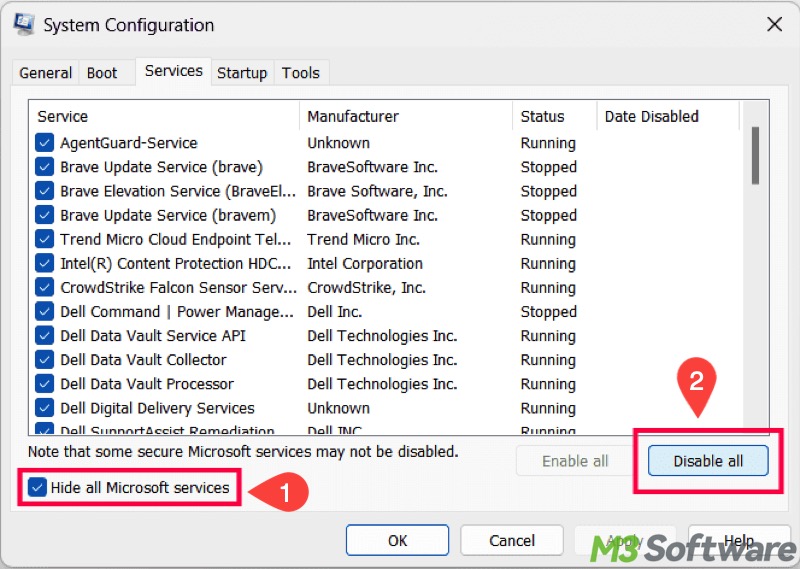
- Go to the "Services" tab, tick "Hide all Microsoft services", and click the "Disable all" button.
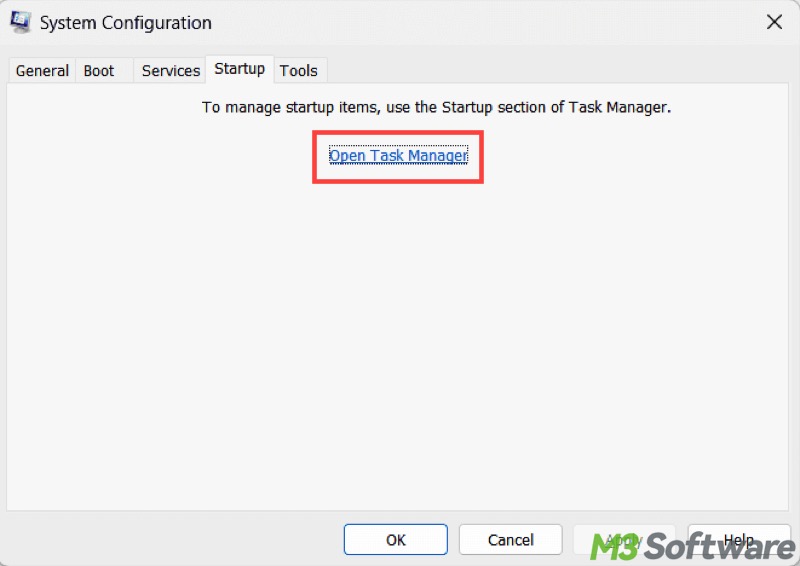
- Go to the "Startup" tab and click "Open Task Manager."
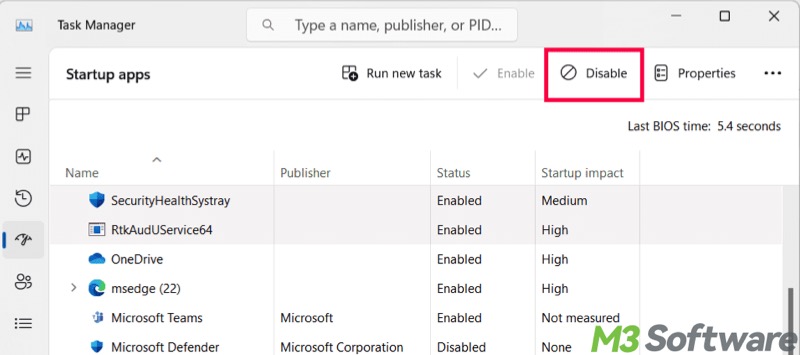
- When "Task Manager" opens, disable all the listed startup apps/programs, especially the third-party ones, and then close "Task Manager."
- Click the "Apply" and "OK" buttons in "System Configuration", and restart the PC. The system will enter Clean Boot mode automatically.
Now, you can isolate the software/app that causes "the exception breakpoint has been reached."
- Open "msconfig" again.
- Under the "Services" tab, re-enable half of the services. Alternatively, you can do it one by one.
- Restart and test if the error occurs again.
- If the error recurs, the issue lies in the services you just enabled. If not, move on to narrow it down.
- Repeat the process with fewer services until you identify the specific service causing the error.
- You can also open "Task Manager" (Ctrl + Shift + Esc) to re-enable startup programs one at a time or in groups, then restart your PC and test.
You may be interested in Clean Boot vs Safe Mode on Windows.
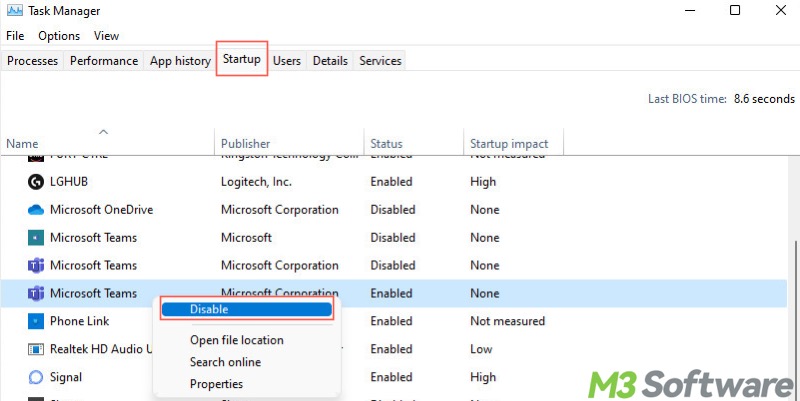
Disable the startup app/software/program to fix the exception breakpoint has been reached
Once you identify the app/software/program that causes "the exception breakpoint has been reached", you can fully close the app/software/program or disable it in the startup list before shutting down the Windows PC. This helps you repair the exception breakpoint has been reached when shutting down.
- Right-click on the "Start" menu or press "Windows+X" keys to choose "Task Manager."
- To fully terminate an item, right-click on it under the "Processes" tab, and choose "End task."

- To disable a startup item, go to the "Startup" tab and right-click on the item to disable.
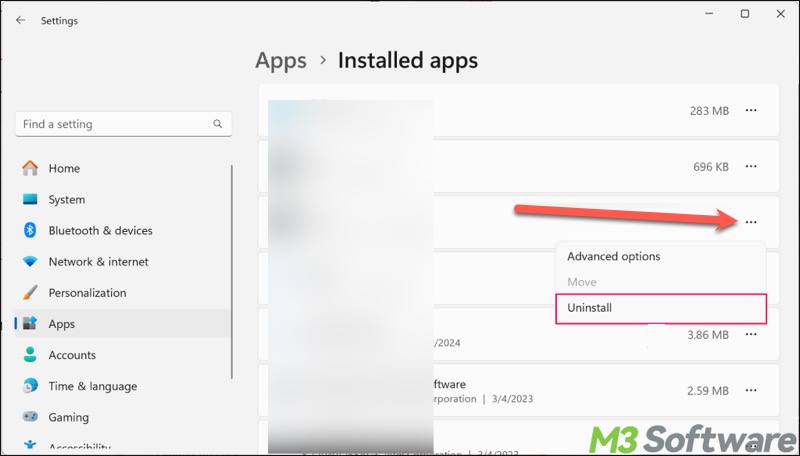
Update or uninstall the app/software/program to fix the exception breakpoint has been reached
To fix the "the exception breakpoint has been reached" error, you can update or uninstall the faulty app/software/program.
Follow the steps below to uninstall an app/software/program:
- Open "Settings."
- Choose "Apps" from the left side panel.
- Tap on "Apps & features."
- Locate the app and click the 3 dots to choose "Uninstall."
Note: Alternatively, you can open Device Manager on Windows 11 to update the outdated or incompatible driver to fix the exception breakpoint has been reached.
You can share this article with your friends!
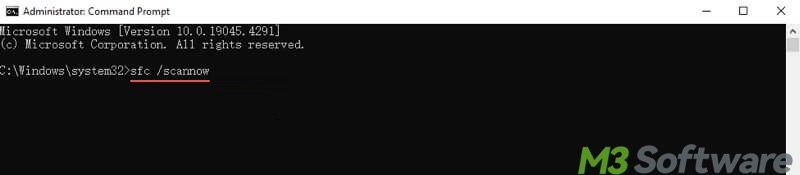
Run SFC and DISM scan to fix the exception breakpoint has been reached
Corrupted system files can cause the "the exception breakpoint has been reached" error. System File Checker (SFC) is a built-in tool that allows you to scan for and restore corrupted system files. You can run an SFC scan through the Command Prompt on Windows 11.
- Type "cmd" in the Windows search box and run it as an administrator.
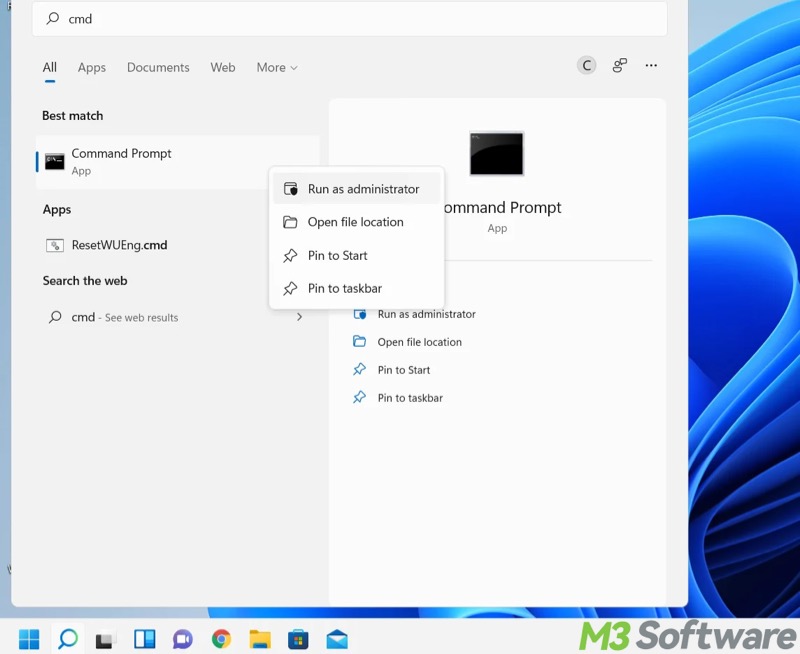
- Input "sfc /scannow" and hit the "Enter" key.
If SFC can't repair files, you can use DISM:
- Input "DISM /Online /Cleanup-Image /RestoreHealth"
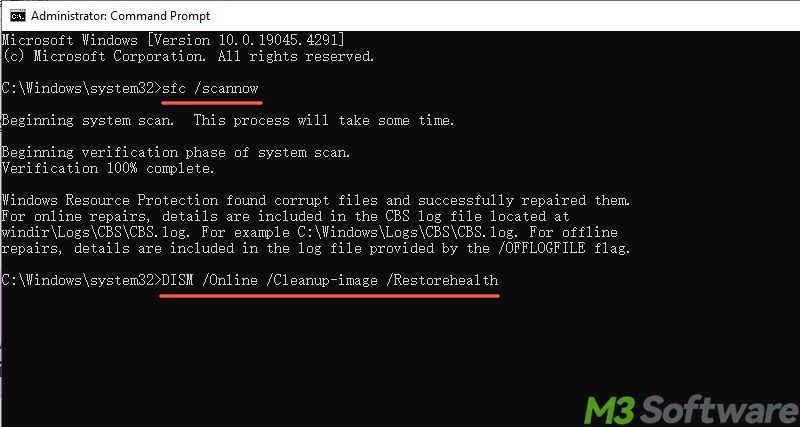
- Hit the "Enter" key to execute.
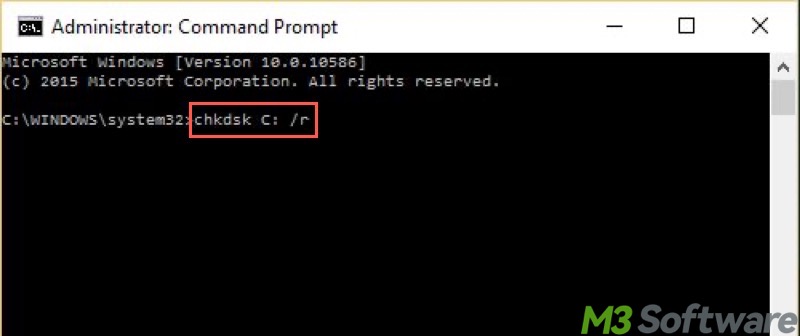
Run a CHKDSK scan to fix the exception breakpoint has been reached
CHKDSK (short for Check Disk) is another built-in utility that helps scan and repair file system errors and disk issues that may trigger "the exception breakpoint has been reached."
- Type "cmd" in the Windows search box and run it as an administrator.
- Input "chkdsk X: /r", replace X with the actual drive letter, and hit "Enter."
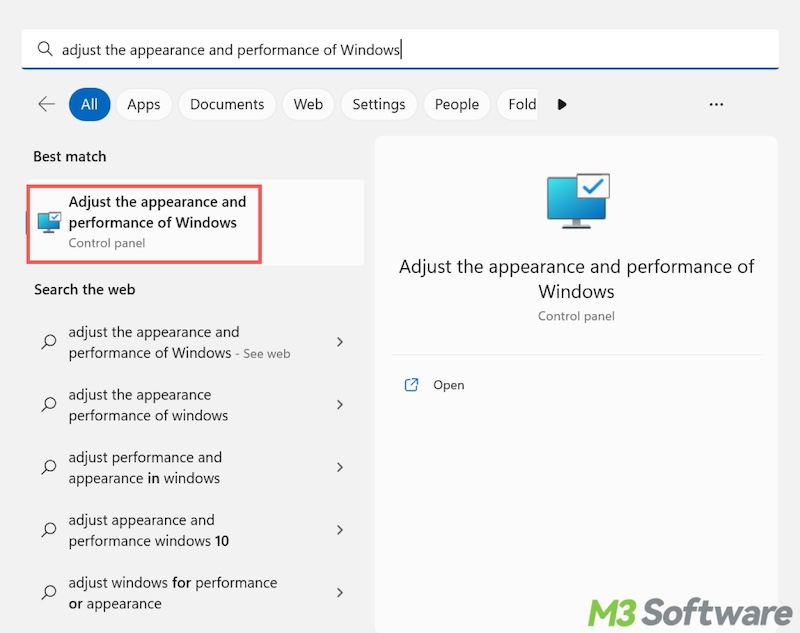
Adjust virtual memory settings to fix the exception breakpoint has been reached
Improper virtual memory (aka paging file or pagefile.sys file) settings may lead to the "the exception breakpoint has been reached" error. In this case, you can readjust and let the system automatically manage the paging file size for all drives.
- Open the Windows search bar, input "Adjust the appearance and performance of Windows", and tap on the result to open.
- When the "Performance Options" window pops up, go to the "Advanced" tab, and tap on the "Change" button under the "Virtual memory" section.
- Tick "Automatically manage paging file size for all drives" and click "OK."
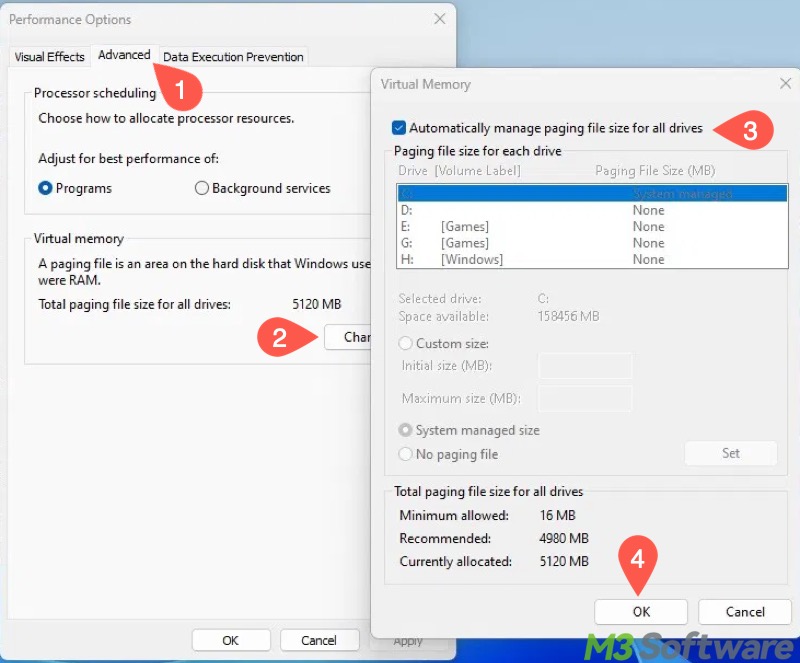
- Close all the windows and restart your PC.
Add a new user profile to fix the exception breakpoint has been reached
If the "the exception breakpoint has been reached" error persists, try adding a new user profile on Windows 11.
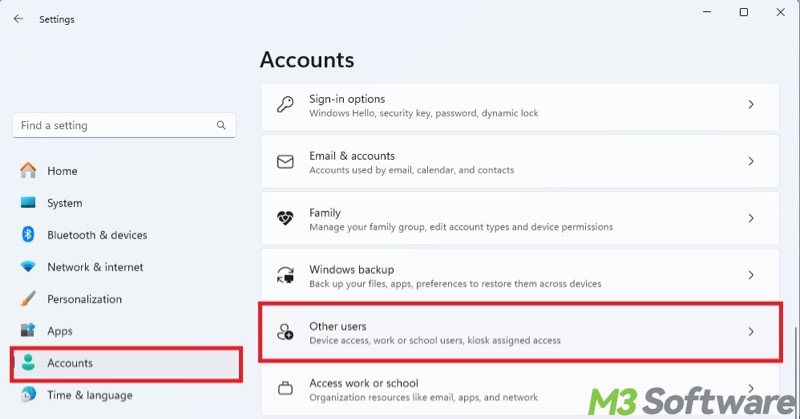
- Open "Settings", select "Accounts" from the left side panel, and choose "Other users."
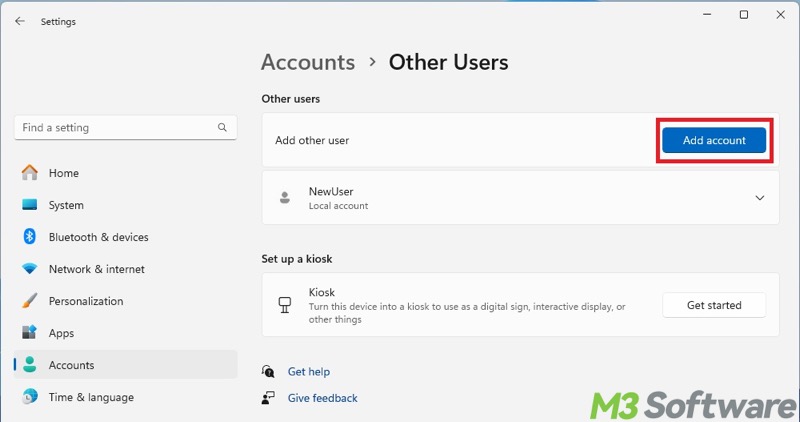
- Tap on "Add account."
- Choose "I Don't Have This Person's Sign-In Information."
- Choose "Add a User Without a Microsoft Account."
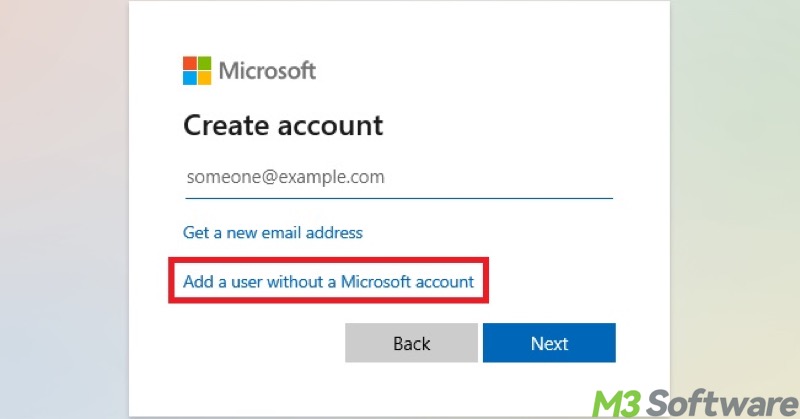
- Enter a username, set the password, input other information, and then click "Next."
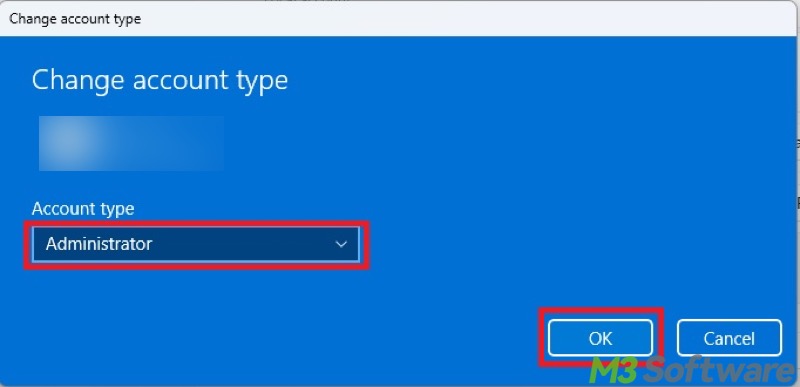
- To set the new user account as an administrator, click the account under "Other Users", choose "Change Account Type", and select "Administrator."
FAQs about the exception breakpoint has been reached
You can share this post by tapping on the buttons below
A
This error typically indicates that a program/app encountered a severe issue, like an access violation, invalid operation, or corruption, and raised a breakpoint exception. If no debugger is attached, Windows still shows this error to tell you that the app cannot proceed safely.
A
Here are 4 recommended methods for developers: 1. Attach a debugger to get a call stack. 2. Check for unhandled exceptions in your code. 3. Use breakpoints and exception settings to pinpoint where the error is triggered. 4. Check for third-party DLLs or libraries that might be injecting faulty code.
A
Here are the quick measures: 1. Update the problematic application. 2. Fully terminate the application before shutting down the system. 3. Prevent the application from starting up during system boot. 4. Uninstall the application. 5. Reinstall the application.