

The accumulated junk files in Windows can consume a large amount of disk space, but they often lurk in the shadows so that many Windows 11 users are hardly aware of their existence or are unable to identify them, causing your C drive to keep filling up.
How to delete junk files in Windows 11? How to delete system junk files in Windows 11? This article is centered on these questions and offers some methods to free up disk space by removing junk or unnecessary files in Windows 11/10.
You can click the buttons below to share the post.
How to delete junk files on Windows automatically?
iBoysoft DiskGeeker for Windows is an all-in-one disk management tool that can help scan the system drive for junk files more deeply than any other tool in Windows 11. With the advanced algorithm and intuitive interface, you will be provided with scanning results that clearly display what takes up disk space on your Windows PC.
This tool can also auto-select deletable files on your system drive and allow you to select unwanted personal files and large files manually, which can be permanently deleted in one click.
iBoysoft DiskGeeker for Windows is perfect for space analysis and system cleanup in Windows. Here's how to delete all junk files on Windows 11, 10, 8 & 7 via iBoysoft DiskGeeker for Windows automatically:
- Download, install, and launch iBoysoft DiskGeeker for Windows.
- Click Clean in the AI disk space optimization module.

- After the scan completes, see how many gigabytes of data you can free instantly, and add personal or large files you no longer need.
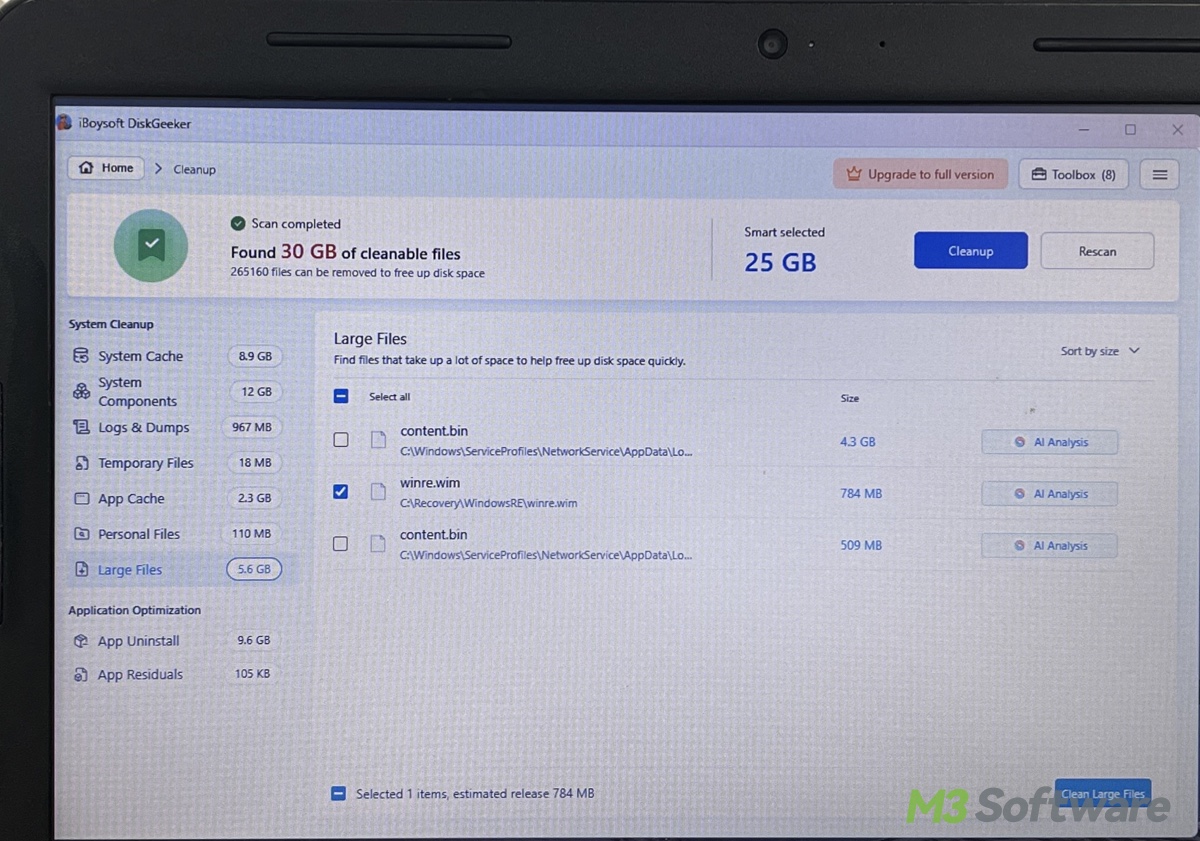
- Click Cleanup > Clean to delete all sorts of junk files on your system drive, including system cache, system components, logs & dumps, temporary files, and app cache.
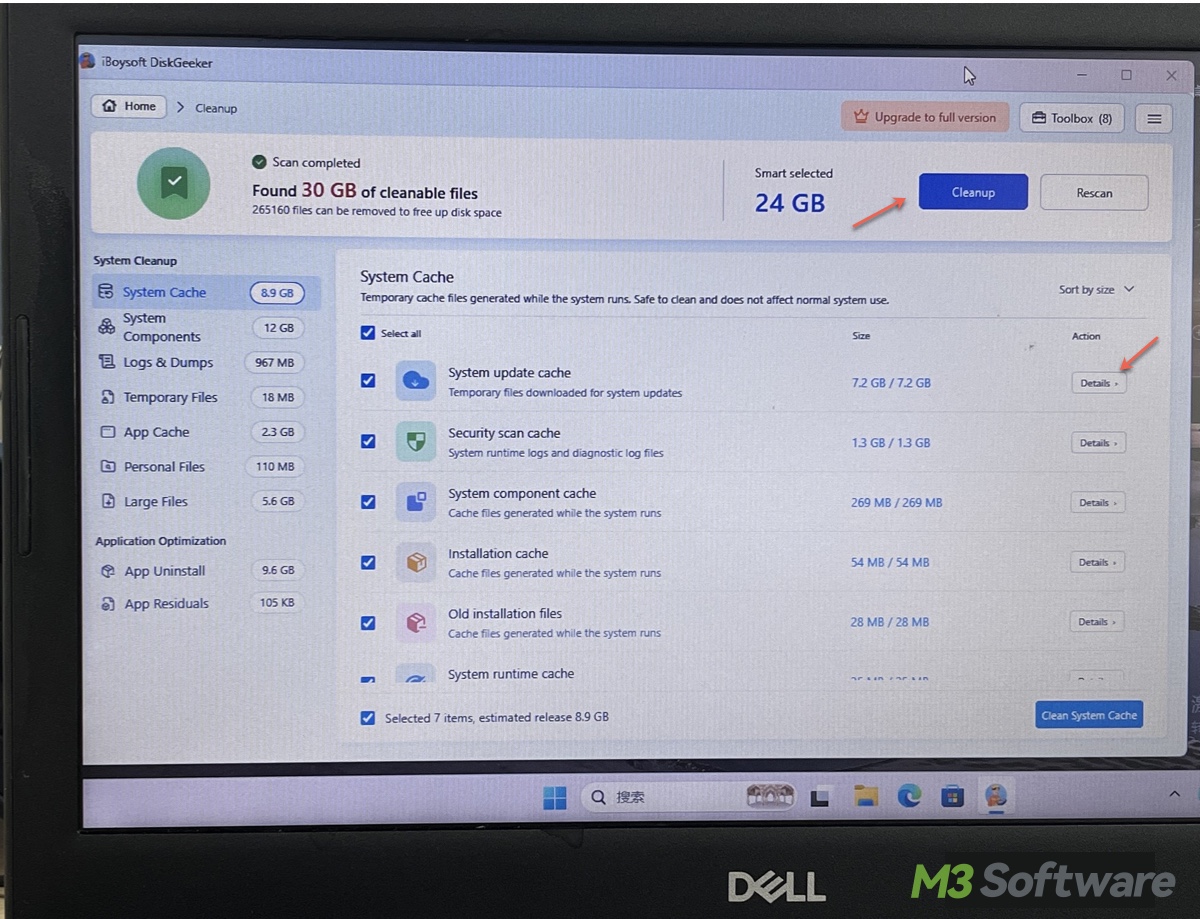
This tool provides multiple cleaning functions; you can continue to perform space analysis on other partitions or search for large files on the C or D drive to quickly reclaim space.
You can share this wonderful disk management tool with your friends.
How to delete junk files on Windows 11/10 with built-in tools?
You can choose the methods below, built-in or specialized, based on your needs. You can get the most out of them when used in combination.
Method 1 - Delete junk files in Windows 11 with the Disk Cleanup tool
Disk Cleanup is a built-in tool in Windows that can help delete a variety of junk files, like temporary files, previous Windows installations (Windows.old), thumbnail cache, and more. To carry out a Disk Cleanup, follow the steps below:
- Double-click "This PC" on the "Desktop" in Windows 11.
- Right-click on the system drive (aka C: drive or Local Disk C:) and choose "Properties."
- Under the "General" tab, click the "Disk Cleanup" button.

- Various files will be included in the box. Choose the files you want to remove, and click the "OK" button to delete them directly.

Method 2 - Delete junk files in Windows 11 with Settings
Besides the Disk Cleanup tool, here's how to delete junk files in Windows 11 through the Settings:
- Open "Settings" by pressing the "Windows+I" keys or through the "Start" menu.
- Select "System" from the left side panel.
- Tap on "Storage" in the right pane.

- Click "Temporary files." You will be taken to the page where you can select the junk files.

- After files are selected, click the "Remove files" button to delete them right away.

Method 3 - Delete junk files in Windows 11 by checking the Downloads folder
Typically, everything you download from a web browser goes to the Downloads folder, which tends to grow large over time. Therefore, here's how to delete junk files in Windows 11 by removing unnecessary files in the Downloads folder:
- Double-click “This PC” on the “Desktop.” Alternatively, press the “Windows+E” keys to open “File Explorer.”
- Choose “Downloads” from the left side panel.
- View the files inside and delete those you don't need.

Method 4 - Delete junk files in Windows 11 by removing installers
An installer, aka an installation package, often becomes useless after the software/application/program is successfully installed. Some of them may be in the Downloads folder. If not, follow the steps below to search for the installer file in Windows 11:
- Double-click “This PC” on the “Desktop.” Alternatively, press the “Windows+E” keys to open “File Explorer” and choose “This PC” from the left side panel.
- Tap on the search box on the right, input *.exe, *setup*.exe, or *installer*.exe.

- After scanning is finished, identify the apps' installers and delete them if you want to.
Method 5 - Delete junk files in Windows 11 by disabling hibernation mode
Hibernation mode in Windows allows you to shut down your Windows PC without losing your work. When you put your computer into hibernation, Windows saves all open files, apps, programs, and settings into a file called hiberfil.sys on HDD/SSD.
When you turn the Windows PC back on, the hiberfil.sys allows you to restore the state to exactly where you left off without needing to reopen apps, programs, or files; they will be just as they were before hibernation.
Few Windows users know that the hiberfil.sys file is likely to be large (several GBs), and it will not be automatically removed. Disabling hibernation mode can remove the old hiberfil.sys file.
Here's how to delete junk files in Windows 11 by disabling hibernation mode:
- Open "Control Panel" on Windows 11.
- Switch to the "Large icons" view method.
- Tap on "Power Options."

- Click "Choose what the power buttons do" from the left side panel.

- Click "Change settings that are currently unavailable."

- Uncheck "Hibernate" and tap on "Save changes." This disables hibernation mode and deletes the hiberfile.sys file.

Alternatively, you can disable hibernation mode through the Command Prompt:
- Press the "Windows+S" keys to open the Windows search box.
- Input "cmd" and choose "Run as administrator."

- When the command window appears, input "powercfg /hibernate off" and hit the "Enter" key on your keyboard.

Method 6 - Delete junk files in Windows 11 by removing Windows update files
Windows Update service stores many temporary update files, such as installation files and update history, to the SoftwareDistribution folder in the system drive, which can occupy a lot of space.
Deleting the files in the SoftwareDistribution folder can free up much disk space, but it won't damage your current updates or system functionality. However, it will cause Windows Update to recreate update files the next time it checks for updates, and the update check could take a little bit longer than before.
Here's how to delete Windows update files:
- Open "Command Prompt" as an administrator through the Windows search box.
- Input “net stop wuauserv”, “net stop bits” into the command window, and hit the "Enter" key after each to stop Windows update service.

- Double-click "This PC" to open "File Explorer."
- Navigate to C:\Windows\SoftwareDistribution
- Select all the files and subfolders, and then right-click on them to delete.

- Run the Command Prompt as an administrator again.
- Input and execute “net start wuauserv” and “net start bits” commands one by one to restart the Windows update service.
Method 7 - Delete junk files in Windows 11 by disabling system protection
The System Restore feature in Windows relies on System Protection to create restore points that can help revert your system to a previous working state, which often comes into play when Windows acts up.
However, system restore points can pile up and take up much space. Disabling System Protection can help delete these restore points, but also means you won't be able to perform a system restore.
Here's how to delete junk files in Windows 11 by disabling system protection:
- Open the Windows search box, type "Create a restore point", and click the result to open.

- Select a hard drive from the box and tap on the "Configure" button.
- Choose "Turn off system protection."

- Click "Apply" and "OK" to save changes.
What do you make of this article? Please share your opinions.