
Windows update files can consume a large amount of disk space on a Windows PC, and many Windows users wonder where they are and how to delete them safely. This post primarily demonstrates how to delete Windows update files using various methods on Windows, including manual deletion and the use of Windows' built-in tools.
Quick Selector Table
| Method | Best for | Can it clean specific Windows Update files? | Most suitable users |
| Disk Cleanup | Removing Windows Update Cleanup files and other system junk | Partially. Select Windows Update Cleanup when available; individual update files cannot usually be selected | Users who want a built-in, reliable cleanup tool |
| Storage Sense | Automatically clearing temporary files and reclaiming disk space | Limited. Can clean certain temporary files, but doesn't offer precise control over individual update files | Users who prefer automated, low-maintenance cleanup |
| iBoysoft DiskGeeker for Windows | Scanning the system drive and identifying unnecessary files for cleanup(Learn the best free C drive cleaner) | Yes, depending on the items identified and supported by the software | Users who want a visual overview of disk usage and more convenient cleanup options |
| Manually uninstall Windows updates | Removing a specific installed update that causes problems or needs to be rolled back | Yes. Targets a selected installed update rather than simply deleting its cached files | Users troubleshooting update-related errors or compatibility issues |
| Manually delete files and folders | Removing specific update-related files or folders after identifying them | Yes, but with caution. Some files are protected or required by Windows | Advanced users who understand Windows system folders and update components |
Where Are Windows Update Files Stored?
| Folder path | Purpose | Can you delete it manually? |
| C:\Windows\ SoftwareDistribution\Download | Downloaded Windows Update installation files and temporary data | Generally, yes, after following the proper cleanup procedure |
| C:\Windows\ SoftwareDistribution\DataStore | Windows Update history and database information | Not recommended; deleting it can reset update history |
| C:\Windows\WinSxS | Windows component store, including components used for updates and repairs | No. Use Windows cleanup tools |
| C:\Windows\Logs\ WindowsUpdate | Windows Update log files used for troubleshooting | Some logs can be cleared when no longer needed |
| C:\$WINDOWS.~BT | Temporary setup files used during certain Windows upgrades | May be removable through Windows cleanup tools when no longer needed |
| C:\Windows\ DeliveryOptimization | May contain files related to Delivery Optimization; the commonly used cache is under C:\Windows\ServiceProfiles\ NetworkService\AppData\Local\ Microsoft\Windows\DeliveryOptimization | Clear the cache through Windows settings or Disk Cleanup |
Important distinction: Uninstalling a Windows update is not the same as deleting downloaded update files. The former rolls back an installed update when supported; the latter frees up storage without necessarily removing the installed update.
Method 1 - Delete Windows update files via Disk Cleanup
The Disk Cleanup tool in Windows is a built-in system utility that helps you free up disk space by safely removing unnecessary files, such as Temporary files, Recycle Bin files, Thumbnails, Windows Update files, downloaded program files, etc.
Here's how to use the Disk Cleanup tool on Windows:
- Double-click "This PC" or "My Computer" on the "Desktop" to open "File Explorer."
- Right-click on the C: drive (aka System drive/Local Disk C:) and choose "Properties."
- Under the "General" tab, tap on the "Disk Cleanup" button.

- When the "Disk Cleanup" window pops up, tick "Previous Windows installation(s)" or other unnecessary files you want to remove.
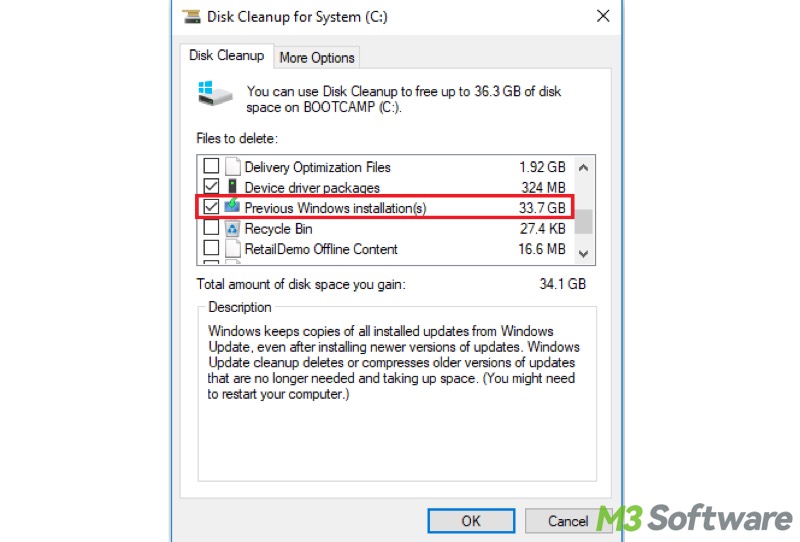
- Click the "OK" button to delete them.
Low disk space, but nothing to delete? Please read: Low Disk Space but Nothing to Delete: Causes & 7 Solutions!
Method 2 - Delete Windows update files via Storage Sense
Storage Sense is a built-in feature on Windows that can help automatically clean out unnecessary files, like previous Windows installations, on a regular basis. Unlike Disk Cleanup, Storage Sense runs in the background.
However, you can still manually delete Windows update files by accessing the Storage Sense:
- Press the "Windows+I" keys to open "Settings" on Windows.
- Choose "System" from the menu.
- Select "Storage" from the left side panel.
- Switch on "Storage Sense" and tap on "Temporary Files."

- Select "Previous Windows installation(s)" or other Windows temporary files you want to delete.
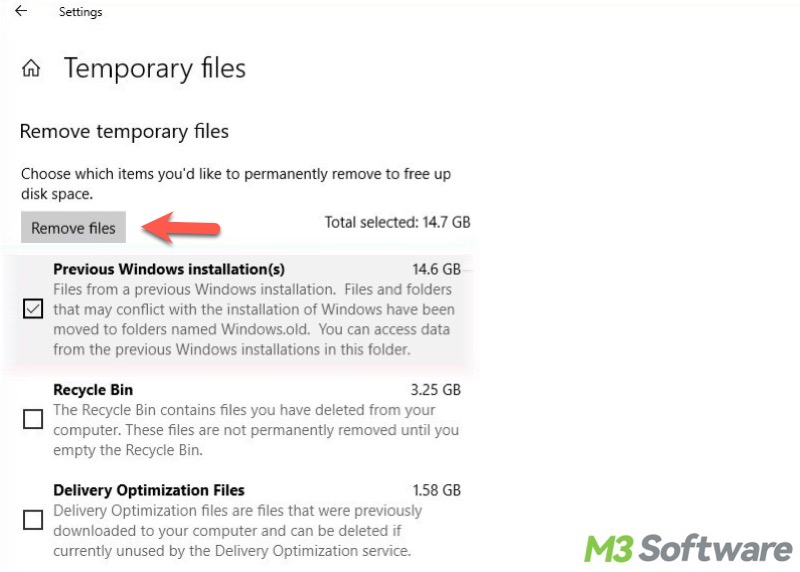
- Click the “Remove files” button.
Windows users may wonder what takes up the hard disk space on a Windows PC: How to See What Takes Up Space on PC? Best Ways for Windows!
Method 3 - Delete Windows Update Files via iBoysoft DiskGeeker
Many Windows users want to free up storage by removing old update files, but determining which files are actually safe to delete can be confusing and risky. That's where a reliable, AI-powered disk space analyzer like iBoysoft DiskGeeker for Windows comes in.
Using its smart AI disk analysis mode, DiskGeeker rapidly scans your C: drive and presents a visual space map so you can instantly pinpoint large, hidden update files. To make the process stress-free, the tool automatically selects safe-to-remove update files—such as temporary update data, cache, setup files, update logs, and Delivery Optimization files—without putting your operating system at risk.
With a single click, you can safely clean up these redundant files and reclaim valuable disk space without worrying about system instability.
- Download, install, and launch iBoysoft DiskGeeker for Windows version 2.0 (the latest version).
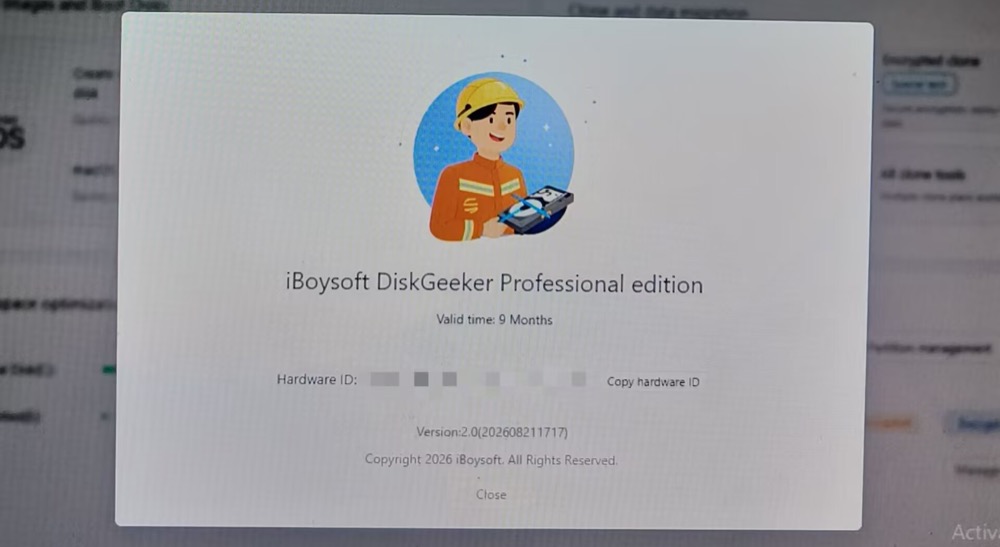
- Click the “Clean” blue button next to Lock Disk (C:) in the AI disk space optimization section.
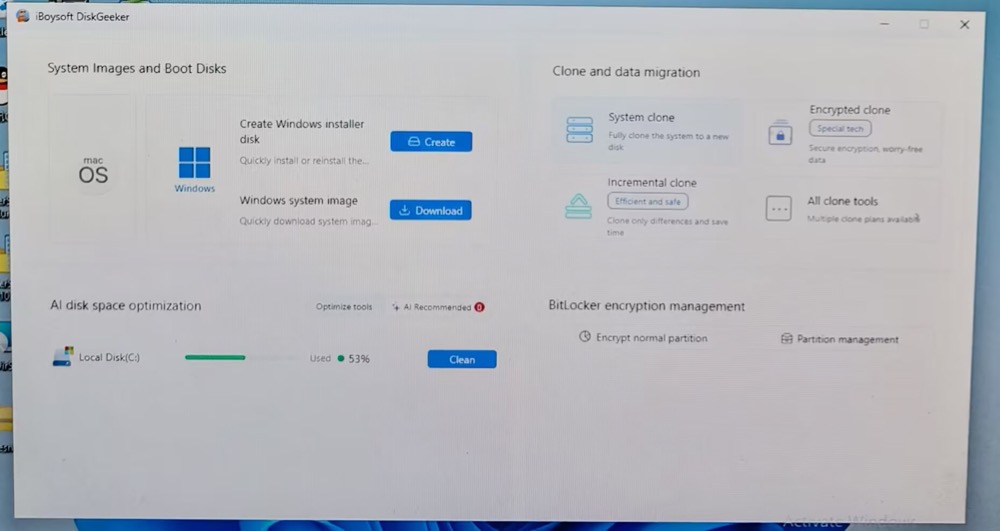
- This feature-rich disk manager will instantly scan your system drive C: and then list out the results in 3 major categories: system cleanup, application optimization, and chat tools.
To clear system update files, target System cleanup, which covers almost all the safe-to-remove update files, including update cache, installation cache, logs, temporary update files, components, etc.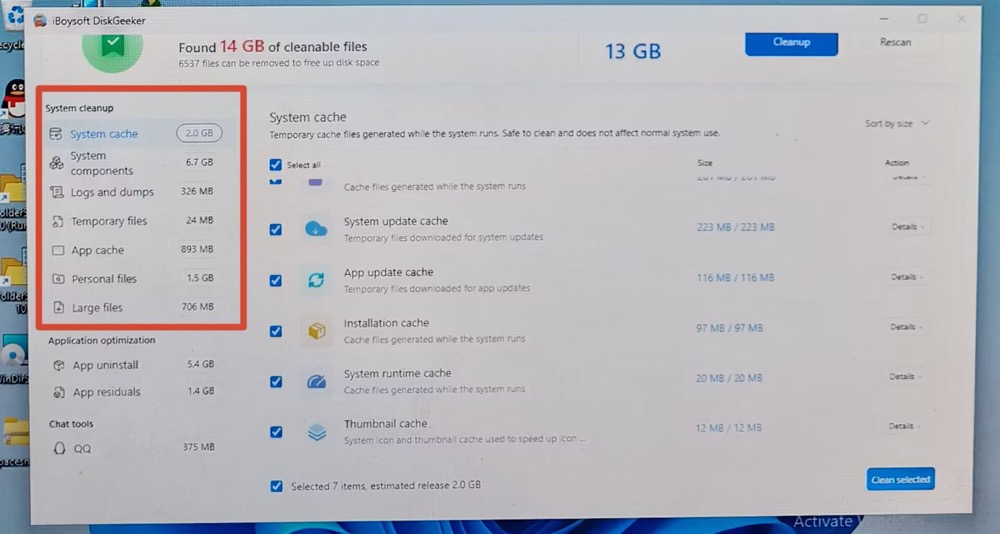
The standard scan results group files by category rather than their original storage paths (e.g., Download, DataStore, or WinSxS).
To inspect a specific directory like WinSxS, simply return to the home screen and click Specific folder analysis. You will then see a targeted list of safe-to-delete update files (see screenshot below):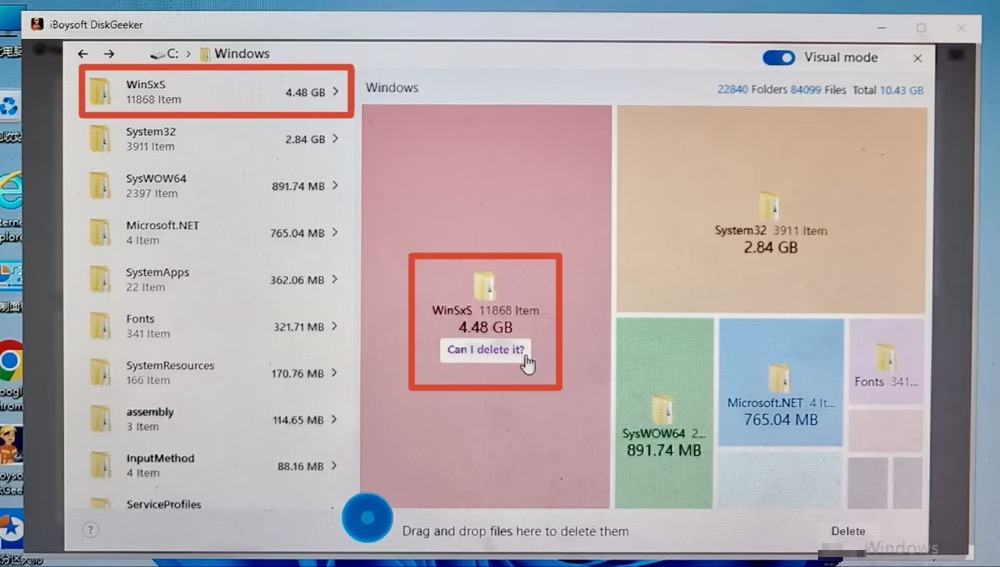
- Click the “Cleanup” button in the top menu or the “Clean selected” button in the lower right corner of the screen to clear unnecessary Windows update files.
Method 4 - Delete Windows update files by manually uninstalling updates
You can delete Windows update files by uninstalling updates through the Windows Settings. Here's how:
- Press the "Windows+I" keys to open "Settings" on Windows.
- Choose "Update & Security" from the menu.
- Choose "Windows Update" from the left side panel.
- Tap on "View update history."

- Click "Uninstall updates."

- Right-click on the update and click "Uninstall."

Think carefully before uninstalling updates through the Windows Settings, as some of them may be crucial for the system stability and security.
You can share this post with your friends online
Method 5 - Delete Windows update files by manually deleting files or folders
Besides using the Disk Cleanup or Storage Sense tool on Windows, you can delete Windows update files by navigating to the corresponding folders and manually deleting related files.
The SoftwareDistribution folder on Windows is a system folder used by Windows Update. It contains files required to install new updates, such as update installers, downloaded patches, update history, logs, etc., which can consume a large amount of hard disk space.
Follow the steps below to manually delete the folders that store the Windows update files. First of all, we need to stop the Windows update service via the Command Prompt:
- Press the "Windows+S" keys on your keyboard to launch the Windows search box.
- Input "cmd" into the Windows search box and choose "Run as administrator."

- Input “net stop wuauserv”, “net stop bits”, and hit the "Enter" key after each.

After the Windows update service is stopped, follow the steps below to delete Windows update files:
- Double-click "This PC" or "My Computer" on the "Desktop" to open "File Explorer."
- Open the SoftwareDistribution folder by following the path: C:\Windows\SoftwareDistribution
- Select all the files and subfolders and right-click on them to delete. Note: You can delete just the "Download" subfolder if you want to keep logs.

Now, you need to restart the Windows update service:
- Run the Command Prompt as an administrator again.
- Input and execute “net start wuauserv” and “net start bits” commands one by one.
- Restart your PC
Matters needing attention:
- Emptying the SoftwareDistribution folder also involves removing the Windows Update history, only the log entries, not the installed updates themselves.
- System will recreate the folder automatically the next time it checks for updates.
- The next update check could take longer as Windows needs to rebuild its update cache.
- Don't delete the folder while the Windows Update service is running.
Conclusion
In conclusion, each method offers a different approach to deleting Windows Update files on Windows 10/11. Disk Cleanup is ideal for users who want a straightforward, built-in cleanup tool, while Storage Sense suits those who prefer automated maintenance.
iBoysoft DiskGeeker for Windows is a good option for users who want a more visual way to scan and manage disk space. Manually uninstalling updates is best for troubleshooting problematic updates, whereas manually deleting files and folders is more suitable for advanced users who understand Windows system files and the risks involved.
The best choice depends on whether your priority is freeing up disk space, automating cleanup, or resolving update-related issues.
What do you make of this article? You can share it using the buttons below