
Written by
Wilsey YoungSummary: This post discusses the install error 0xc1900101 when installing Windows 11. Effective solutions to this error code are provided. iBoysoft DiskGeeker for Windows can help free up disk space on your Windows PC. -From m3datarecovery.com
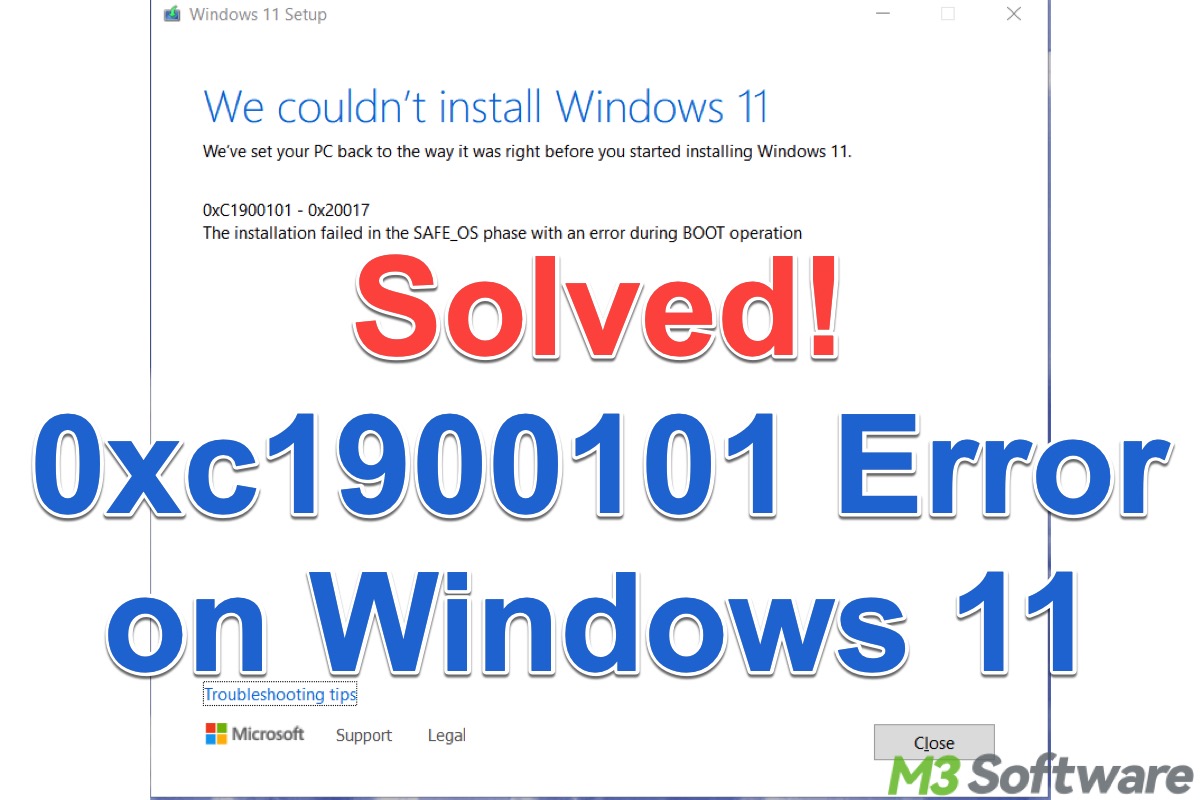
0xC1900101 is an error code that usually indicates a failure has occurred during the full upgrade from Windows 10 to Windows 11 or a major Windows 11 feature update. It happens most commonly after the first or second reboot.
Tips: Have you tried downloading the full Windows 11 ISO installer to upgrade to Windows 11? If not, test it out!
In addition, the Windows 11 0xc1900101 install error may differ in the secondary code:
- 0xc1900101 - 0x30018
- 0xc1900101 - 0x2000c
- 0xc1900101 - 0x20017
- 0xc1900101 - 0x20004
- 0xc1900101 - 0x40021
- 0xc1900101 - 0x40017
Common causes of the 0xc1900101 error when installing Windows 11 are closely related to incompatible drivers, software conflicts, corrupted system files, and misconfigured UEFI/BIOS settings. You can view the following proven solutions and start with the easy ones.
You can tap on the buttons below to share this post!
How to fix 0xc1900101 when installing Windows 11?
Please follow the methods below to troubleshoot and solve the 0xc1900101 error during the system upgrade to Windows 11 or the Windows 11 update. We'll start with the easiest, most common ones.
Free up disk space to fix 0xc1900101 error when installing Windows 11
The install error 0xc1900101 when installing Windows 11 may appear when the system drive (aka C: Drive or Local Disk C:) is running out of space. Therefore, you can fix the error by cleaning up the hard disk.
Tips: If you have an older PC, you can also try the lite version of Windows 11, which takes much less space and performs better: Windows 11 LTSC.
Low disk space but nothing to delete? In this case, iBoysoft DiskGeeker for Windows is highly recommended. It is a professional disk security tool that can help you analyze the disk space and scan the hard disks for various junk files, such as useless temporary files, update patches, thumbnail cache, and more.
Most importantly, with iBoysoft DiskGeeker for Windows, you can easily and quickly free up disk space when encountering install error 0xc1900101, as this tool allows you to permanently delete files on PC.
Follow the steps below to clean up your system drive on Windows 11:
- Download, install, and launch iBoysoft DiskGeeker for Windows.
- iBoysoft DiskGeeker for Windows will immediately scan your system drive.
- View the scanning results and use the viewing button next to each file to check the details, including the location and content.
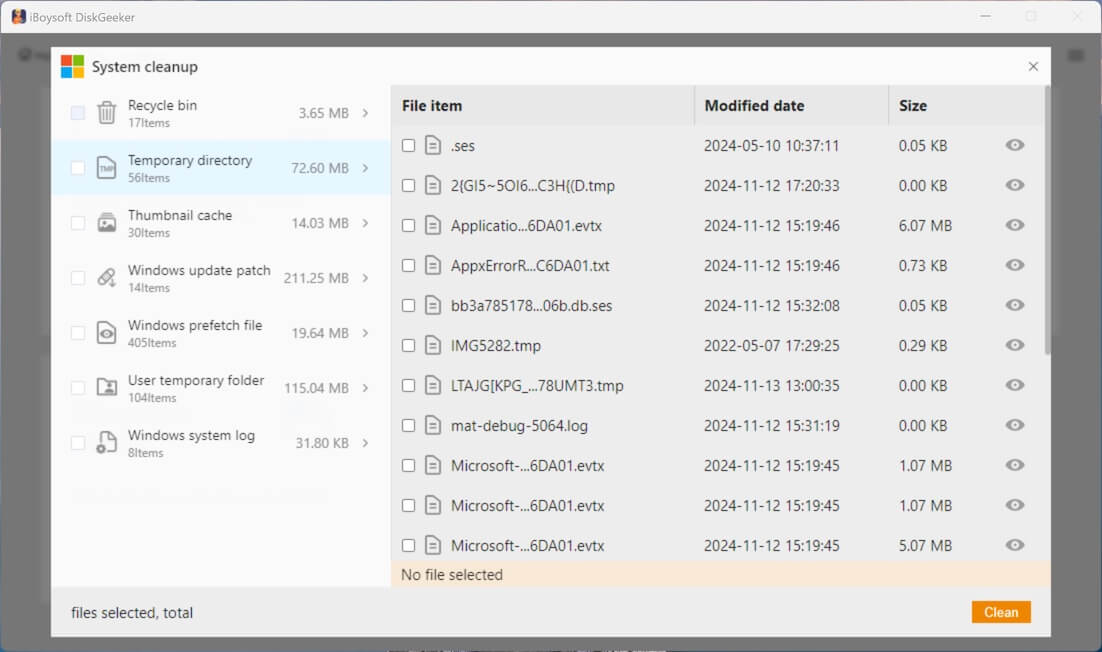
- Tick the files you want to delete and tap on the "Clean" button.
If you don't prefer a third-party tool, use the built-in tool on Windows to clear up the disk:
- Open "This PC" or "My Computer" on the "Desktop."
- Right-click on the system drive and choose "Properties."
- Tap on the "Disk Cleanup" button under the "General" tab.
- Tick the files you want to remove and click "OK."
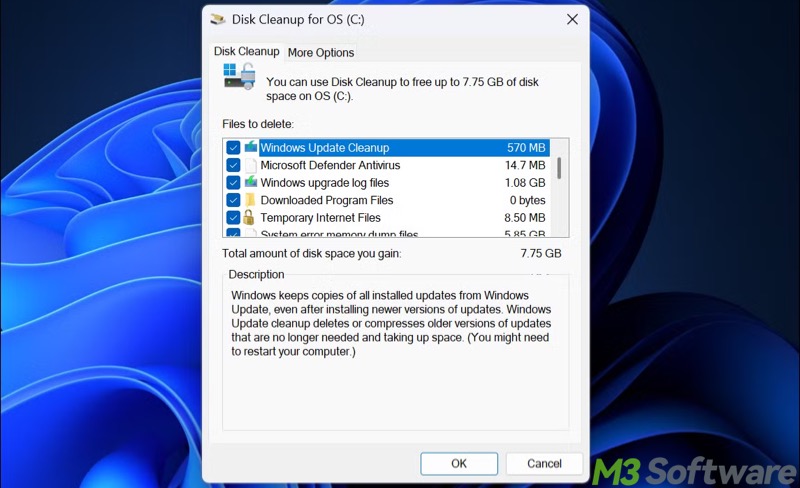
- Click "Clean up system files" to continue.
Unplug unnecessary peripherals to fix 0xc1900101 error when installing Windows 11
Some excessive peripherals may trigger the Windows 11 0xc1900101 install error. Henceforth, we suggest unplugging all USB devices that are not directly used in the installation process, such as printers, scanners, external hard drives, card readers, extra mice/keyboards, USB hubs, gamepads, etc.
All you need is the keyboard, mouse, and network connection. After all the unnecessary peripherals are unplugged, restart your PC and try the system upgrade or update again.
Run Windows update troubleshooter to fix 0xc1900101 error when installing Windows 11
Follow the steps below to run the built-in troubleshooter to solve problems that prevent you from updating Windows:
- Open "Settings" > "Troubleshoot" > "Other troubleshooter."
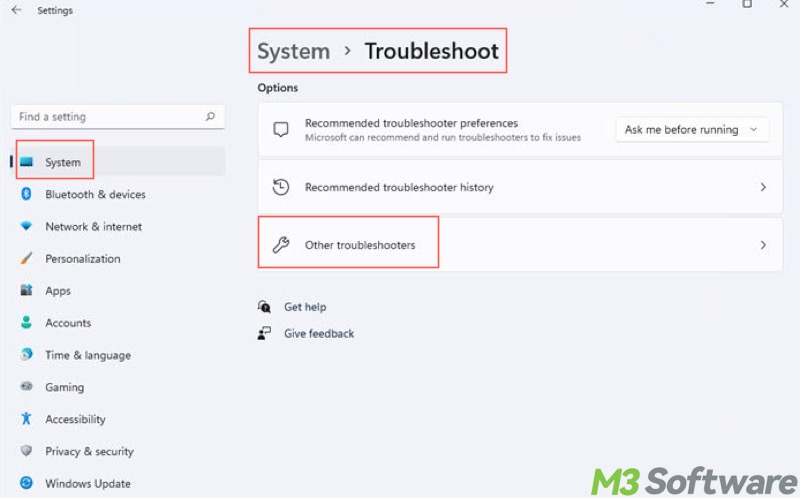
- Locate "Windows Update" and tap on the "Run" button.
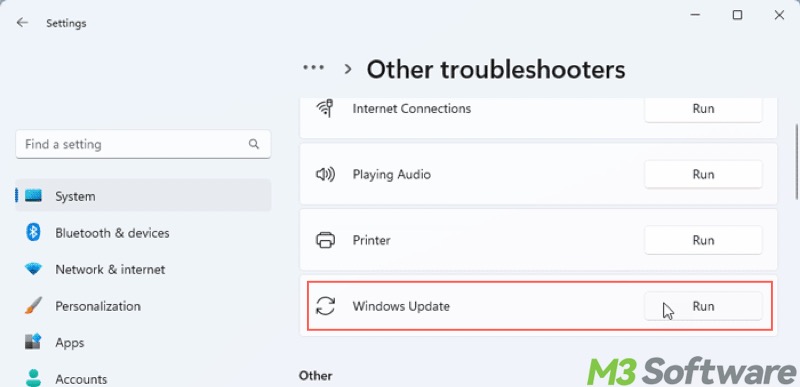
- Wait patiently and see if the problem is solved.
If this troubleshooter detects the problems and successfully repairs them, restart your PC and try the Windows upgrade or update again.
Disable security tool to fix 0xc1900101 error when installing Windows 11
Third-party antivirus or firewall tools (including Windows Defender) could be the culprit for the install error 0xc1900101 when installing Windows 11. Therefore, the following steps will help you disable or uninstall the security tool on Windows 11.
To disable Microsoft Defender Firewall:
- Open "Settings" > "Privacy & security" > "Windows Security" > "Open Windows Security."
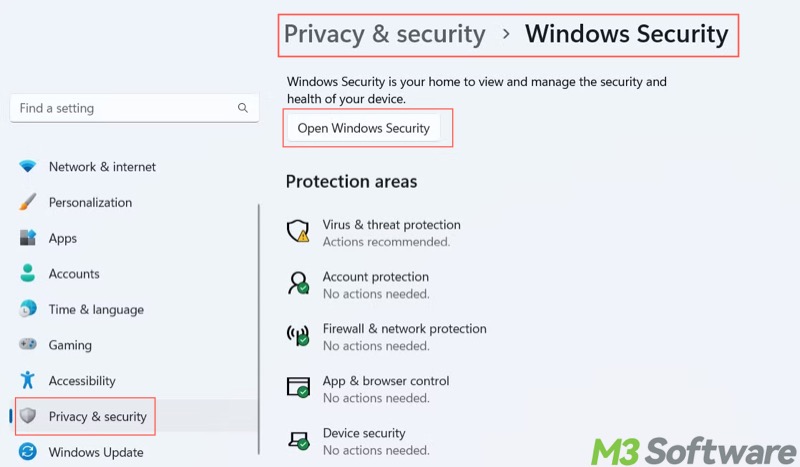
- Choose "Firewall & network protection."
- Tap on "Public network" and "Private network" to disable Microsoft Defender Firewall.
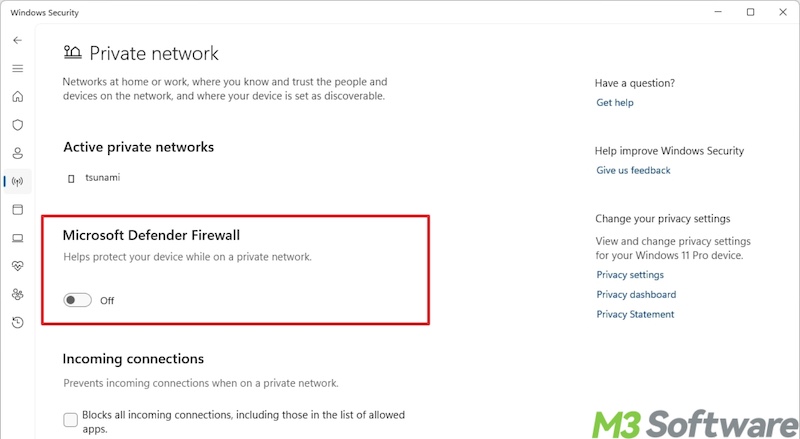
- Restart your PC before the Windows upgrade or update.
To disable the startup antivirus app:
- Press the "Ctrl+Shift+Esc" keys to open "Task Manager."
- Tap on the "Startup" tab.
- Right-click on the target app and choose "Disable."
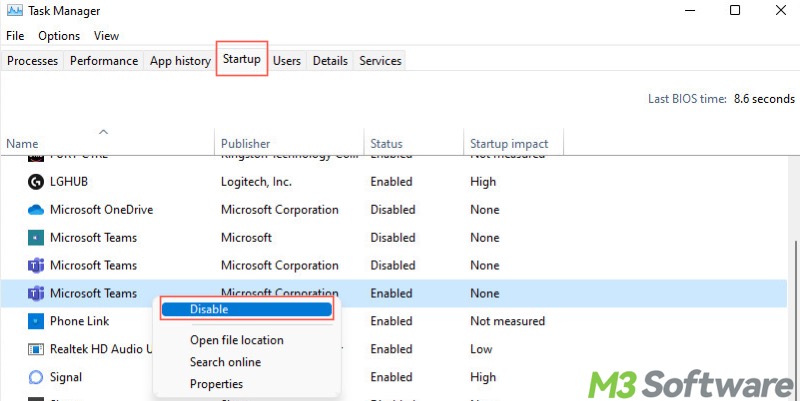
- Restart your PC before the Windows upgrade or update.
Update driver to fix 0xc1900101 error when installing Windows 11
The outdated, faulty, or incompatible device driver may result in the Windows 11 0xc1900101 install error.
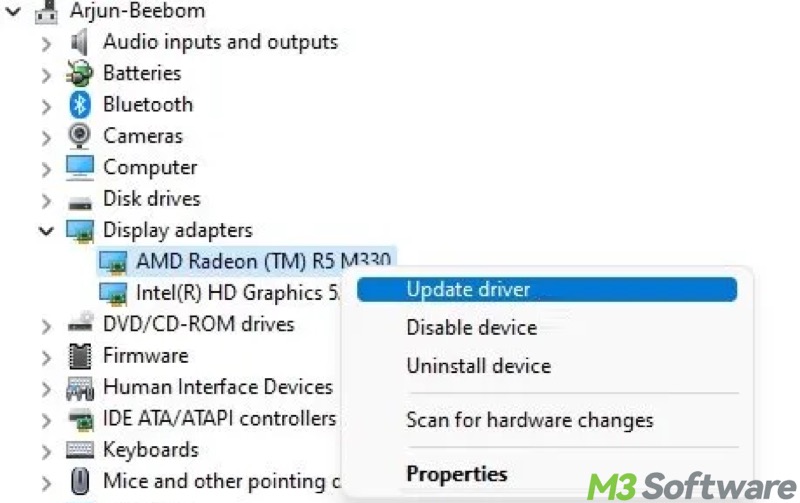
You can open Windows Device Manager to update the drivers. Pay special attention to the driver of the graphics card, chipset, network adapter (wired/wireless), and memory controller (SATA/AHCI/RAID/NVMe).
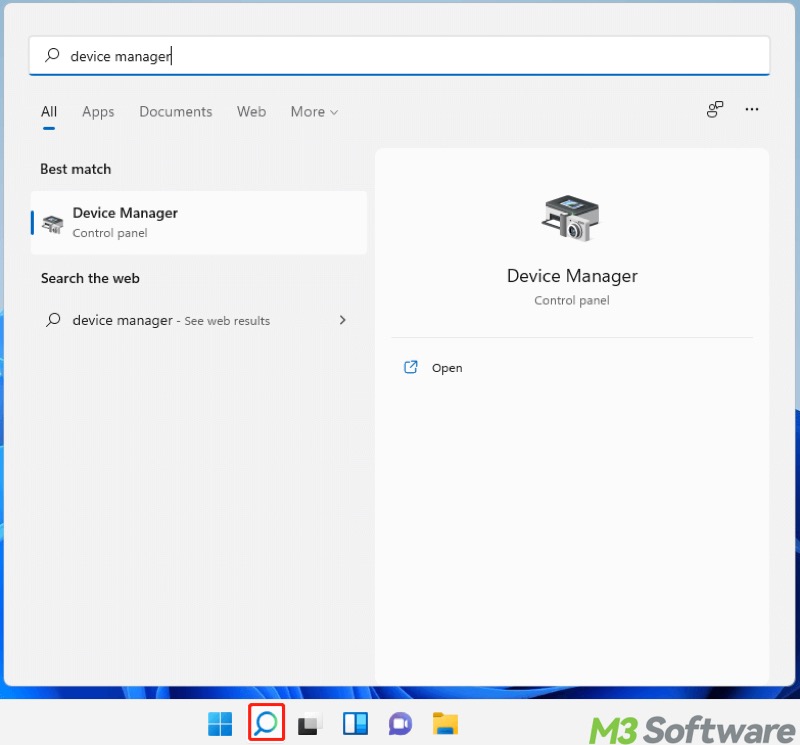
- Type "Device Manager" in the Windows search box and click the result to open the tool.
- Right-click on the target driver to choose "Update driver", and then the system starts to search for and install the latest driver.
Restart your PC when the driver update is done. For those you cannot update through the "Device Manager", visit the manufacturer's website to download and install the driver manually.
We hope these methods can help you out. You can share this post with the following buttons!
Run SFC and DISM to fix 0xc1900101 error when installing Windows 11
Corrupted or missing system files may be to blame for the install error 0xc1900101 when installing Windows 11. You can repair them using the SFC (System File Checker) tool through Command Prompt on Windows:
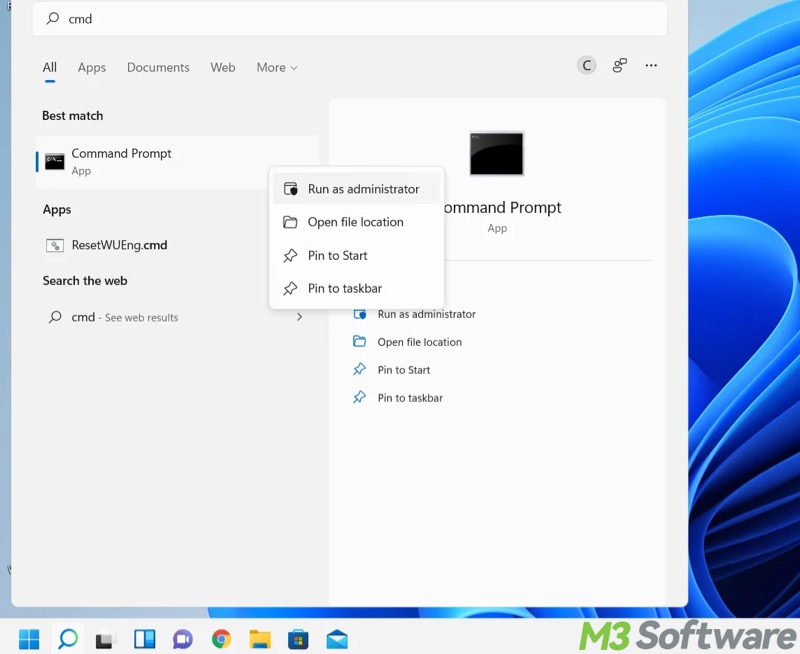
- Type "cmd" in the Windows search box and choose "Run as administrator."
- Input "sfc /scannow" and press the "Enter" key on your keyboard.
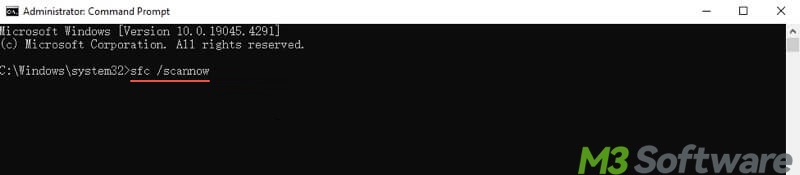
- Check the results and see if any error is fixed.
If SFC cannot fix the problem, move on and run the DISM tool:
DISM /Online /Cleanup-Image /RestoreHealth
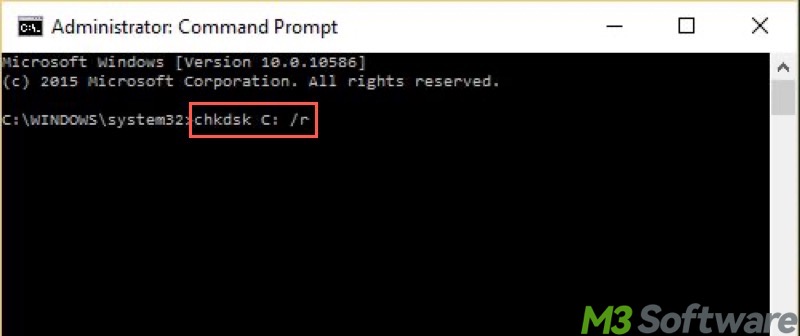
Run CHKDSK to fix 0xc1900101 error when installing Windows 11
You can use the CHKDSK tool on Windows to scan and repair file system errors and disk issues that may cause the 0xc1900101 error to appear.
- Type "cmd" in the Windows search box and choose "Run as administrator."
- Input "chkdsk X: /r", replace X with the actual drive letter, and press the "Enter" key.
Enable Secure Boot to fix 0xc1900101 error when installing Windows 11
Some Windows users encountering the 0xc1900101 error reported that enabling Secure Boot before a Windows upgrade or update could work things out.
Secure Boot is a security feature built into modern UEFI firmware. It helps protect your system by only allowing trusted software to run during the system boot.
- Restart your PC and continuously press the "Del" key (depending on the manufacturer) to enter UEFI.
- Under the advanced mode, go to the "Boot" tab.
- Look for "Secure Boot" using the arrow key.
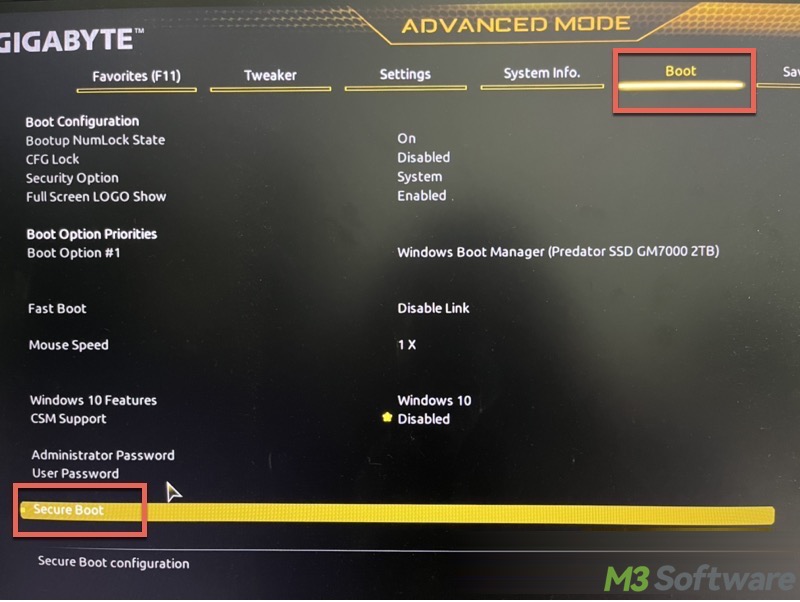
- Press "Enter" to enable the "Secure Boot."
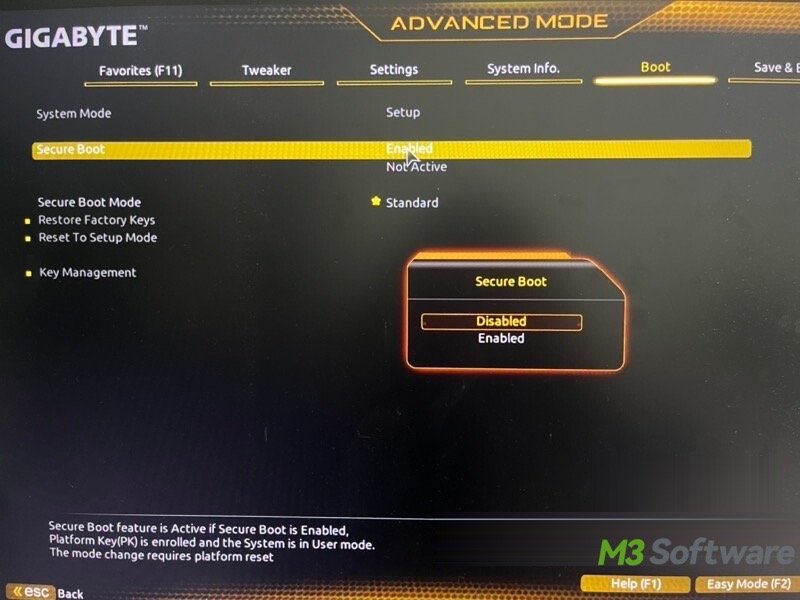
- Save the change, exit UEFI, and restart your PC.
Enter Clean Boot to fix 0xc1900101 error when installing Windows 11
The software conflicts could lead to the install error 0xc1900101 when installing Windows 11. Some Windows users suggest that upgrading or updating Windows in a "Clean Boot" state could resolve the problem.
To enter the "Clean Boot" on Windows, please refer to: Clean Boot vs Safe Mode: Differences & Which One to Choose
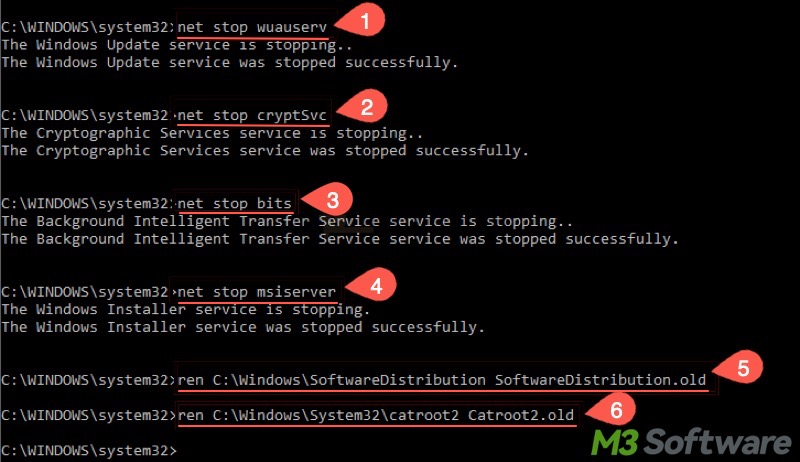
Reset Windows update files to fix 0xc1900101 error when installing Windows 11
The corrupted Windows update files could be responsible for the Windows 11 0xc1900101 install error. You can reset the Windows update file as follows:
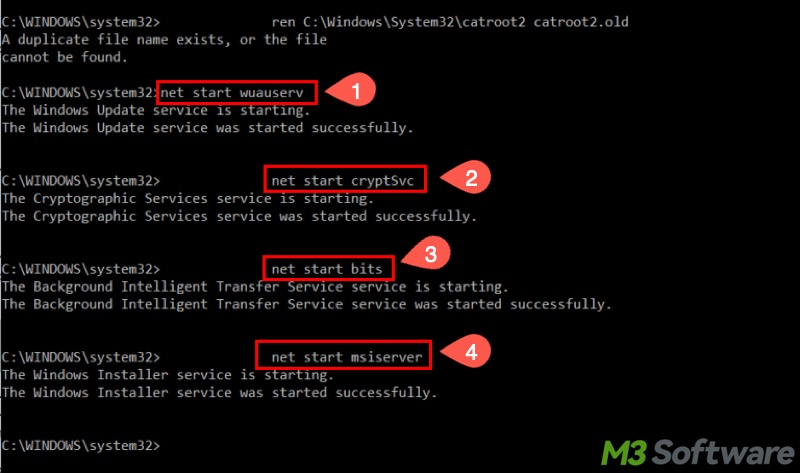
Type "cmd" in the Windows search box and select "Run as administrator." Input the following commands and hit the "Enter" key after each:
- net stop wuauserv
- net stop cryptSvc
- net stop bits
- net stop msiserver
- ren C:\Windows\SoftwareDistribution SoftwareDistribution.old
- ren C:\Windows\System32\catroot2 catroot2.old
Once the commands above are executed, use the commands below and press "Enter" after each:
- net start wuauserv
- net start cryptSvc
- net start bits
- net start msiserver
Do you find this post helpful? Share it with your friends!
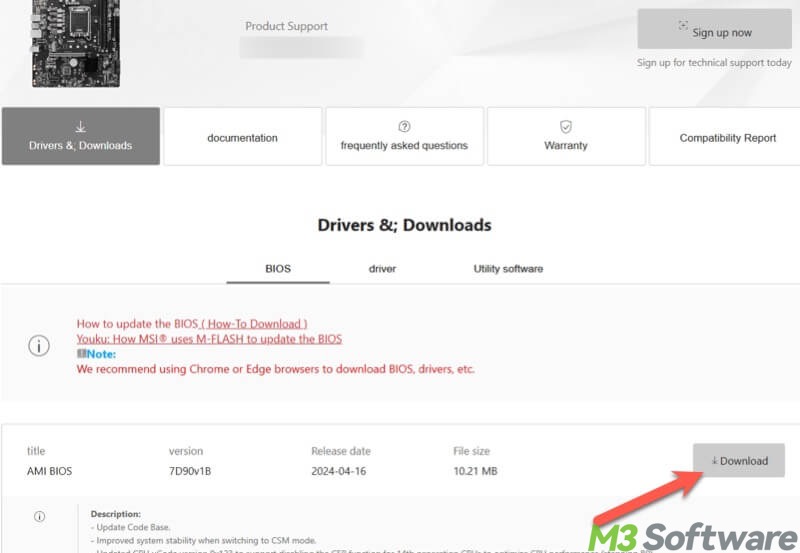
Update BIOS/UEFI to fix 0xc1900101 error when installing Windows 11
If all the methods above fail to help you out, try updating your BIOS/UEFI to the latest version, as an outdated BIOS/UEFI may give rise to the 0xc1900101 error on Windows 11.
- Prepare an empty USB flash drive formatted with the FAT32 file system.
- Download the BIOS/UEFI update files from the manufacturer's website and save them to the empty USB flash drive. Note: If the downloaded file is compressed, unzip it and delete the original compressed file.
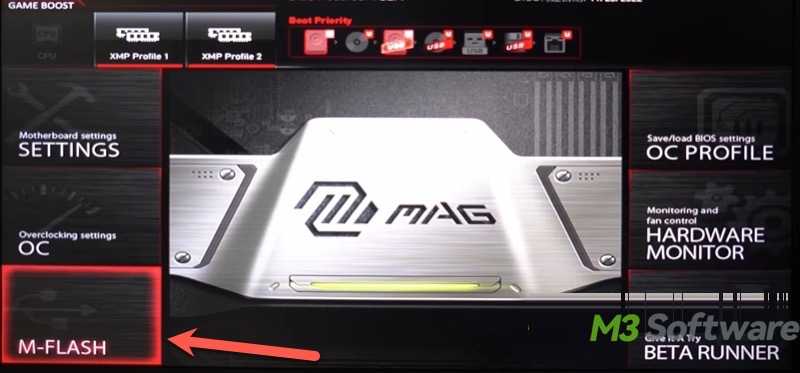
- Restart your PC and enter the BIOS/UEFI by continuously pressing the designated key (typically Del, F1, or F2).
- Under the advanced mode, go to the M-Flash section.
- Look for the target USB flash drive, and then select the BIOS/UEFI update files from the drive.
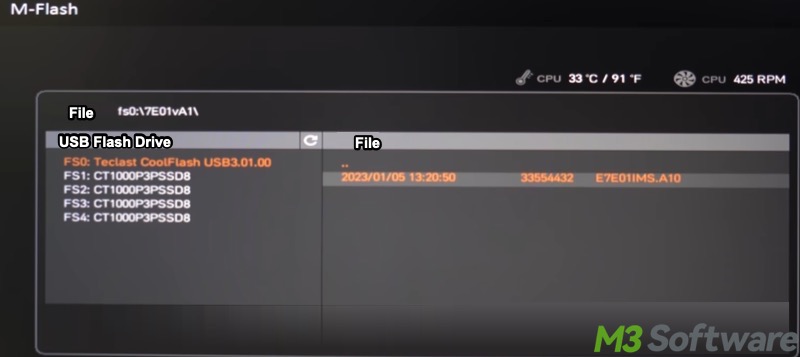
- Once the update files are selected, you'll be guided to follow the prompts to complete the update.
A
0xC1900101 error during a Windows 11 upgrade or upgrade is often caused by low disk space, driver-related issues, software conflicts, or BIOS misconfiguration, etc. To repair this error, you can try freeing up disk space, updating hardware drivers, disabling third-party antivirus, and ensuring Secure Boot is enabled.
A
You can download and install iBoysoft DiskGeeker for Windows, a professional disk management tool, to thoroughly scan your hard disk for junk files, large files, temporary files, and more.
A
The following operations are recommended before any Windows upgrade or update: 1. Disable third-party software, particularly the antivirus or security tools. 2. Ensure the system drive has sufficient free space. 3. Ensure the critical hardware drivers are up-to-date. 4. Use the SFC (System File Checker) and CHKDSK (Check Disk) tools to check if there is something wrong with the system files and disk errors.