
Written by
Wilsey YoungSummary: This post explains what a Local Disk D is, and also tells the main purposes of it. You can clean up Local Disk D via the Disk Cleanup tool or iBoysoft DiskGeeker for Windows.
When you use a computer, especially a computer with the Windows operating system, you often see different drives labeled with letters, such as "C:", "D:", and sometimes even "E:" or beyond. These labels represent different storage devices or partitions on your PC. Among these, the "Local Disk D:" is commonly found on many computers. But what exactly is it, and what is its purpose? You can keep reading this post to get more details.
To quickly clean up your Local Disk D, free download iBoysoft DiskGeeker for Windows to analyze disk space, and find and delete large files efficiently.
What is a Local Disk D?
To understand Local Disk D, it's essential first to distinguish local disks from disk partitions:
- Local Disks: These are storage areas in your PC that house your operating system, software, files, and other data. They can be hard drives (HDDs), solid-state drives (SSDs), or other internal storage devices. Local Disk D refers to a secondary partition or physical drive on your computer.
- Partitions: A single physical drive can be divided into multiple sections called partitions. Each partition can function as an independent disk drive with its own file system and data.
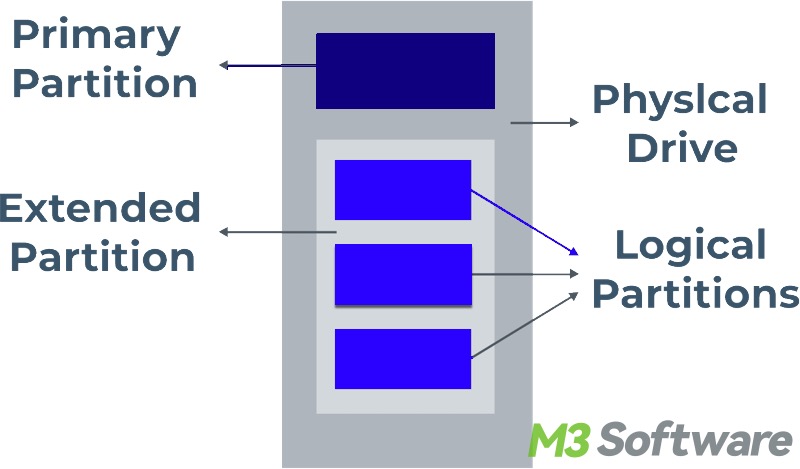
Now, to sum up, Local Disk D refers to a secondary partition or physical drive on your computer. To be clear, the letter D doesn't mean anything, and it's generally assigned as an identifier for the local disks that do not contain your Windows OS. That is to say, a local disk labeled with the letter C(Local Disk C:) is generally used to store your PC's operating system.
You can share this post to tell your friends about Local Disk D!
The usage of Local Disk D
The role and usage of Local Disk D can vary depending on your system configuration and personal preferences. Here are some common purposes for Local Disk D:
- Data storage: Many Windows users store personal files, such as documents, photos, videos, music, and more on Local Disk D, to separate them from the system files on the C: drive. This configuration helps manage data and makes it easier to back up or transfer files.
- Software installation: Some Windows users prefer to install software and applications on Local Disk D instead of the primary C: drive. This practice is conducive to managing disk space more effectively and can improve system performance.
- Large programs and editing tools: Designers and professionals using large software suites, like editing tools or development environments, are prone to use Local Disk D to store these large programs, ensuring they have sufficient space.
- Backup and recovery: Local Disk D: can serve as a backup location for important files and system images. By keeping backups on a separate partition or drive, you can protect your data in case the C drive encounters problems.
How to access the Local Disk D
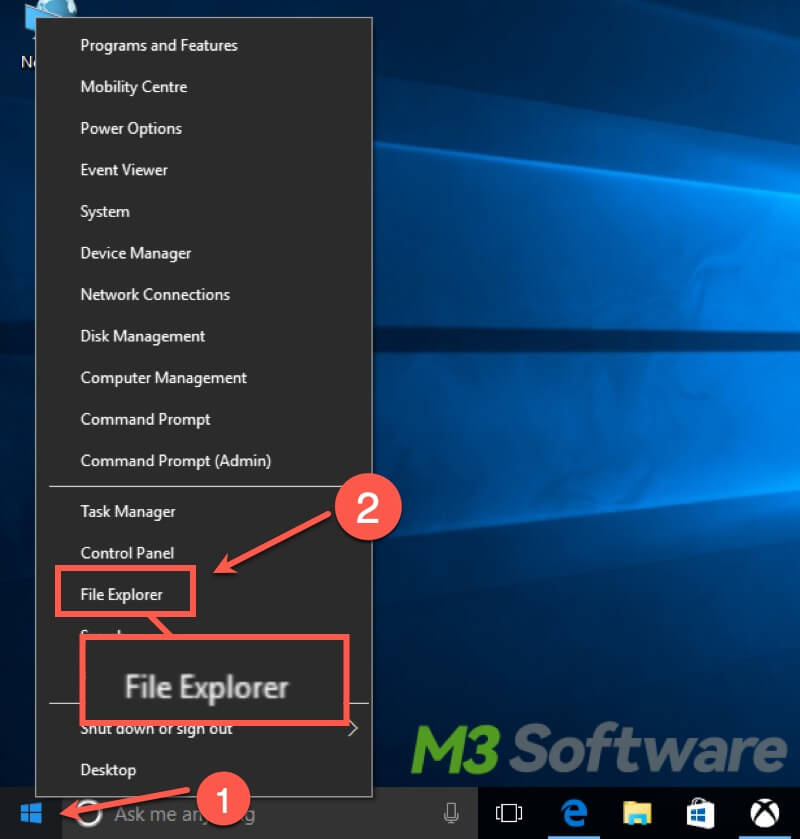
Accessing Local Disk D is quite simple, you can either use shortcut keys or mouse clicks to open File Explorer to access Local Disk D.
Access the Local Disk D
You can access Local Disk D through "This PC" or "My Computer" in File Explorer. You can follow the steps below to open File Explorer.
- Press the “Windows+E” keys to open “File Explorer” directly.
- Right-click on the “Start” menu or “Taskbar” to select “File Explorer”.
How to clean up your Local Disk D?
If the Local Disk C is full, your computer system may slow down and crash frequently. If the Local Disk D is crammed with stuff, you won't be able to install more software or applications, and you may face larger risks of losing important data. So it's best to clean up your Local Disk D regularly, the following contents show you how:
Disk space analysis and cleaning via iBoysoft DiskGeeker for Windows
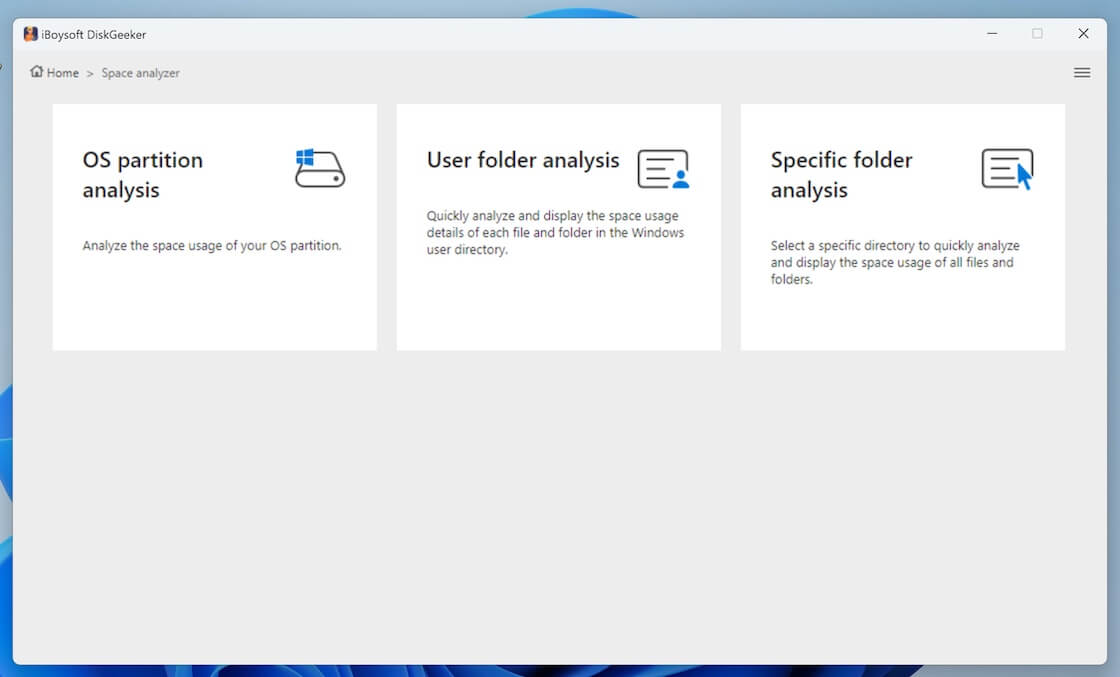
iBoysoft DiskGeeker for Windows is a handy and reliable disk management tool that contains the Space analyzer feature. It can easily analyze disk space for file cleaning. With this tool, you can quickly find large files in partitions or folders, and delete those large and useless files to free up more space.
- Free download, install, and launch iBoysoft DiskGeeker for Windows, then select “Space analyzer” in the main interface.

- Select the analysis feature and wait for the scanning to complete.
- Check the scanned results, and drag and drop the unwanted files into the Trash Bin at the bottom of the window.

- Click the “Delete” button to delete the files in Trash Bin.

You can share this wonderful disk management tool with your friends!
Built-in Disk Cleanup tool in Windows
Using the built-in Disk Cleanup tool to remove temporary and unnecessary files is a quick way to keep your PC clean. You can follow the steps below to run Disk Cleanup in File Explorer.
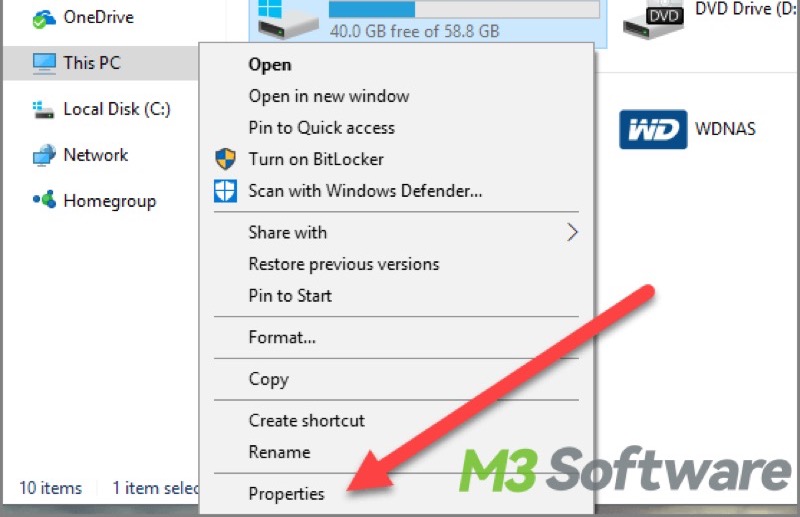
- Open the “File Explorer” and choose “This PC” on the left side panel.
- Right-click on the Local Disk C and choose “Properties”.
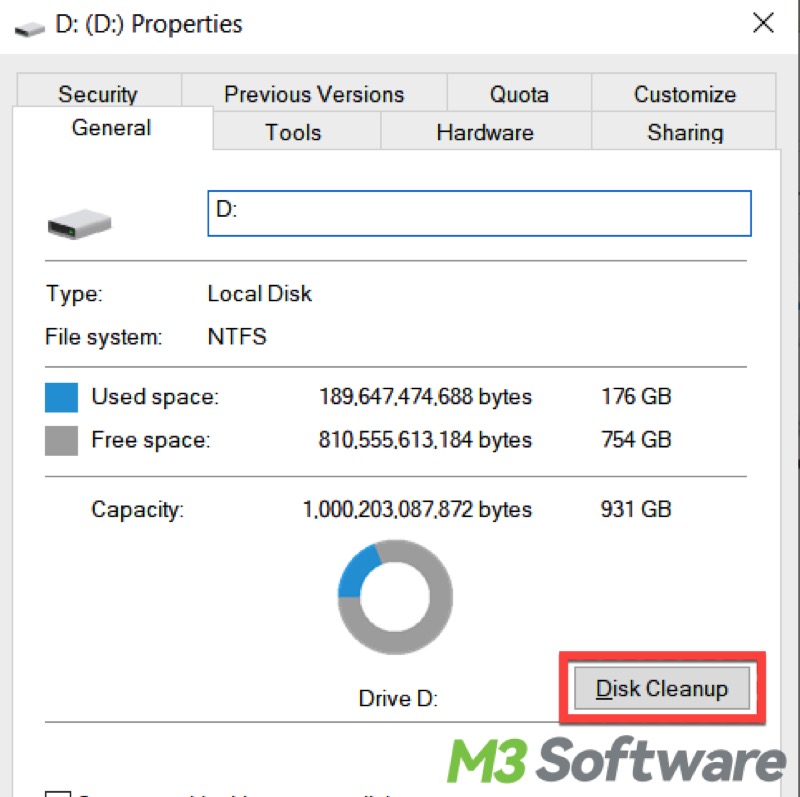
- Click “Disk Cleanup” and wait for the search and calculation.
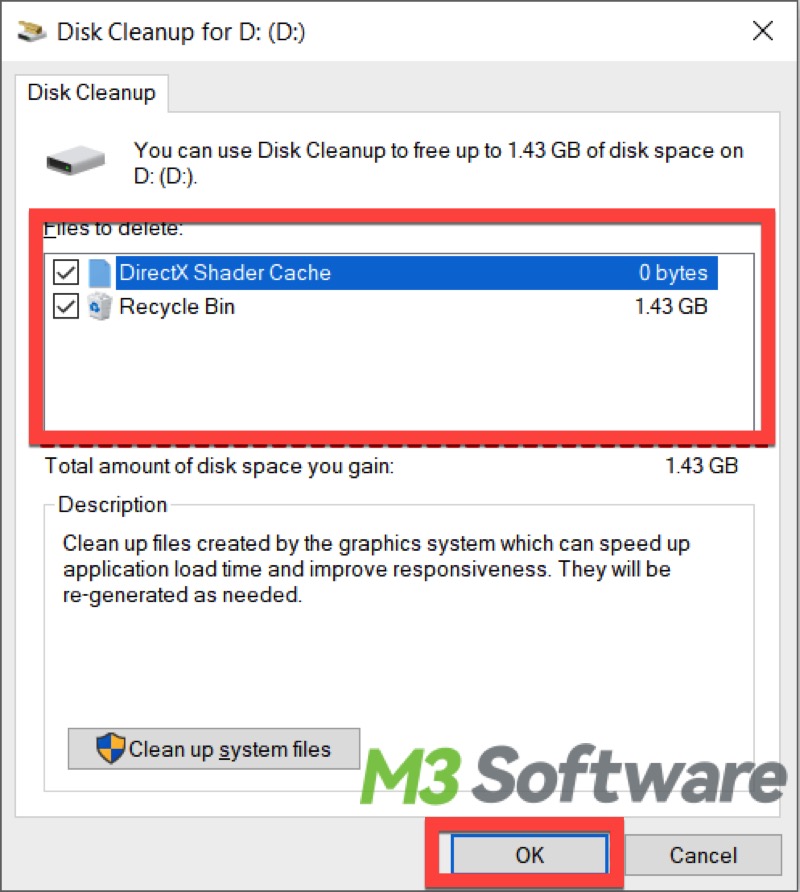
- Select the temporary files, Recycle Bin file, or others you want to remove, Click “OK” to let the cleanup begin.
How to add Local Disk D in Windows 10
If your PC's system doesn't already have a Local Disk D, you can create one by partitioning an existing drive:
- Right-click on the “Start” menu or press the “Windows+X” keys and select "Disk Management".

- Right-click on an existing partition (like C:) and select "Shrink Volume." Follow the prompts to shrink the partition, which allows you to give enough unallocated space to Local Disk D.

- Once you have unallocated space, right-click on it and choose "New Simple Volume."
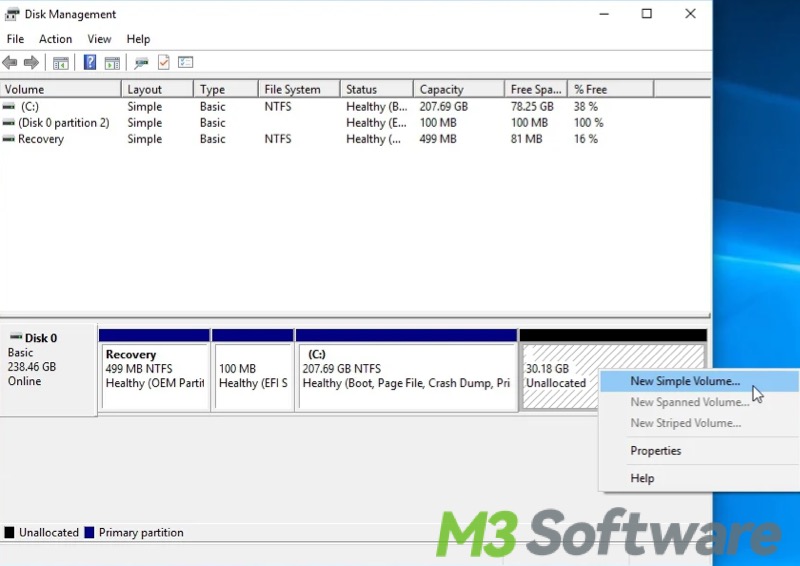
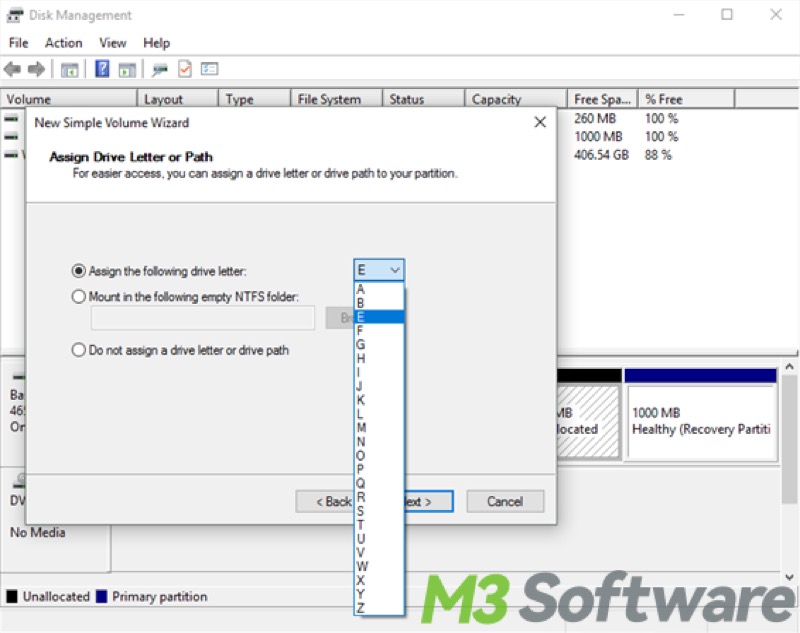
- Follow the wizard to assign a drive letter, you should choose the letter D if it's available. Click “Next” to continue.
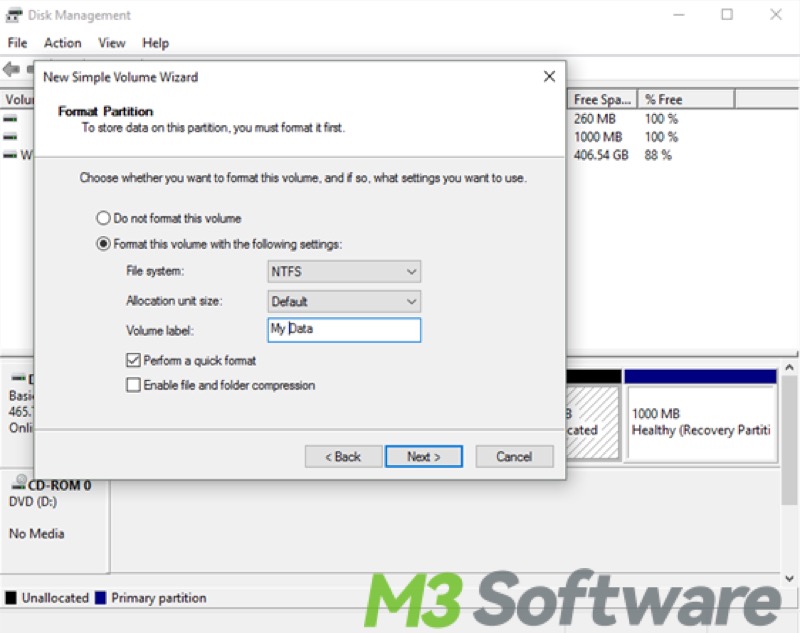
- Format the partition, and it's recommended to select the NTFS file system, and click “Next”.
Conclusion
Local Disk D plays an important role in computer systems, offering a dedicated space for data storage, software installation, backups, and more. By using the Local Disk D effectively and rationally, you can enhance your PC's performance, and data security. Understanding and managing your local disks and partitions is key to maintaining a well-functioning and efficient computing environment.
If you find this article helpful enough, you can click buttons below to share!