iBoysoft Cleaner for Windows Help Document
Help Document
- Overview
- Supported Operating Systems
- How to Download & Install iBoysoft Cleaner for Windows?
- How to Activate iBoysoft Cleaner for Windows?
- How to Clean Up System Junk on Your PC?
- How to Manage Disk Space Usage?
- How to Manage Applications on Your PC?
- How to Manage Startup Items and Optimize Startup Speed?
- How to Manage CPU & Memory Usage on Your PC?
- How to Check Disk Read/Write Speed?
- FAQ
Overview
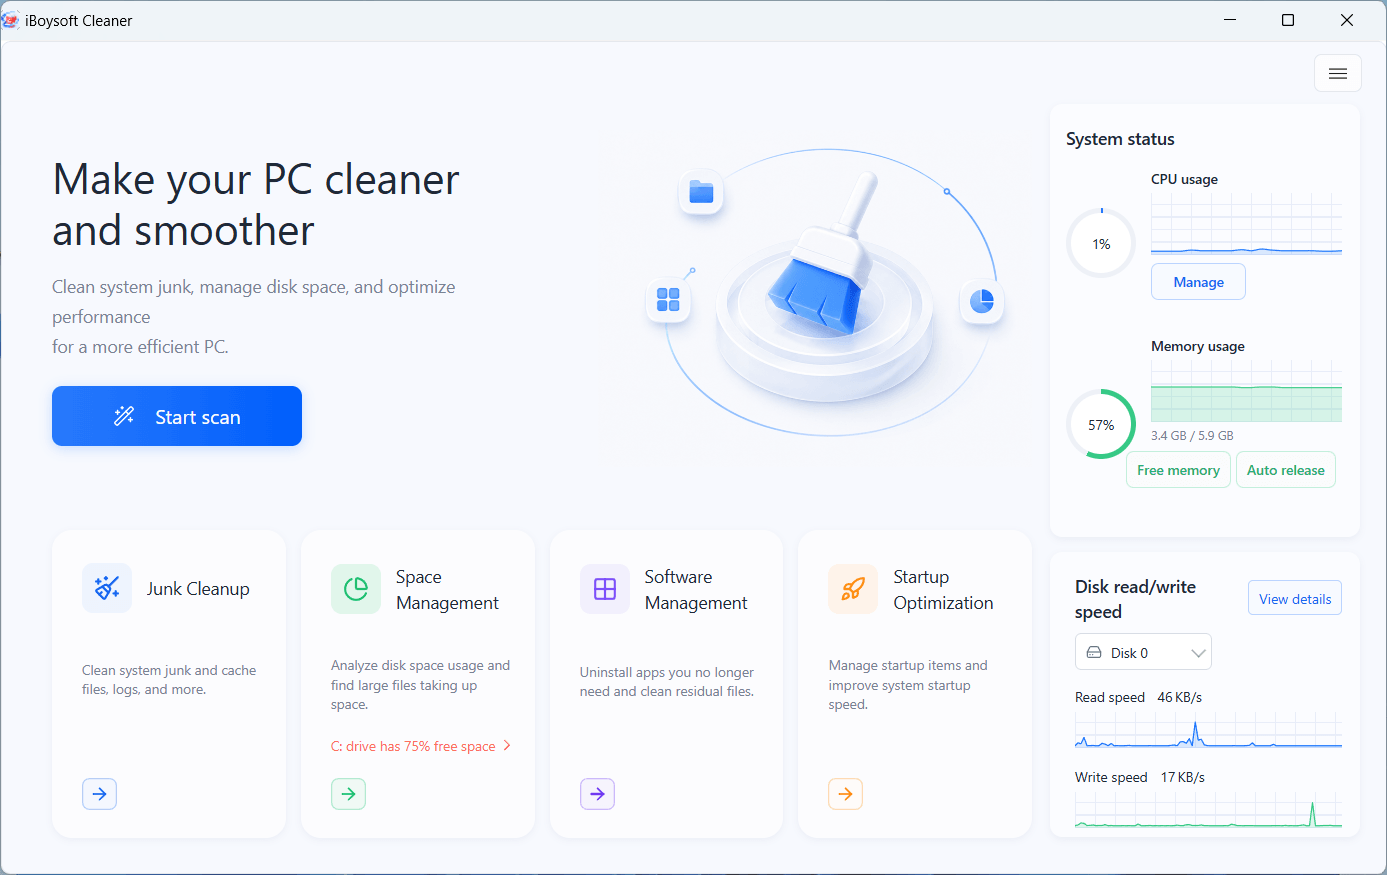
iBoysoft Cleaner for Windows is a PC cleaner and optimizer. It focuses on cleaning up system junk, managing disk space, managing apps and startup items, and optimizing system performance.
It provides four primary functionalities:
- C Drive Junk Cleanup
- Disk Space Management
- Software Management
- Startup Optimization
Additional utilities include memory (RAM) usage monitoring and release, CPU usage monitoring and process management, and real-time disk read/write speed monitoring.
Supported Operating Systems
Windows 11, Windows 10, Windows 8.1, Windows 8, Windows 7 (64-bit processors)
Windows Server 2022, Windows Server 2019, Windows Server 2016, Windows Server 2012, Windows Server 2008 (64-bit processors)
How to Download and Install iBoysoft Cleaner for Windows?
Step 1: Free download iBoysoft Cleaner for Windows from https://www.m3datarecovery.com/download/
Step 2: Double-click the installer to open it.
Step 3: Follow the on-screen instructions to complete the installation.
Step 4: The software will launch automatically.
How to Activate iBoysoft Cleaner for Windows?
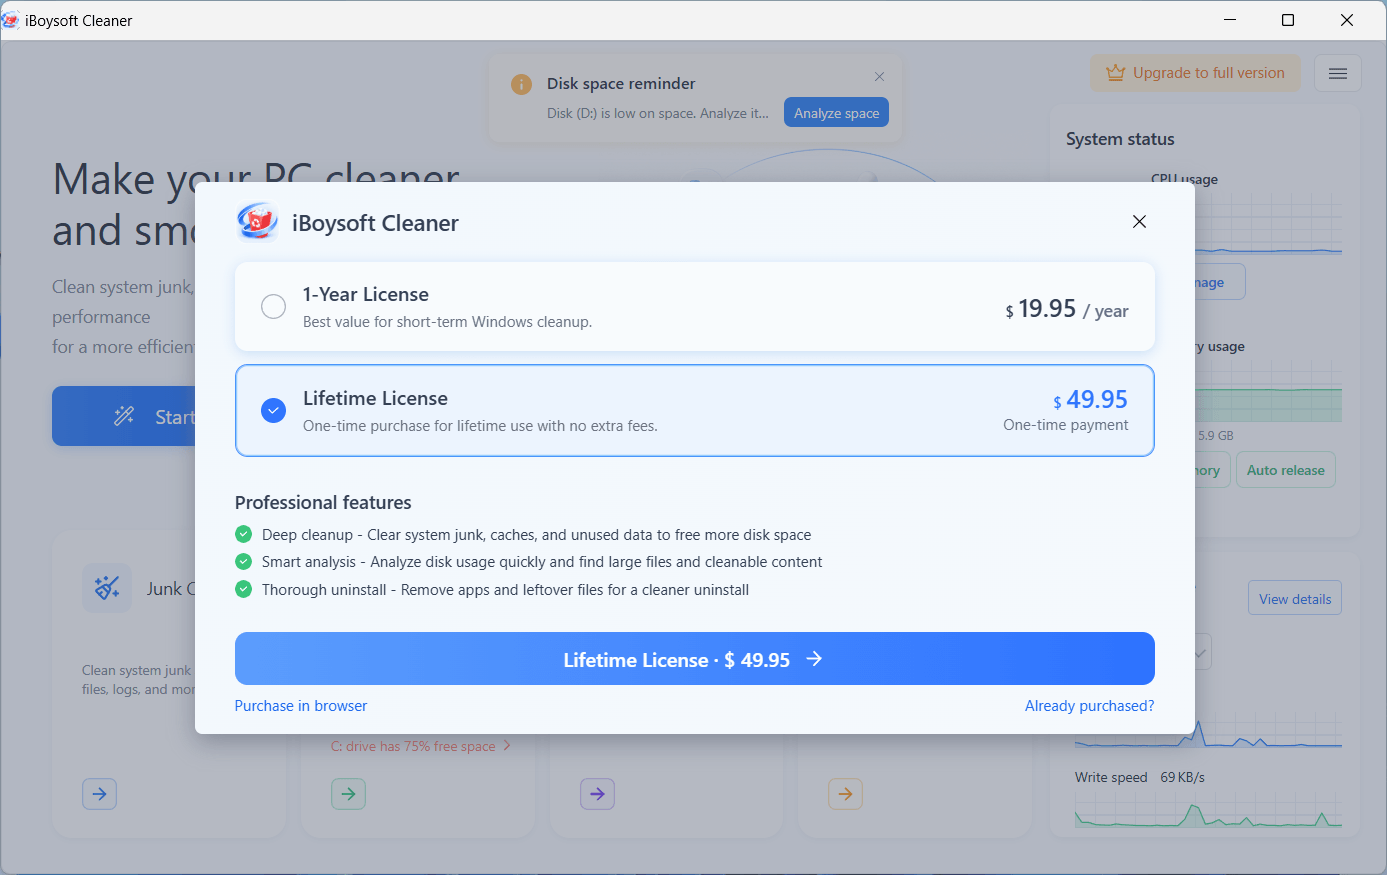
1 GB of free daily system junk cleanup is available for all users before purchasing. To experience unlimited system junk cleanup and enhanced functions, please purchase a license from our online store or in the app.
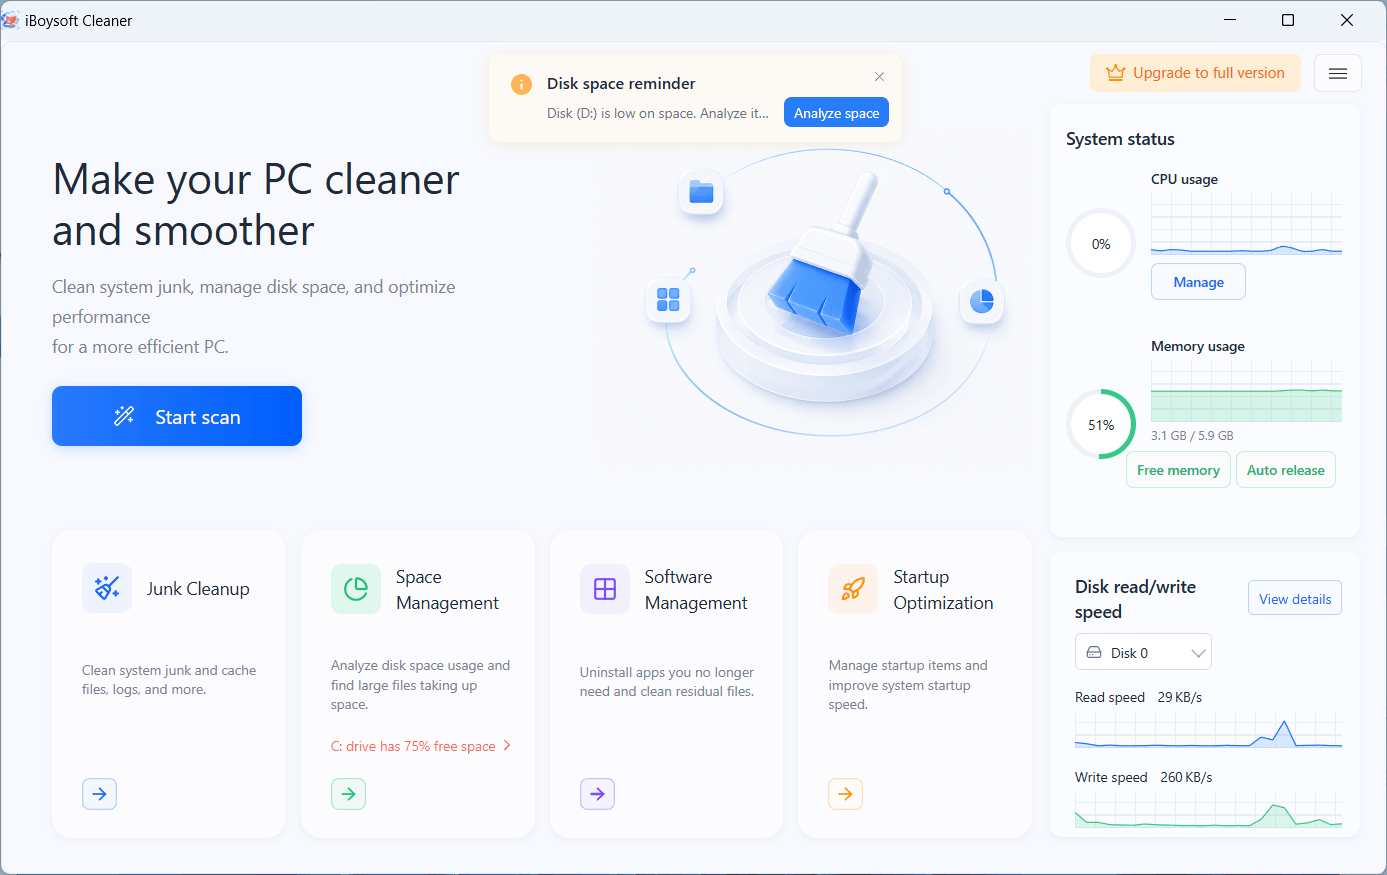
Step 1: Click "Upgrade to full version" in the upper-right corner and purchase a license.
Step 2: Copy the license key from your order confirmation email.
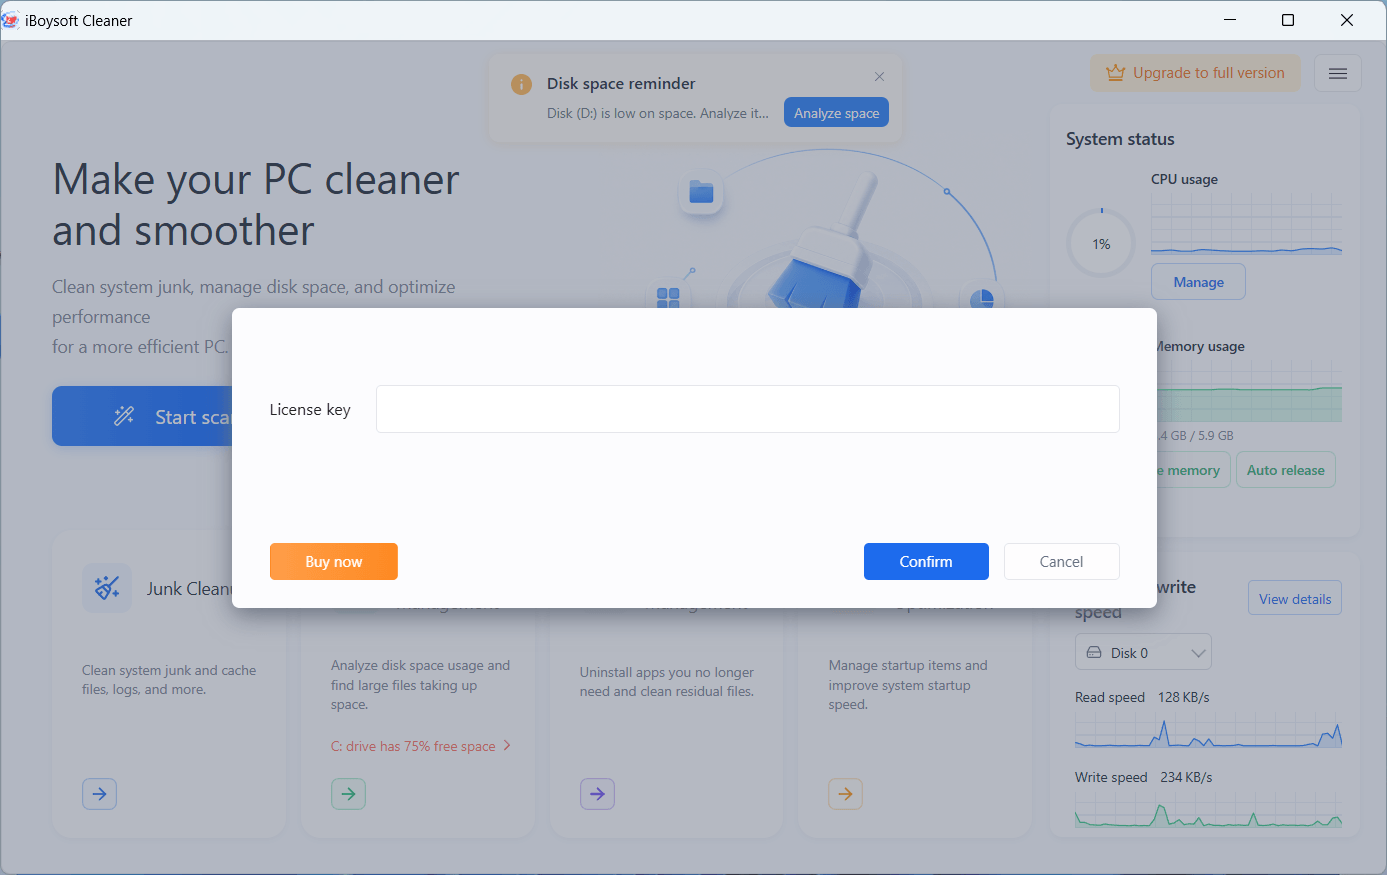
Step 3: Click the three stub lines in the upper-right corner > "Activate."
Step 4: Paste the license key and click "Activate."
How to Clean Up System Junk on Your PC?
The Junk Cleanup feature scans your C: drive for unnecessary files, including system cache, outdated components, logs, temporary files, app cache, and leftover files. It categorizes the results and intelligently selects safe-to-delete files for quick review and one-click cleanup.
Step 1: Click "Start scan" or "Junk Cleanup."
Step 2: Wait for the scanning to complete.
Step 3: Check the scanning results.
The software groups the files into categories and smartly selects files that can be safely deleted. You can check them by category.
Among them, system cache, system components, logs & dumps, temporary data, Recycle Bin files, app cache, and uninstalled app residuals are safe to delete and won't affect system or app performance.
Personal files, large files, applications, and chat records from chat tools may contain necessary files and remain unselected for your review.
You can click "Details" next to each group of cleanable files to view what is selected.
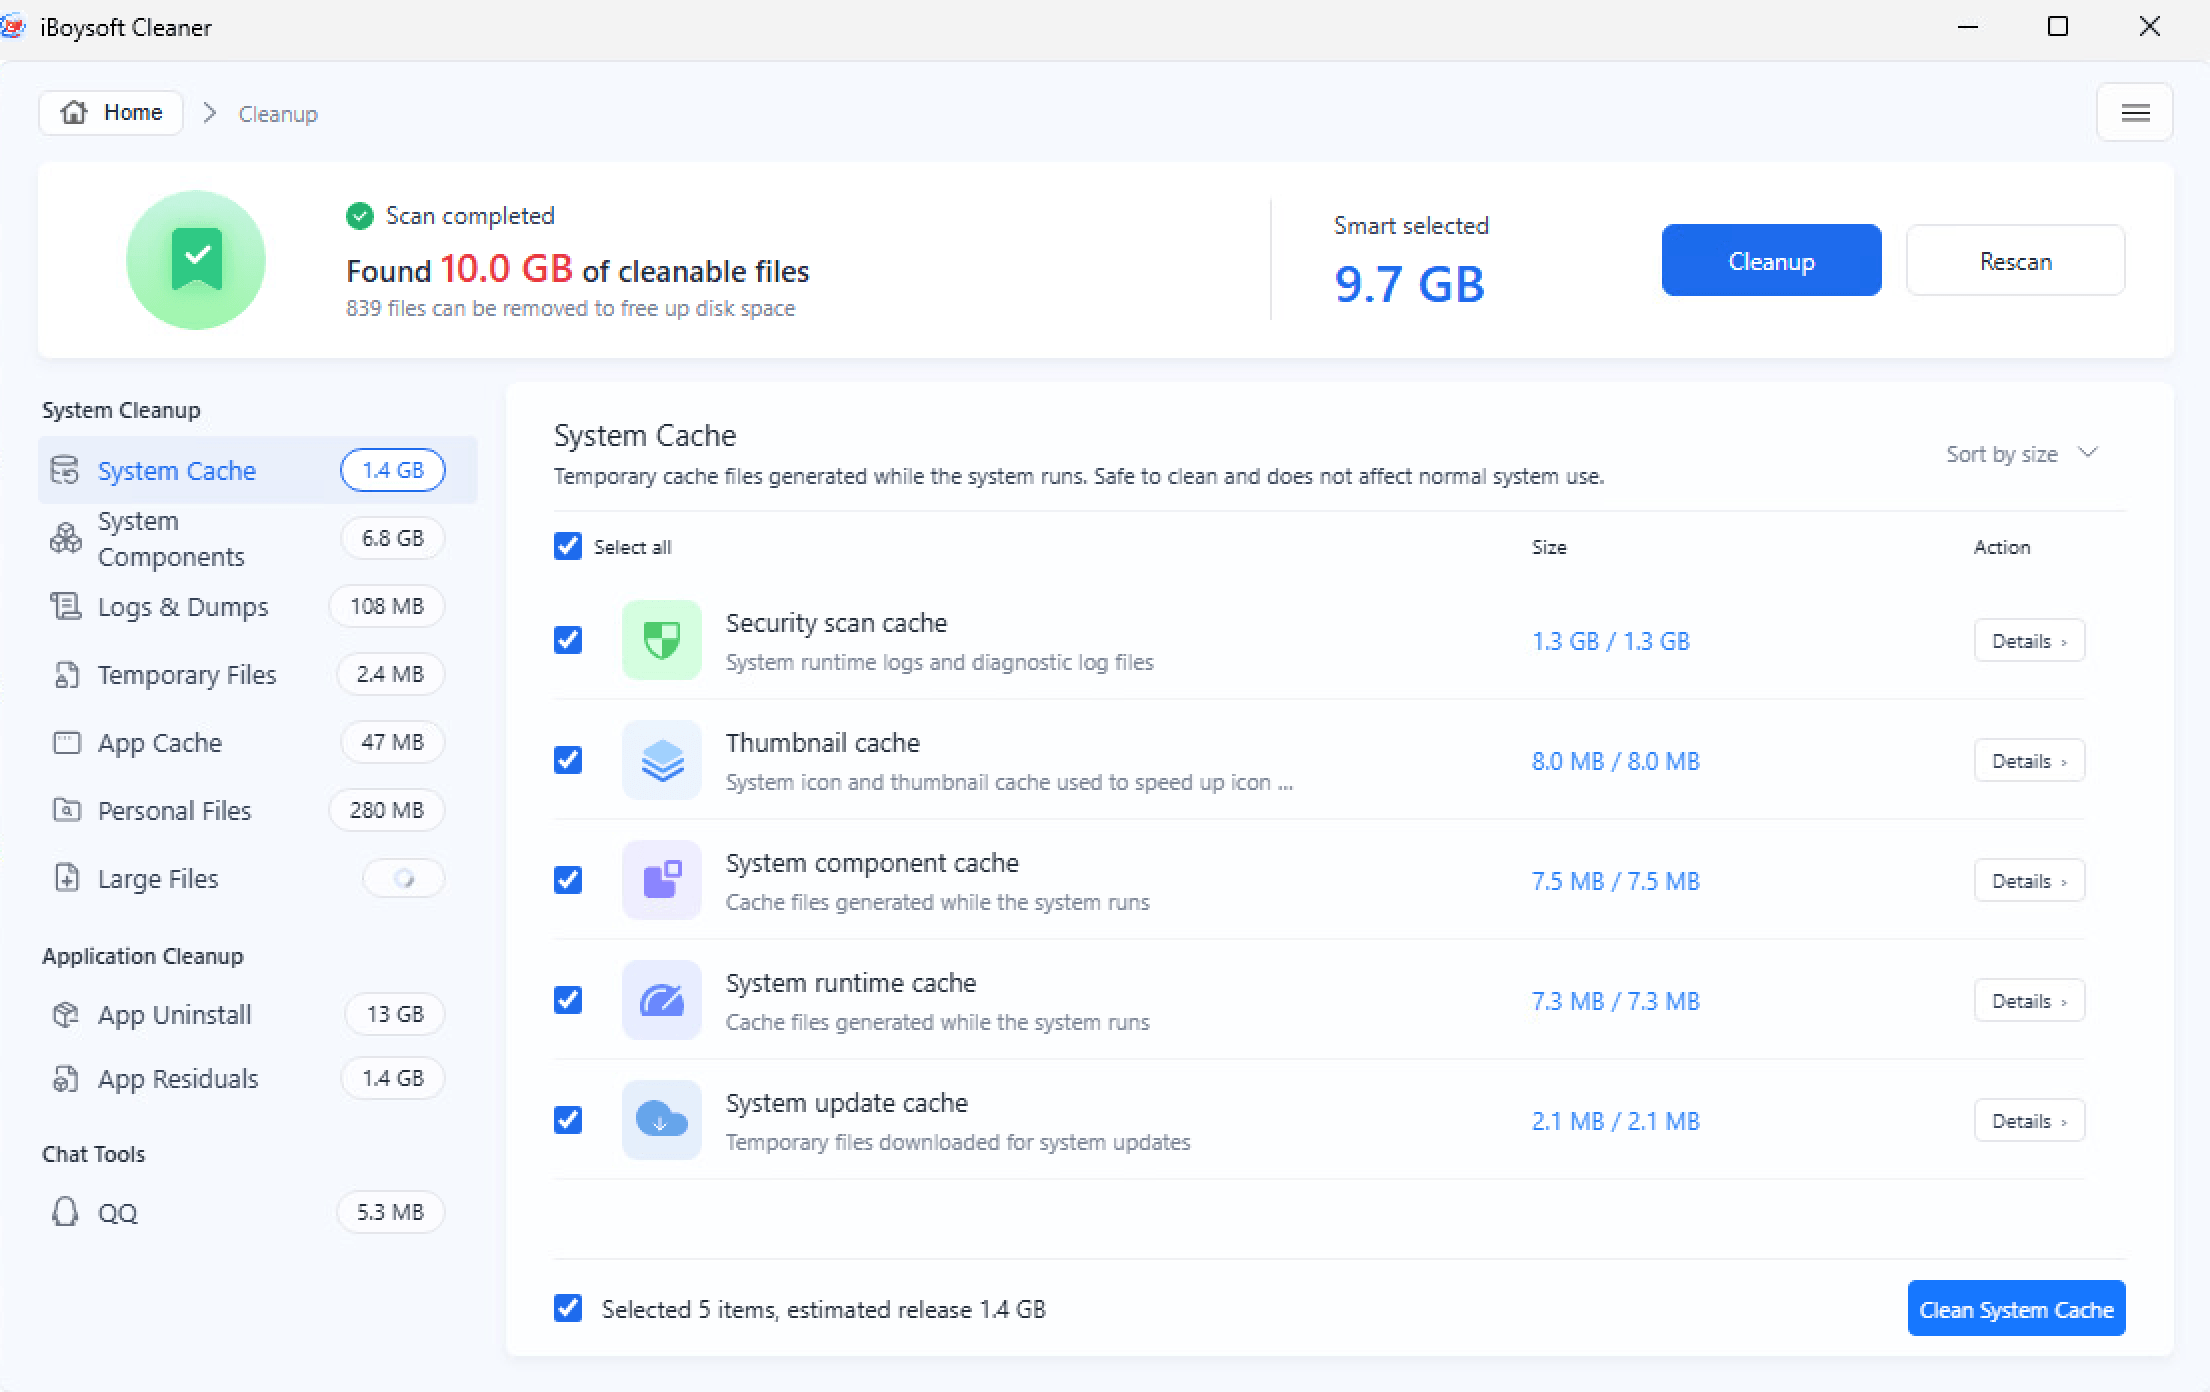
System Cache: Temporary cache files generated during system runtime, including system update cache, security scan cache, system component cache, thumbnail cache, and system runtime cache.
System Components: Old system components, update leftovers, and reclaimable component caches.
Logs & Dumps: System logs, error reports, and dump files.
Temporary Files: Temporary files are generated during the system runtime.
App Cache: Cache data generated by apps.
Personal Files: Categorized personal files, such as images, audio, downloads, Recycle Bin files, etc.
Large Files: Files that take up a lot of space. On-demand AI Analysis button is available for understanding whether you can delete the large file.
App Uninstall: All system and third-party apps. You can click the drop-down menu to show only system apps or only third-party (normal) apps.
For some third-party apps, you can click "Move" to move them to another local partition, but you can't move them to the C drive, an external drive, or a virtual disk partition. System apps can only be uninstalled, but can't be moved.
By default, all the app-related files are scanned, including cache files, program files, and data files. You can click "Details" to check them.
App Residuals: Caches, settings, and temporary files left by previously uninstalled apps.
Chat Tools: Cache files generated by chat tools and chat records, such as images, documents, and videos.
Step 4: After confirmation, click "Cleanup" > "Clean" to delete all the selected files at a time.
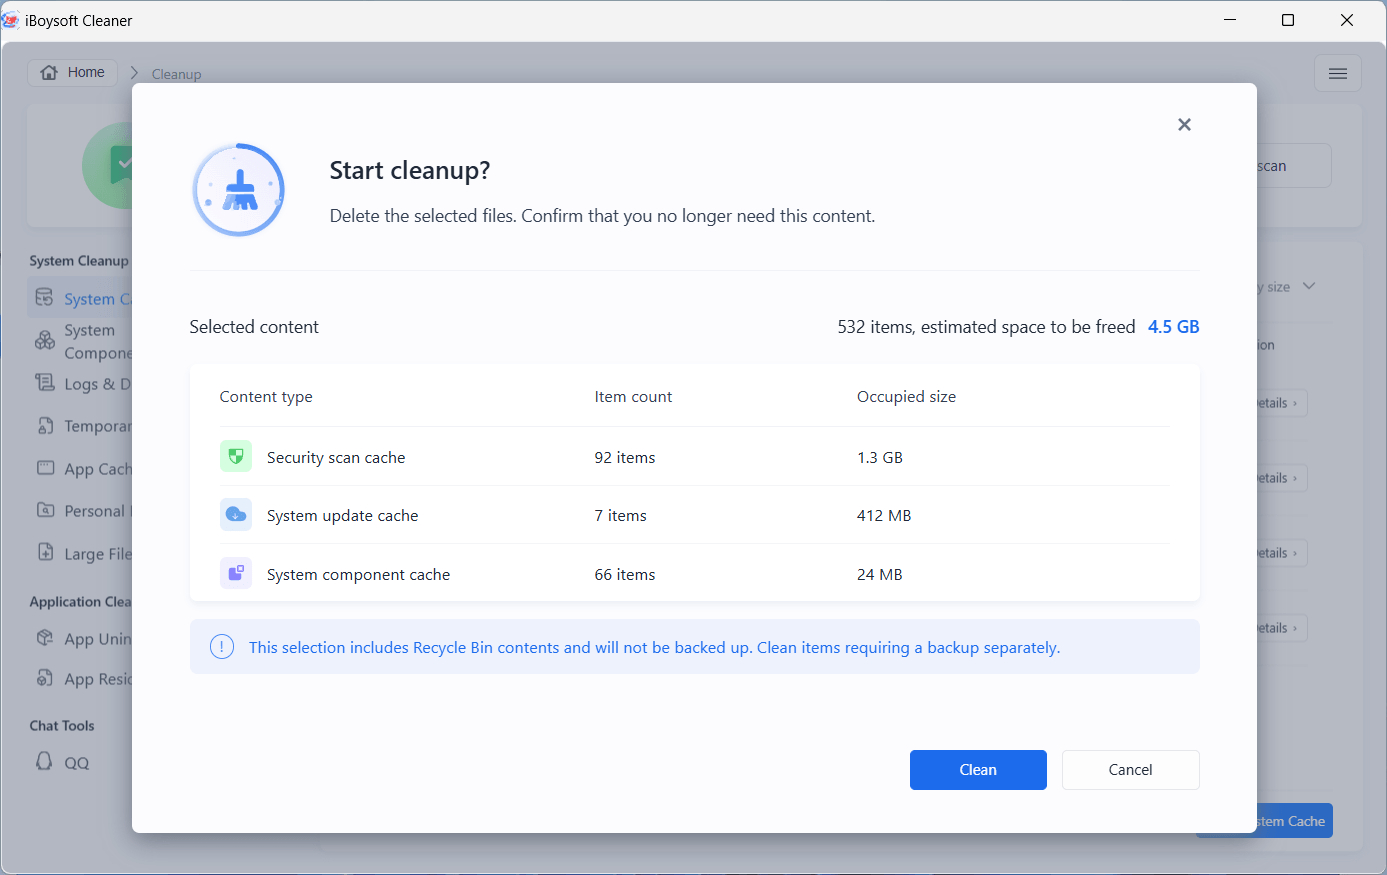
Or, you can delete files by category.
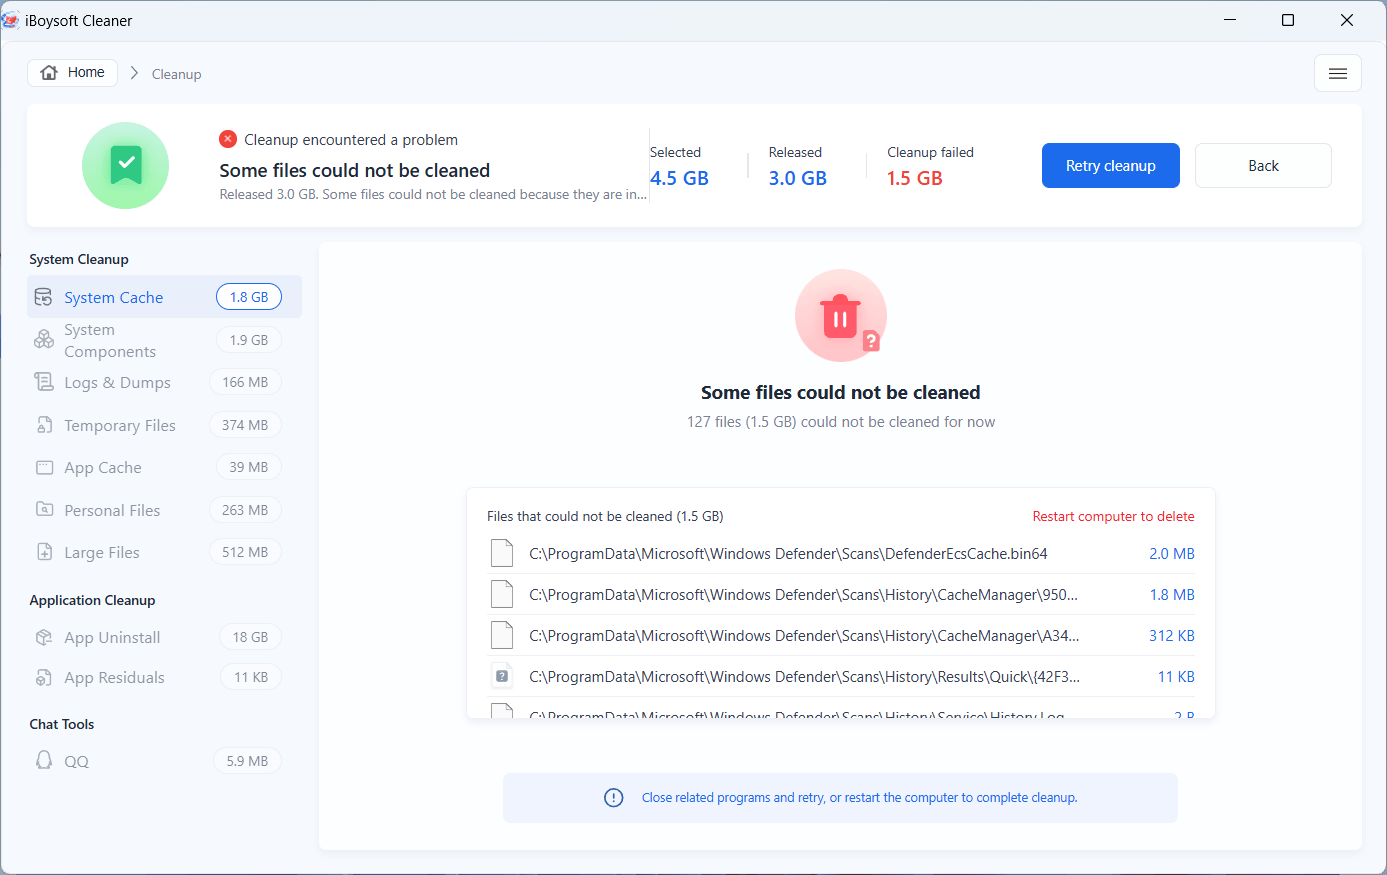
If you fail to delete some files, check the warning to find the reasons and try again.
How to Manage Disk Space Usage?
Space Management helps you analyze and manage space on your C drive, other partitions, or individual folders.
Step 1: Click "Space Management."
Step 2: Select your C drive, a specific partition, or a folder and click "Confirm" to start the scan.
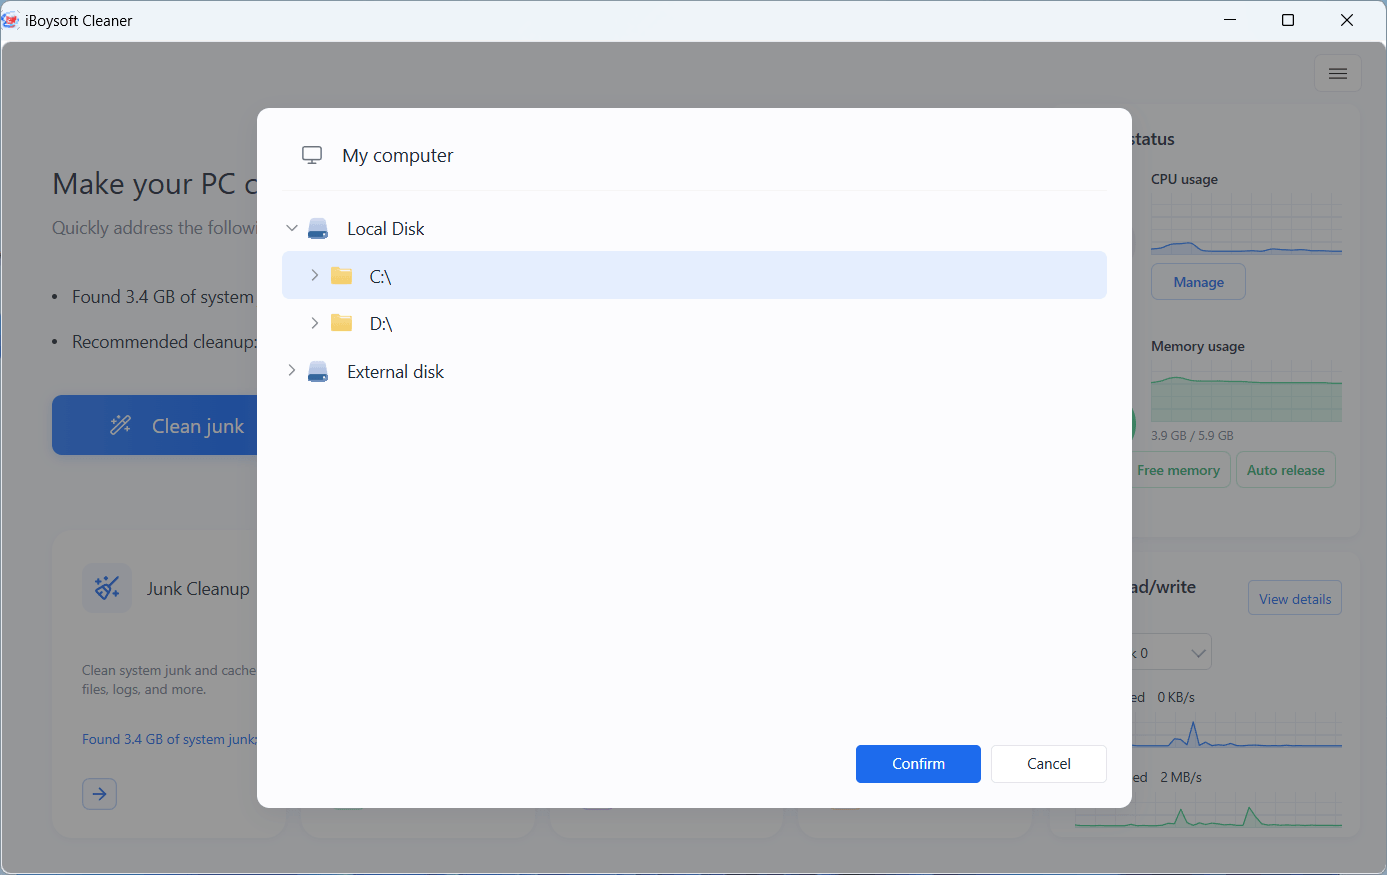
Step 3: Wait for the scanning process to complete.
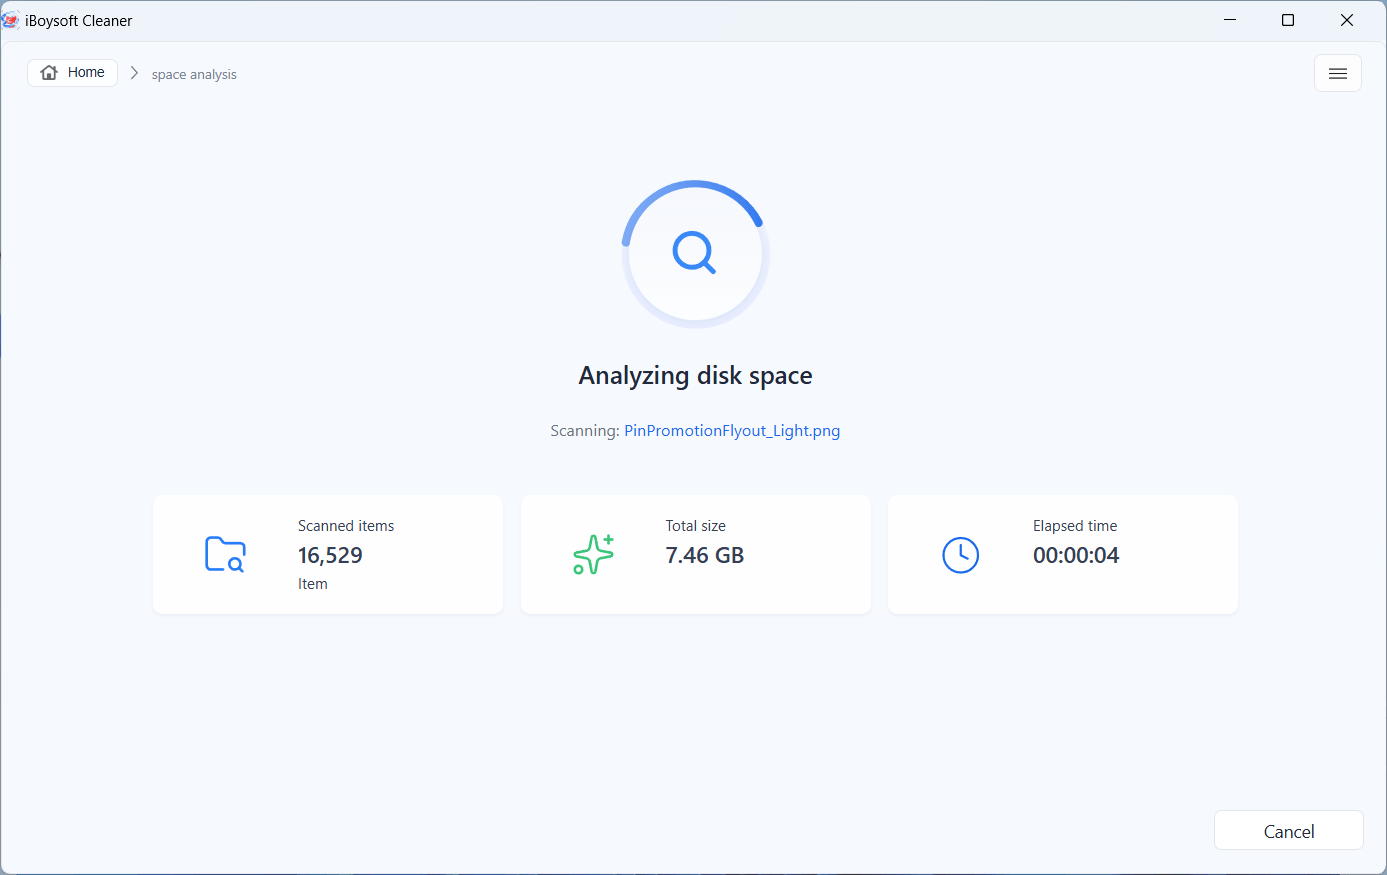
Step 4: Check the results.
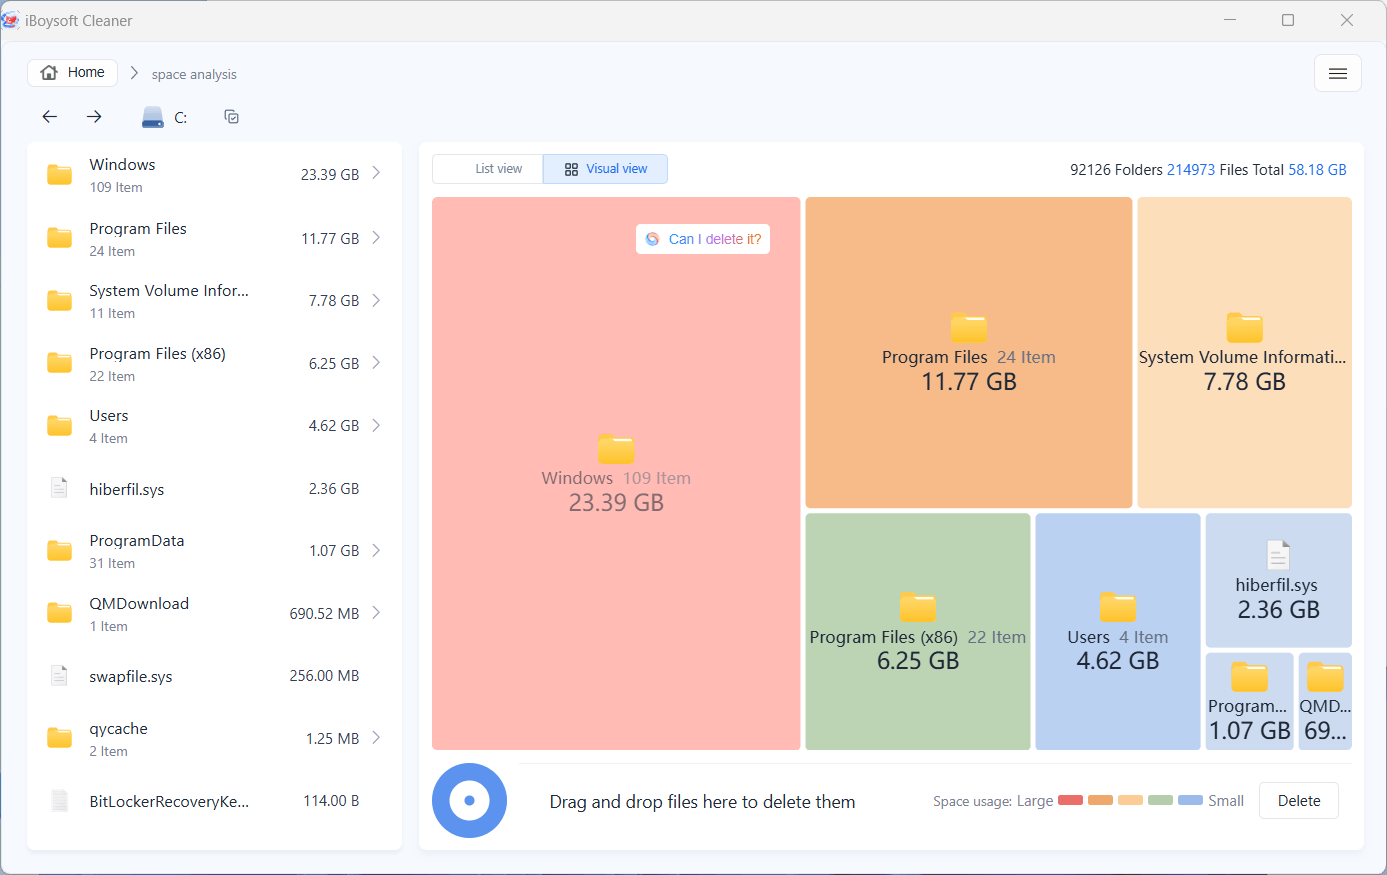
By default, the results are in visual mode.
View storage usage in visual or list formats, with color-coded file sizes for easy identification.
In visual mode, both panes show the same directory level, with the right pane visualizing the files listed in the left pane.
In list mode, the software displays up to three directory levels along the current path, showing all available levels if fewer than three exist.
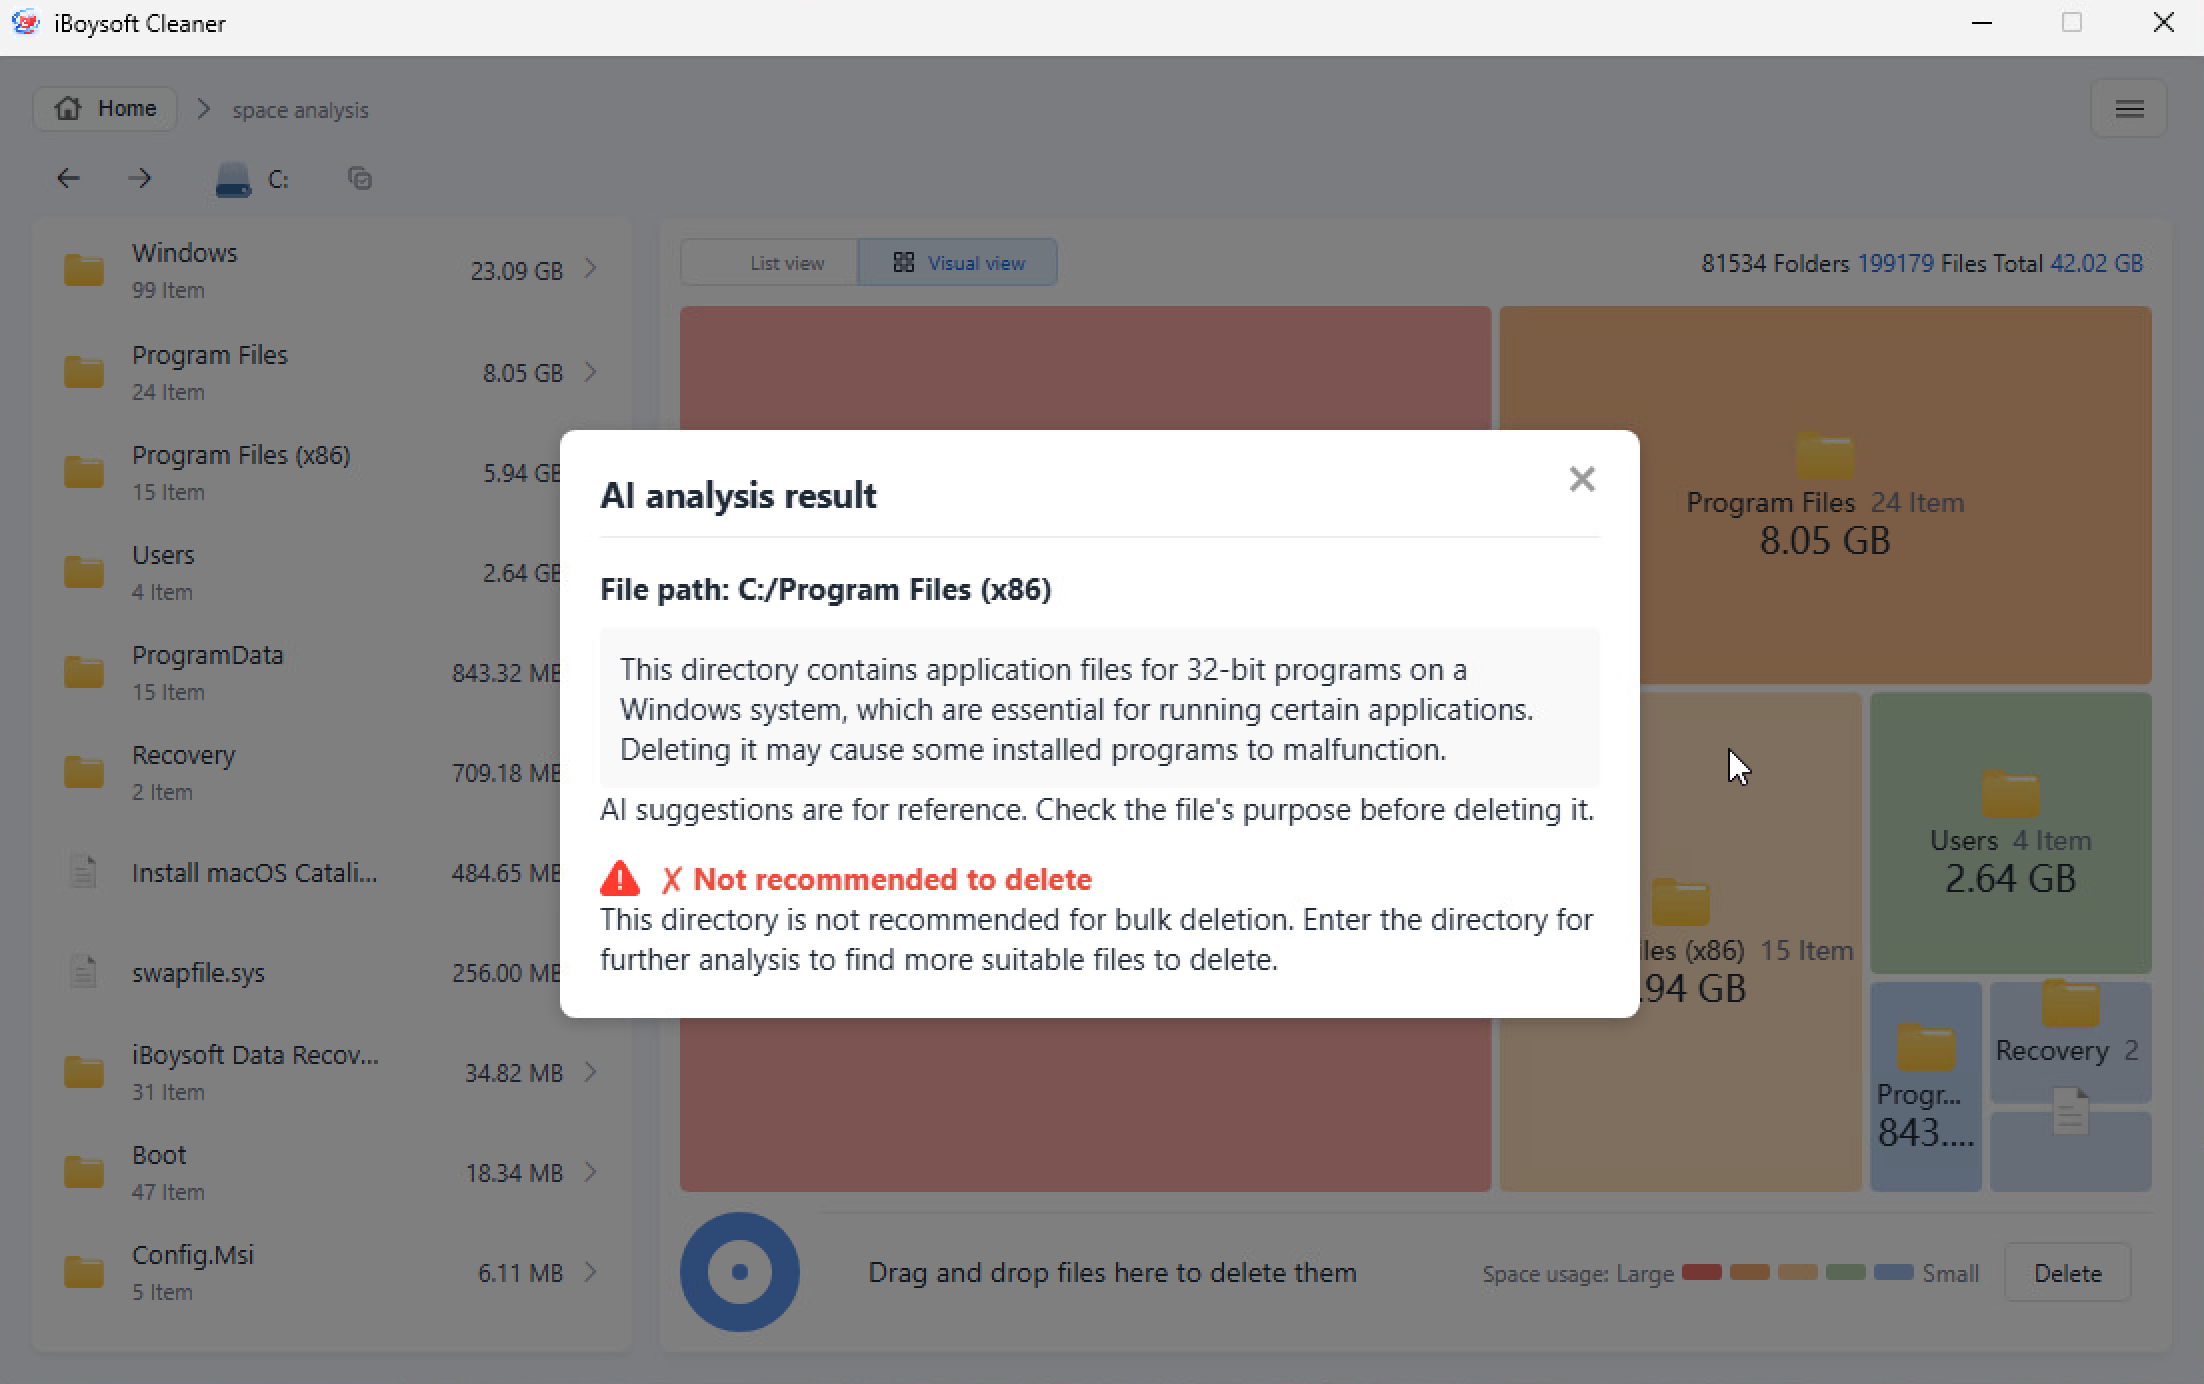
Click the AI analysis icon next to any file or folder to see what it is and whether it's safe to delete.
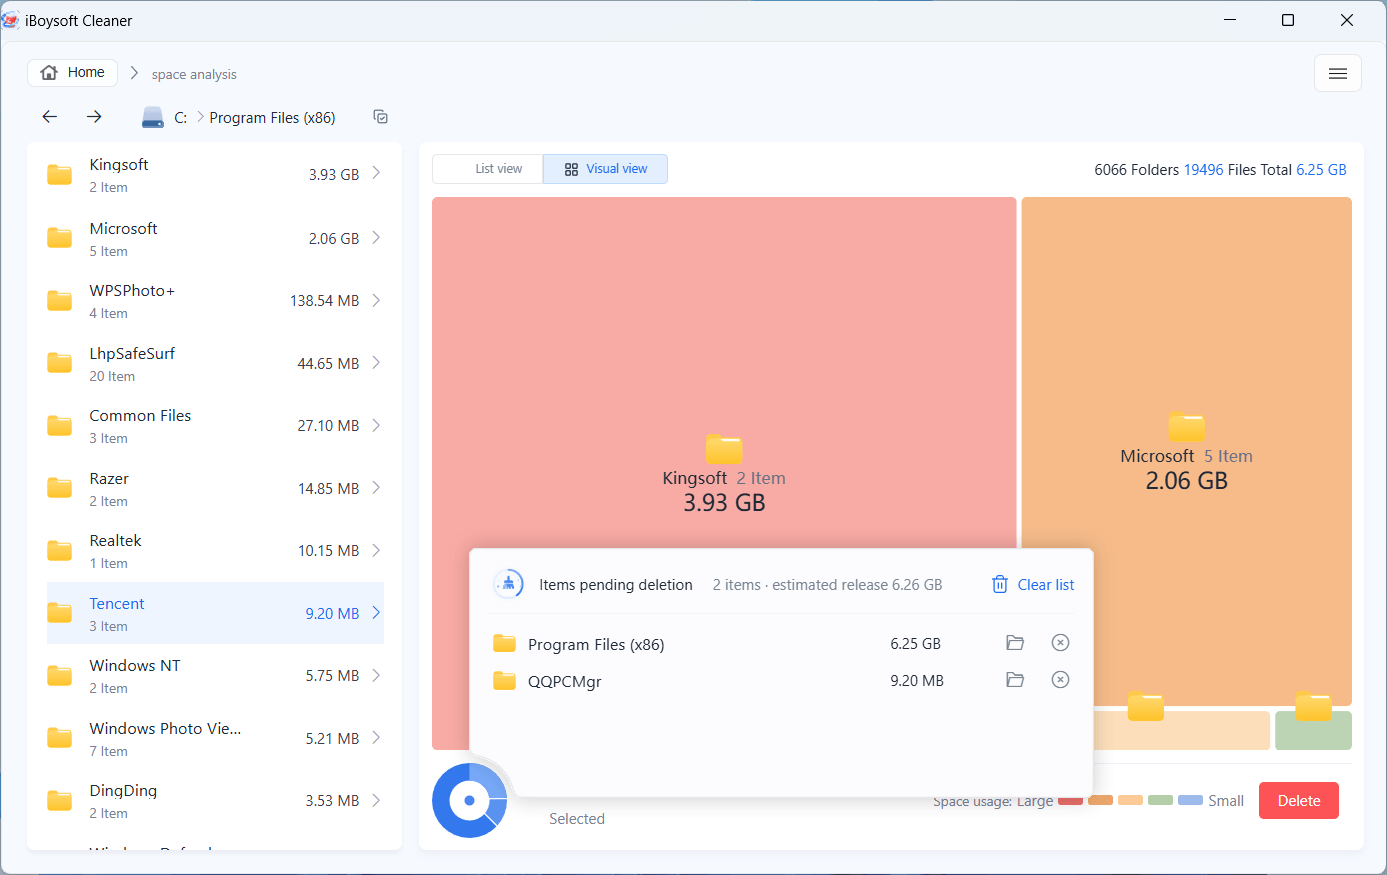
Step 5: Drag and drop what you want to delete to the collection box (the blue circle) and click "Delete."
To restore a file from the blue collection box, open it and click the Remove button next to the file.
🔔 Note: If deletion fails, click the file path in the prompt to locate the file and identify the issue. Common causes include read-only files or files currently in use.
How to Manage Applications on Your PC?
Software Management scans and organizes installed apps by download source, publisher, or size. It lets you uninstall apps using their built-in uninstallers, move them to another location, and clear individual or multiple apps' caches in one click.
Step 1: Click "Software Management."
Step 2: Wait for the scan to complete.
Step 3: Check the results.
By default, it displays all installed applications. Click the categories in the left sidebar, including Store, Non-store, By publisher, and By size, to check the applications by group.
App Residuals lists leftovers from previously uninstalled apps. You can clear them.
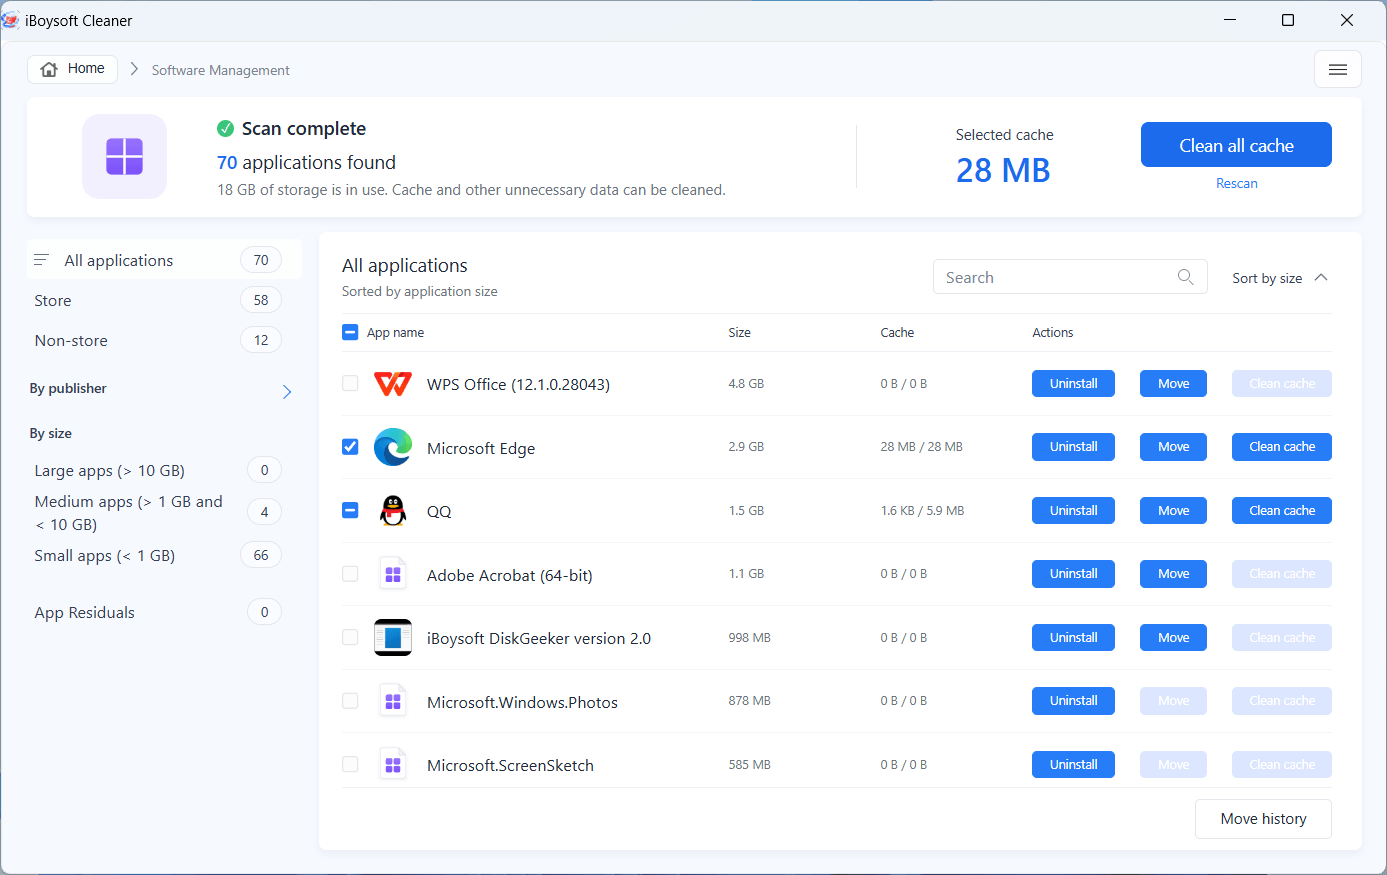
Step 4: Step 4: Manage the target apps.
① Uninstall apps: Click "Uninstall" next to the unnecessary application to uninstall it. iBoysoft Cleaner for Windows will use the app's built-in uninstaller and its own technology to finish the task, ensuring the app is completely uninstalled.
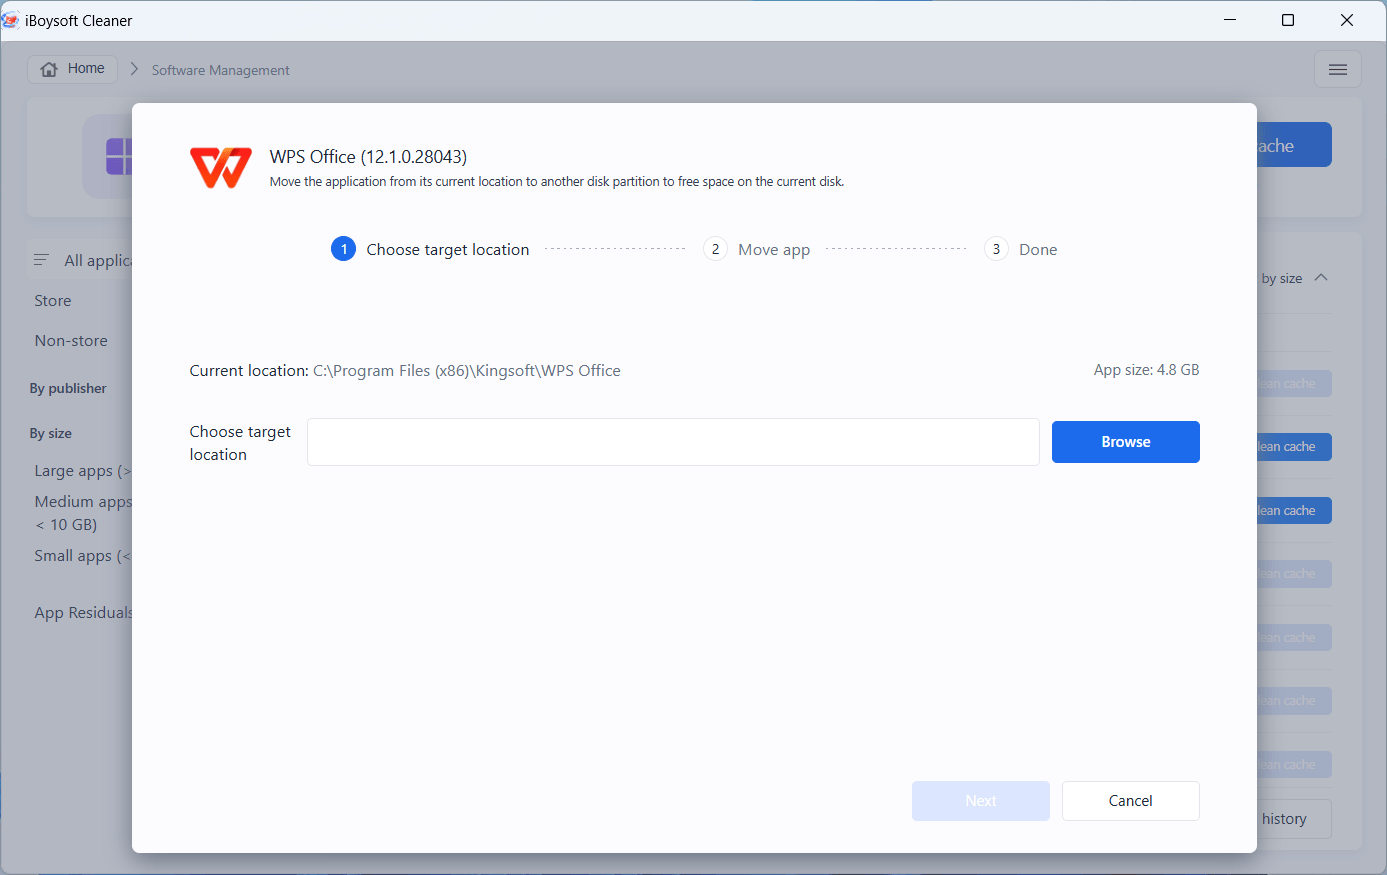
② Move apps: Click "Move" next to the application and select a location to move it to another local partition.
🔔 Note:
⚠️ You can't move it to the C drive, an external drive, or a virtual disk partition. System apps can't be moved.
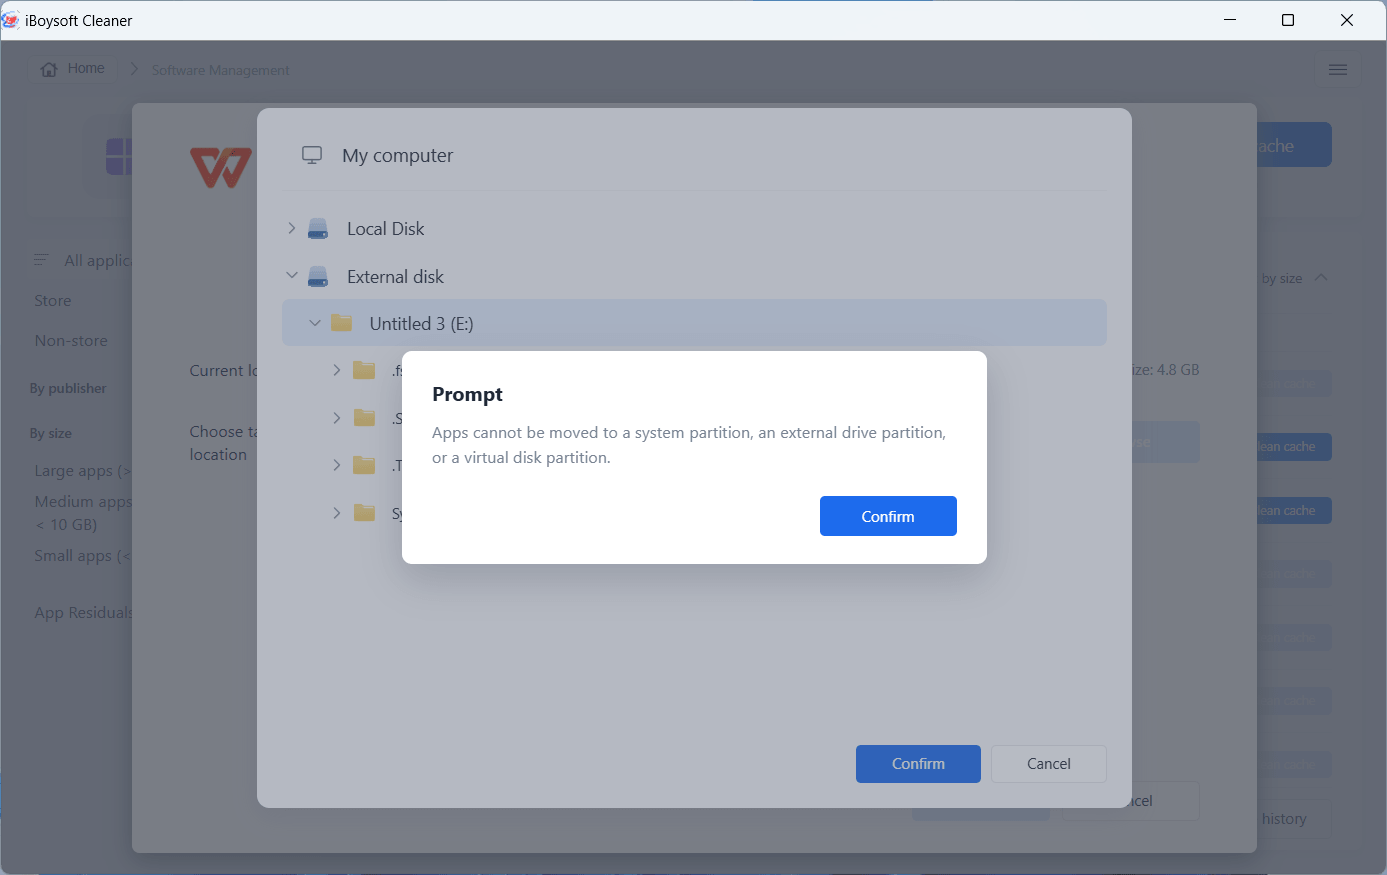
⚠️ Close the app before relocating it to prevent failures.
⚠️ Relocation may also fail due to insufficient space at the destination, an existing copy in the destination, app or destination permission issues, or app locks.
⚠️ After moving, you can review relocation history and roll back changes if needed. Note that rollback may involve risks.
③ Clean app cache: Click "Clean cache" next to an app to clear its cache, or select multiple apps and click "Clean all cache" to clear them at once.
How to Manage Startup Items and Optimize Startup Speed?
Startup Optimization scans system startup and background items, organizing them into four categories: startup apps, scheduled tasks, context menu entries, and Windows services. You can enable or disable individual items or manage them in batches.
Step 1: Click "Startup Optimization."
Step 2: Wait for the scan to finish.
Step 3: Review the results.
In the results pane, it shows all the startup items by default. You can quickly review the items it recommends you disable safely in "Recommended," all the enabled items in "Enabled," and all the disabled items in "Disabled."
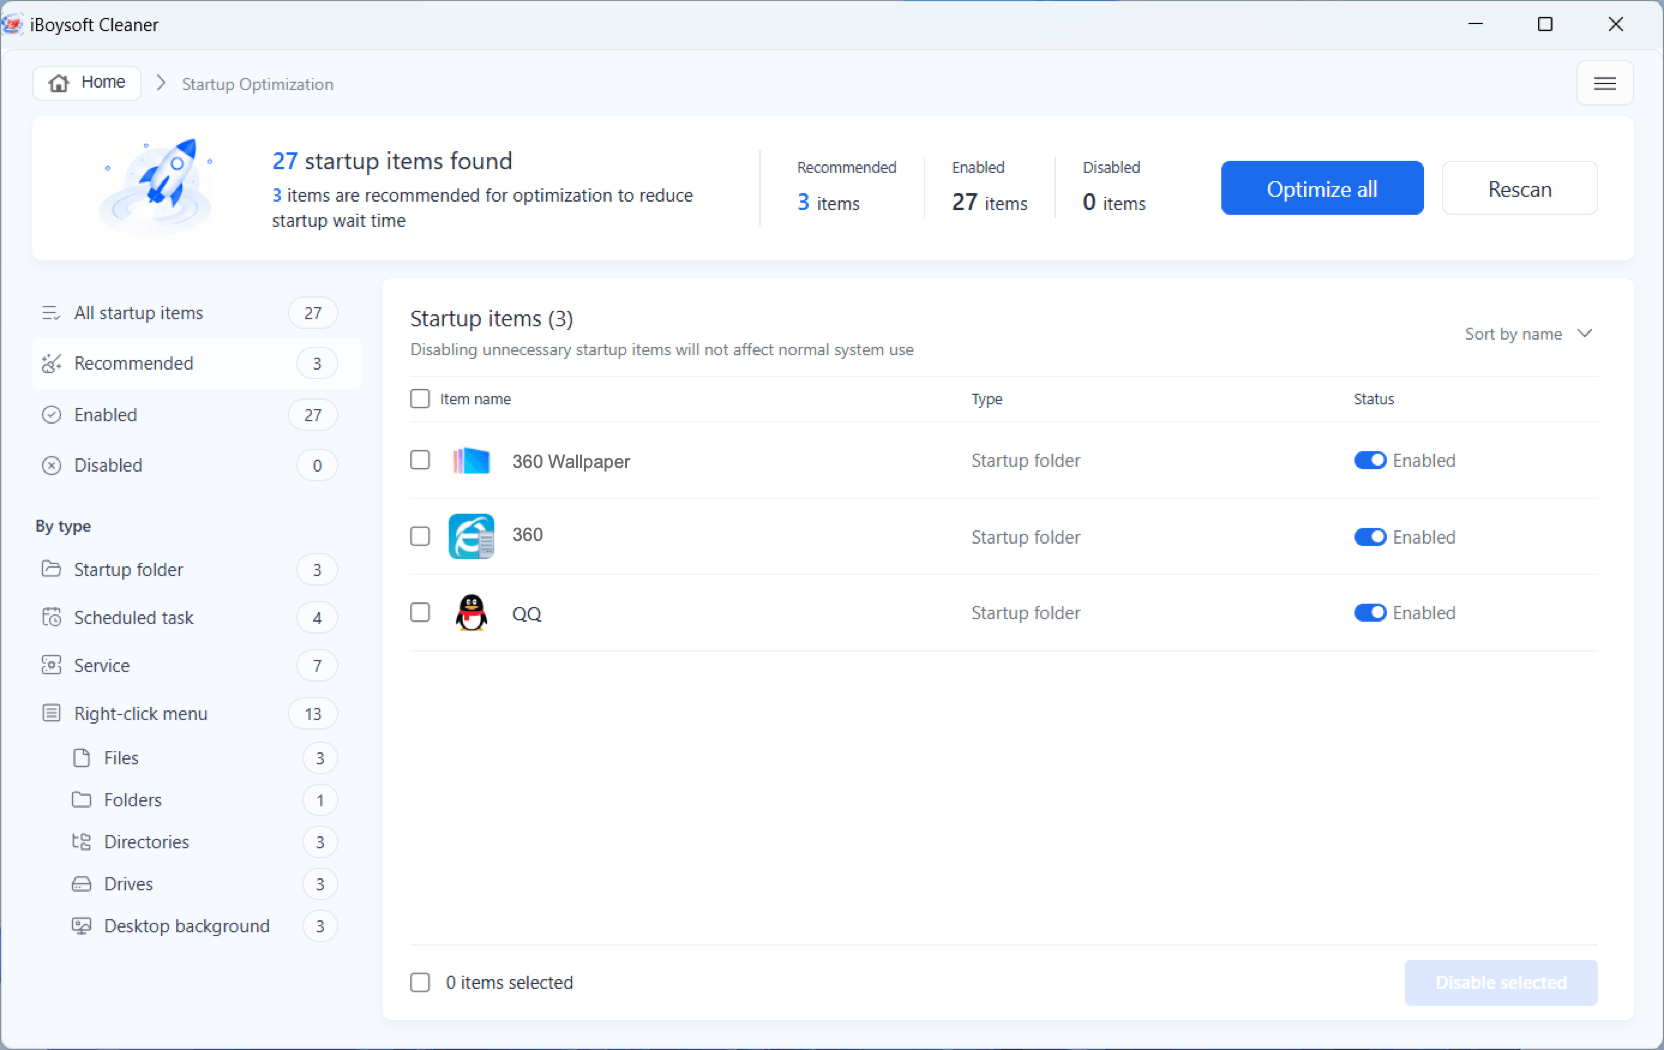
You can also check the items by type:
• Startup Folder: Shortcuts to programs that automatically launch when you sign in to Windows.
• Scheduled Tasks: Tasks configured to run automatically at specific times or in response to events, such as system startup, user login, or system idle.
• Services: Background processes that provide Windows functionality or support installed applications and hardware.
• Right-click Menu: Entries added by Windows or installed applications to right-click menus for files, folders, drives, and desktop backgrounds.
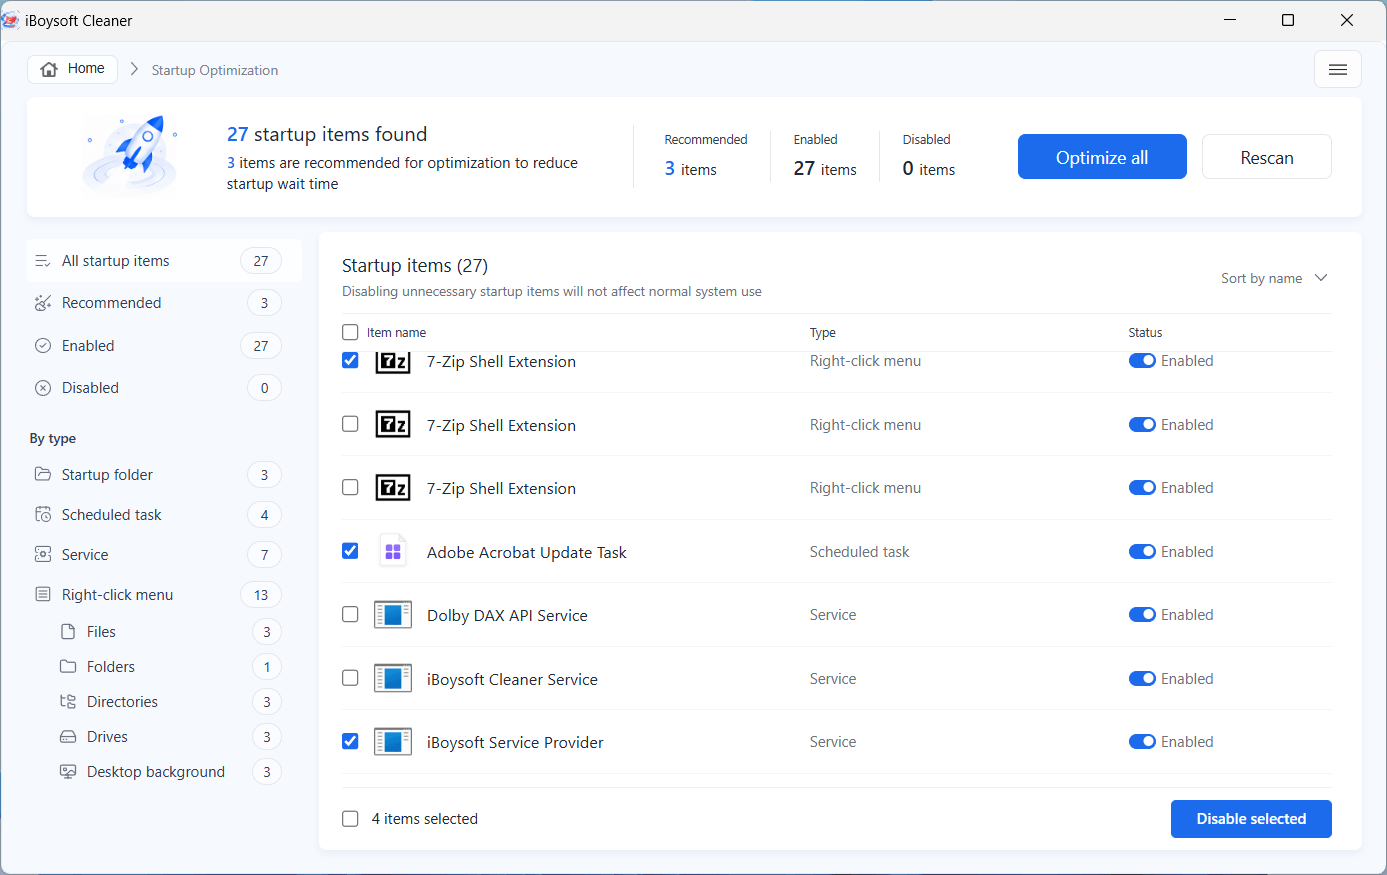
Step 4: Disable the unnecessary items.
Disable the individual item: Switch the Enabled button off for a specific item.
Disable the items in a bunch: Tick all the items you want to disable, and click "Disable selected."
Disable the recommended items: Confirm the items in the Recommended group and click "Optimize all."
🔔 Note: Disabling certain critical services may affect Windows or app functionality. Monitor for impacts after disabling them, and restart the services if needed.
How to Manage CPU & Memory Usage on Your PC?
In the system status dashboard, you can see the real-time CPU and memory monitors separately. Use the functions to manage your PC's CPU and memory usage if needed.
How to Manage CPU Usage on Your PC?
The real-time CPU monitor shows how heavily your CPU is being used by apps and background processes. You can view process details and end unnecessary tasks to reduce CPU usage.
Step 1: Click "Manage" under CPU usage monitor.
This opens the Task Manager utility.
Step 2: View the Task Manager and manage tasks.
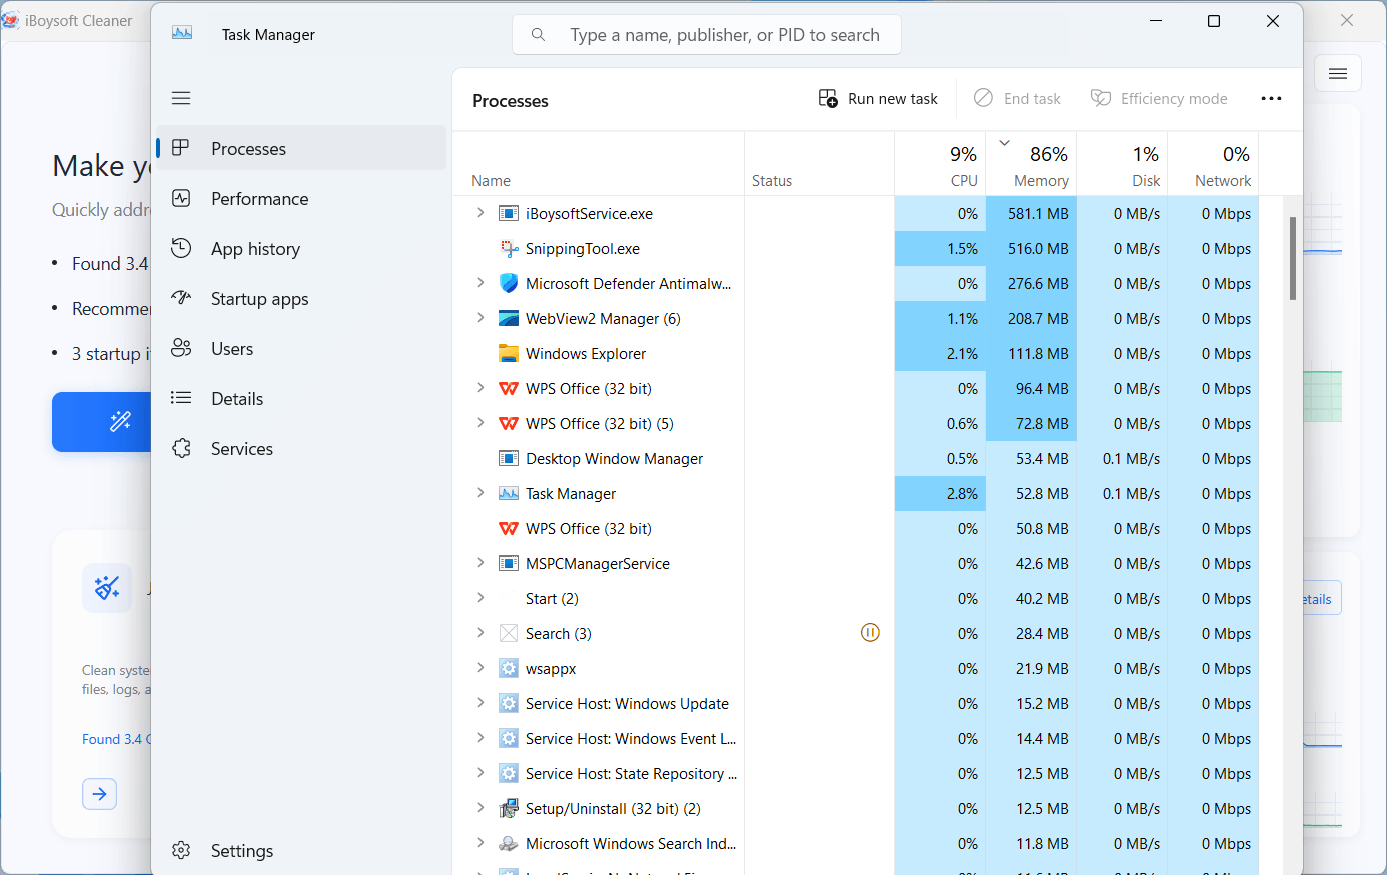
Processes: Lists running apps and background processes with their CPU, memory, disk, and network usage. Lets you end tasks or start new ones.
Performance: Displays real-time CPU, memory, disk, network, and GPU usage.
App history: Shows historical CPU time and network usage for supported apps.
Startup apps: Lists apps that launch automatically at sign-in and lets you enable or disable them.
Users: Shows signed-in users and the system resources consumed by their sessions.
Details: Displays individual process information, including PID, status, username, CPU, and memory usage.
Services: Lists Windows and third-party services, their status, and service names.
By default, it shows the Processes tab. You can click the settings button in the bottom-left corner and customize your Task Manager.
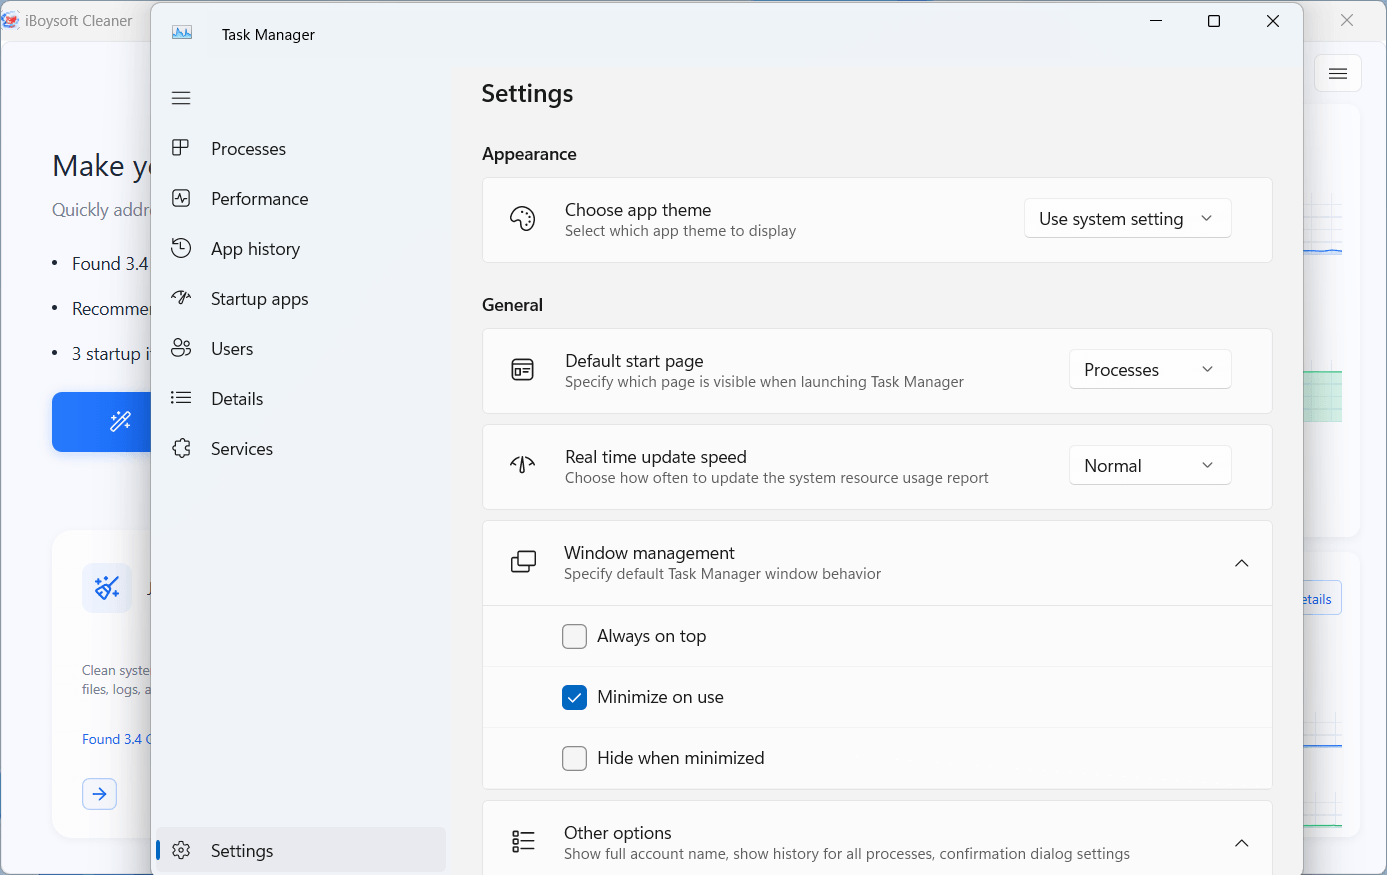
🔔 Note: You can click the three stub lines in the upper-right corner > "Settings," enable "Notify when CPU usage is high," and set a threshold to trigger the auto CPU usage notification.
How to Manage Memory Usage on Your PC?
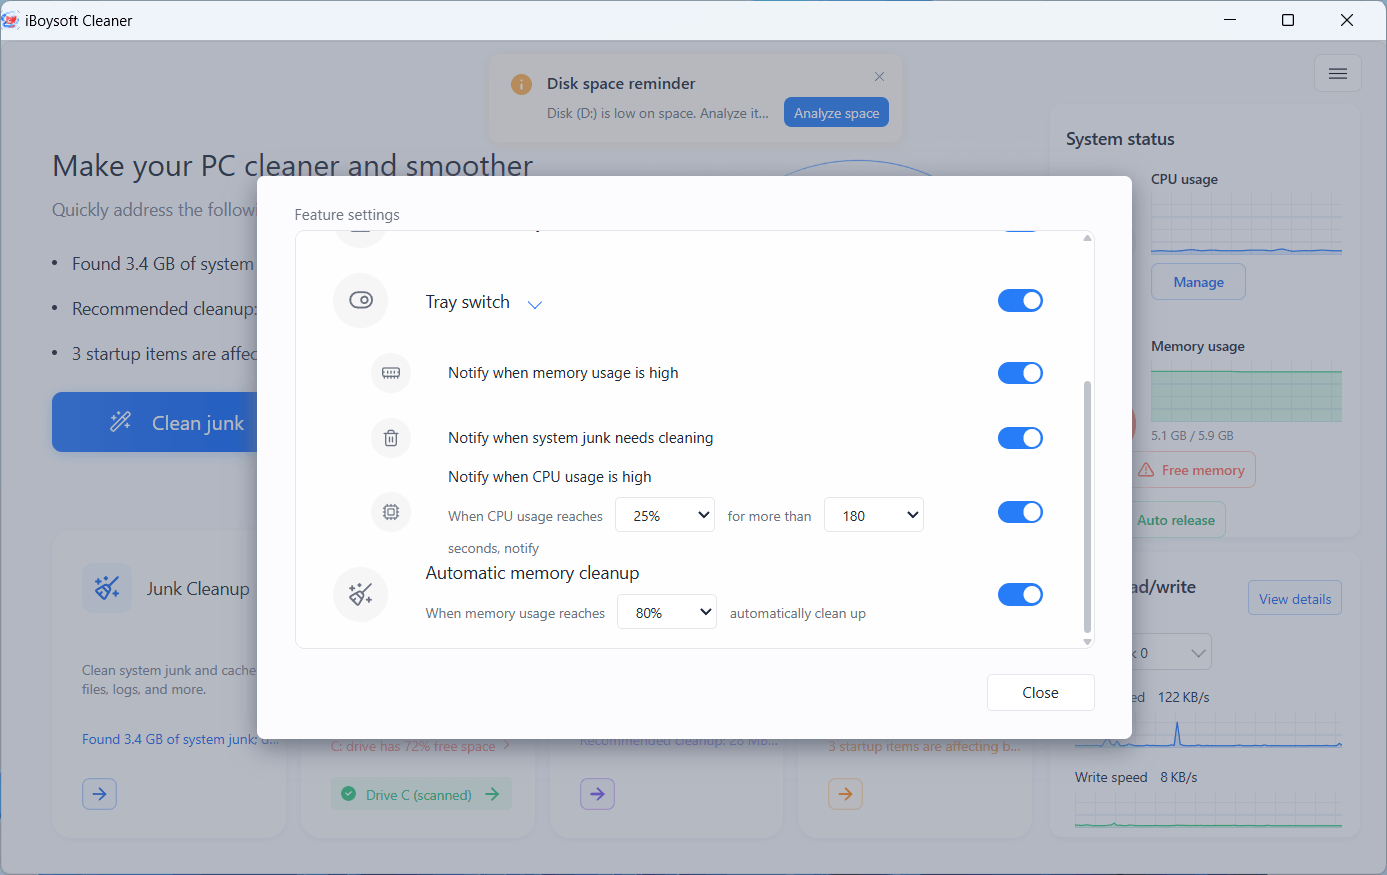
The memory usage monitor shows how much working memory your PC is using to keep programs running and handle active tasks. You can free up memory with a click or set a memory usage threshold to trigger automatic memory cleanup.
To manually release memory, click "Free memory."
To let the software auto-release memory, follow:
Step 1: Click "Auto release."
Step 2: Enable "Automatic memory cleanup."
Step 3: Choose a percentage.
The recommended value is 80%. When memory usage reaches the set percentage, the software will automatically help you release memory.
If you want to modify the set value later, click the three stub lines in the upper-right corner > "Settings" to make changes.
How to Check Disk Read/Write Speed?
iBoysoft Cleaner for Windows shows the read/write speed of your C drive by default in the bottom-right corner of the app's main interface.
You can also click the arrow on the drop-down menu to switch to another drive to check its read/write speed.
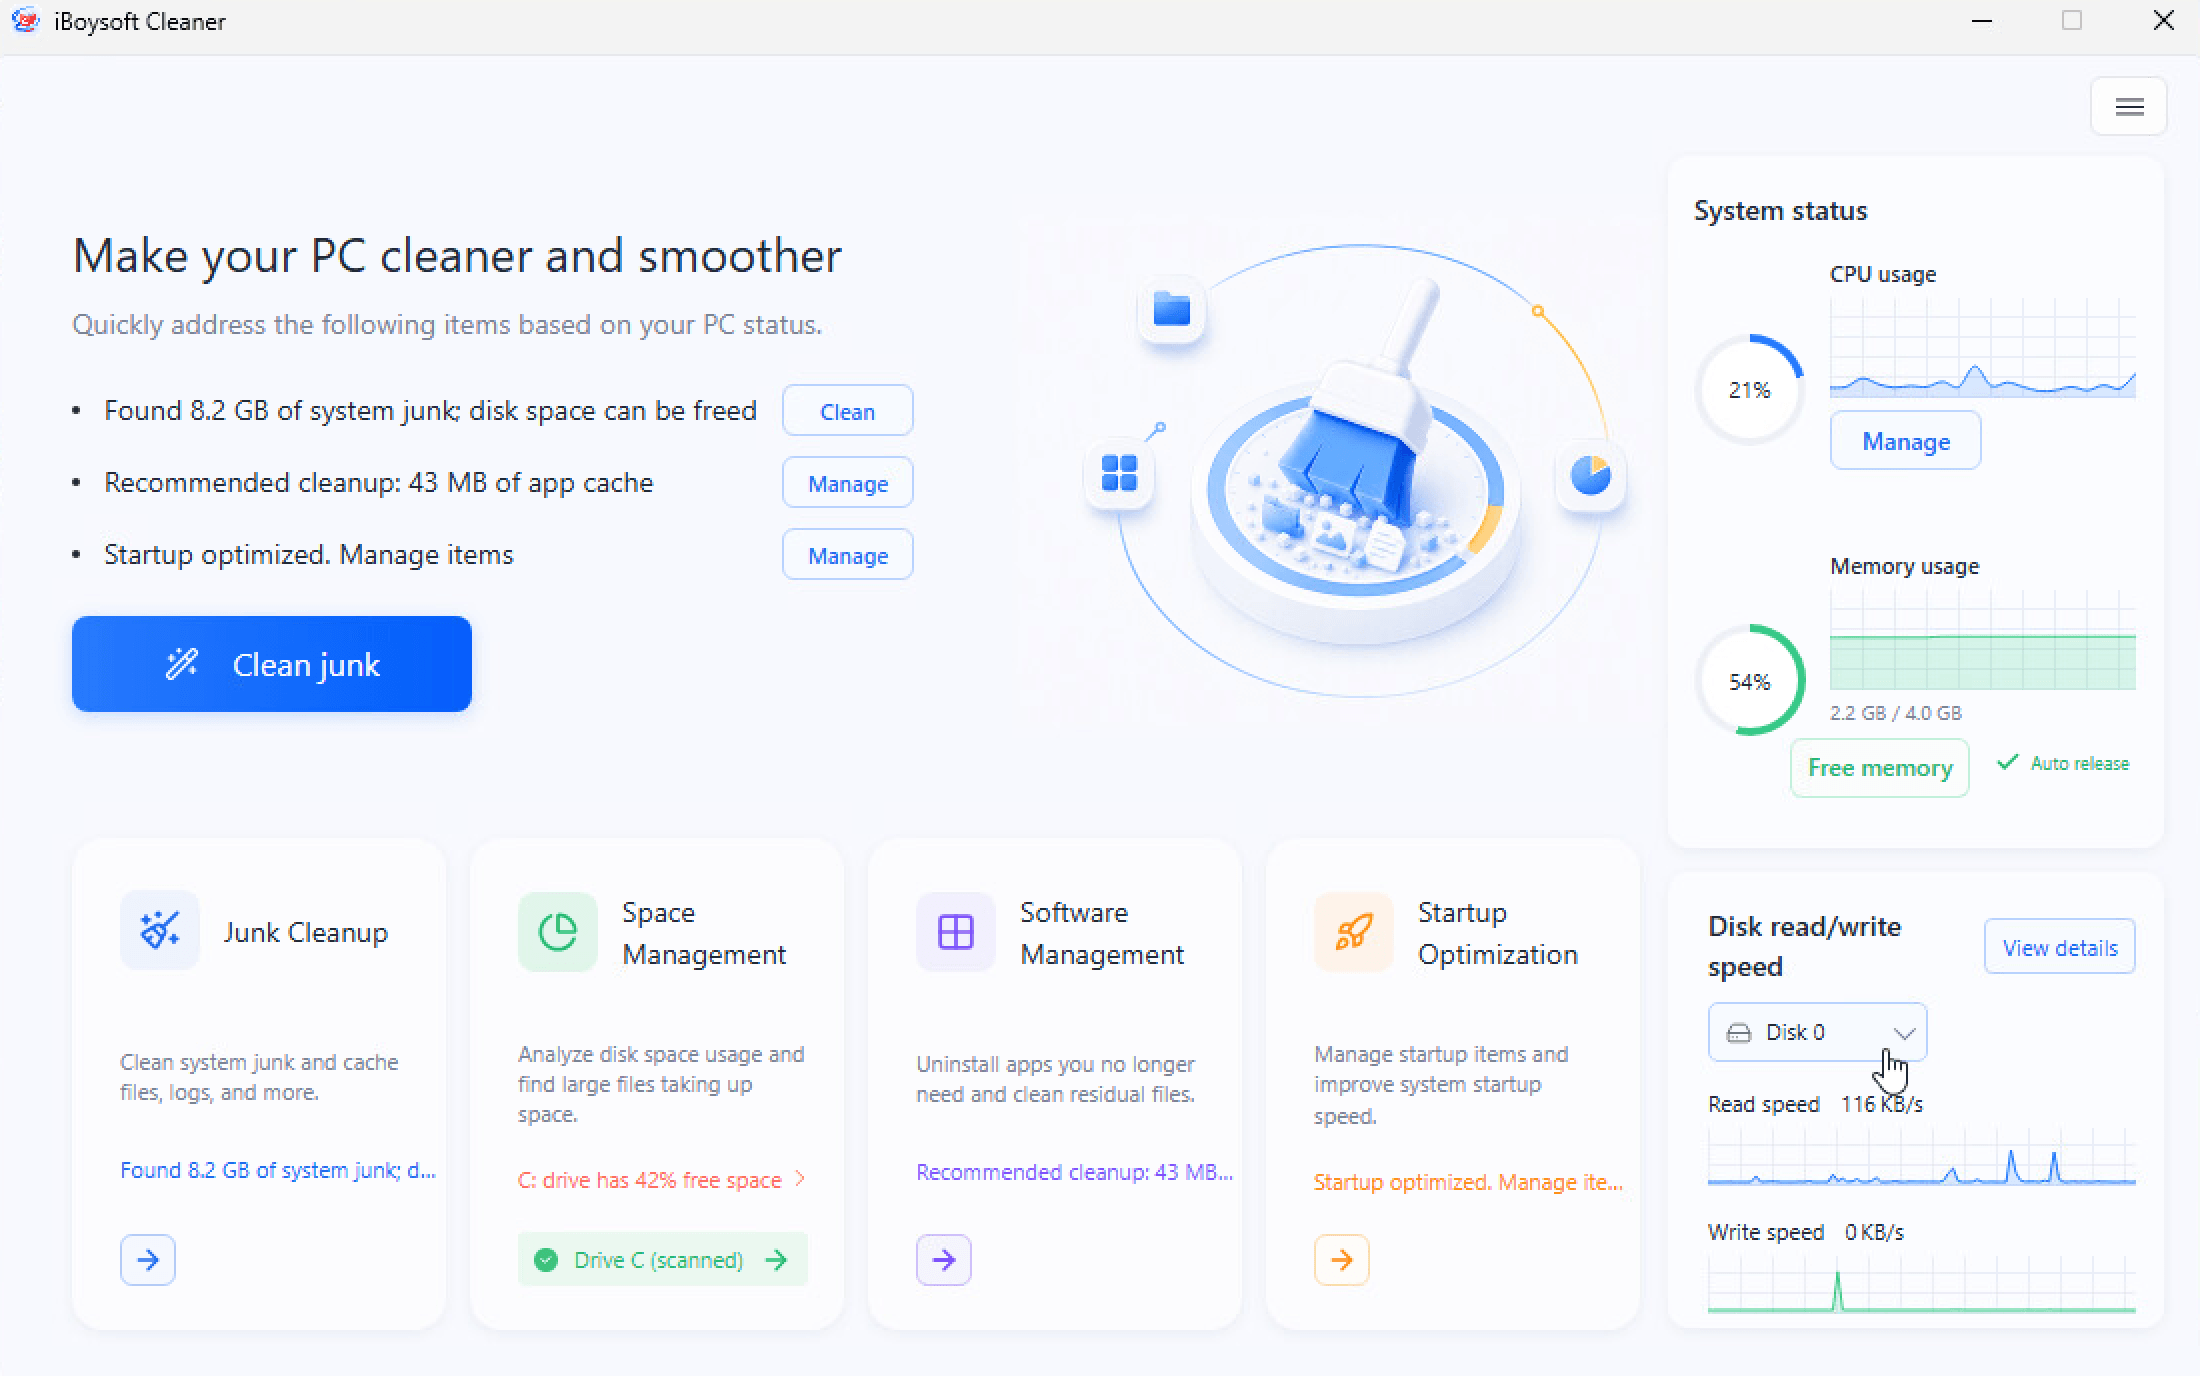
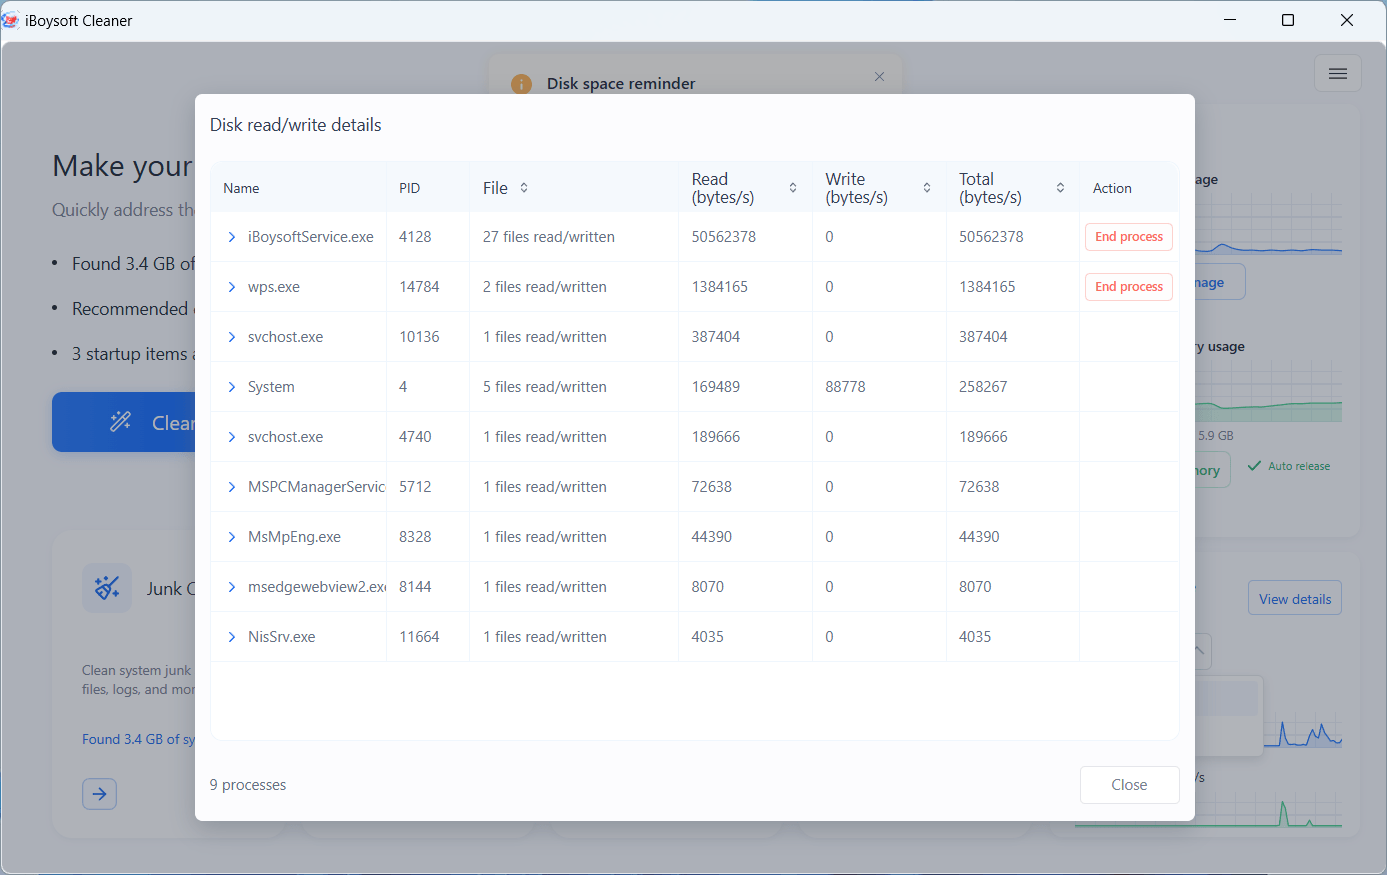
To get more details of the drive's read/write speed, click "View details."
FAQ
1. Will iBoysoft Cleaner for Windows clean all files on my PC?
No. It scans your PC for junk files and automatically selects those considered safe to delete. Files are deleted only after you confirm the cleanup.
2. Why can't I relocate some applications?
Only third-party apps with an available Move button can be relocated to another local partition. Relocation may fail due to insufficient space, an existing copy in the destination, permission issues, or the app being in use.
3. Why did Junk Cleanup fail to delete some files?
Some files may be read-only or currently in use.
4. Can I recover files deleted during cleanup?
Recovery is extremely difficult. Once you confirm deletion, iBoysoft Cleaner for Windows permanently deletes the selected files without moving them to the Recycle Bin. Make sure you review your selections before proceeding.
5. Why can't AI analysis analyze some files?
AI analysis requires an internet connection and a valid license.