
Written by
Yuri ZhangSummary: This article expounds on Windows backup/ copy commands: copy, xcopy, and robocopy. When, why, and how to use each. iBoysoft DiskGeeker can copy the whole system disk as a faster supplement.

Which way will you choose when you try to back up cherished photos, shift files between drives, or keep folders in sync across machines?
Except for simple drag-and-drop duplication, there is a more precise and fancy way to do it. Windows offers three built-in command-line tools—Copy, Xcopy, and Robocopy, which all handle repeated file operations faster, but each one is tailored for a different level of complexity, speed, and reliability.
Now let's dive into key differences between Copy, Xcopy, and Robocopy, and which one offers the best performance. If you've ever been unsure which command to run or why your file transfer took forever, this article will steer you in the right direction.
For greenhands to use copy, xcpopy, robocopy
Take a general look at it, if you wish to know the meaning and details of the syntax, keep reading.
| Task | Best Command | Command Example |
| Copy 1 file | copy | copy C:\a.txt D:\Backup\ |
| Copy folder with files | xcopy or robocopy xcopy | C:\Folder D:\Backup /E /I |
| Backup with reliability | robocopy | robocopy C:\Data D:\Backup\Data /MIR /MT:4 |
| Copy file with spaces | Any + quotes | copy "C:\My Docs\a.txt" "D:\My Backup\" |
| Save copy log | robocopy | robocopy C:\D D:\B /E /LOG:copylog.txt |
To use these commands, you need to open Command Prompt through: search for cmd in the Start Menu, right-click on it, and choose to run it as an administrator. Then you can type the command you need and hit Enter.
1. copy – Basic file copy tool
It copies one or more files (NOT folders) from one location to another.
Basic format:copy [source] [destination]Example:copy C:\Users\Alice\Documents\notes.txt D:\Backup\This copies the file notes.txt to the D:\Backup folder. Note that use quotes if your file or folder names have spaces:copy "C:\My Files\doc.txt" "D:\My Backup\"
We remind you that this command will overwrite without asking if the file exists unless you set it to prompt.
2. xcopy – File & folder copy tool (old, but better than copy)
This copies files and entire folders, optionally including subfolders and hidden or system files.
Basic format:xcopy [source] [destination] [options]Example:xcopy C:\Users\Alice\Pictures D:\Backup\Pictures /E /H /C /I This copies the whole Pictures folder and everything inside it:
- /E: includes subfolders, even if empty.
- /H: copies hidden and system files.
- /C: continues copying even if there's an error.
- /I: treats destination as folder (avoids "file or folder?" prompt).
Note: When copying folders, you must include /E. We suggest you type xcopy /? in Command Prompt to see all options.
3. robocopy – Reliable and powerful file/folder copy tool
This command can do more things, including copying folders plus files, metadata like permissions, and timestamps. It can also be retried on failure, supports network use, and can even mirror directories.
Basic format:robocopy [source] [destination] [options]Example 1 – Copy entire folder:robocopy C:\Users\Alice\Music D:\Backup\Music /E/E copy all subfolders including empty ones.
Example 2 – Mirror, which makes backup folder exactly match source:robocopy C:\Project D:\ProjectBackup /MIR/MIR mirrors source to destination while deleting extra files in destination.
Example 3 – Multithreaded fast copy:robocopy C:\BigFolder D:\Backup\BigFolder /MT:8/MT:8 uses 8 threads to speed up copy.
Note that this method doesn't copy individual files easily; it works best with folders. If you want to copy just one file, use:robocopy C:\MyStuff\ D:\Backup\ myfile.txt
Notice how both the source and file names are split.
Share this article to help clear up the confusion about Copy, Xcopy, and Robocopy.
copy vs xcpopy vs robocopy speed
| Task | copy | xcopy | robocopy |
| Few small files | Fast | Fast | Fast |
| Many small files | Slow | Medium | Very Fast |
| One large file | Fast | Fast | Fast |
| Big folder tree (e.g. 20 GB+) | ❌ Not supported | Slow | Efficient |
Robocopy wins for large-scale or repeated copy jobs due to multithreading, retry logic, and smart file skipping. It is built for power users and is the most efficient and modern. If you're learning, don't be afraid of it, even simple robocopy C:\A D:\B /E works.
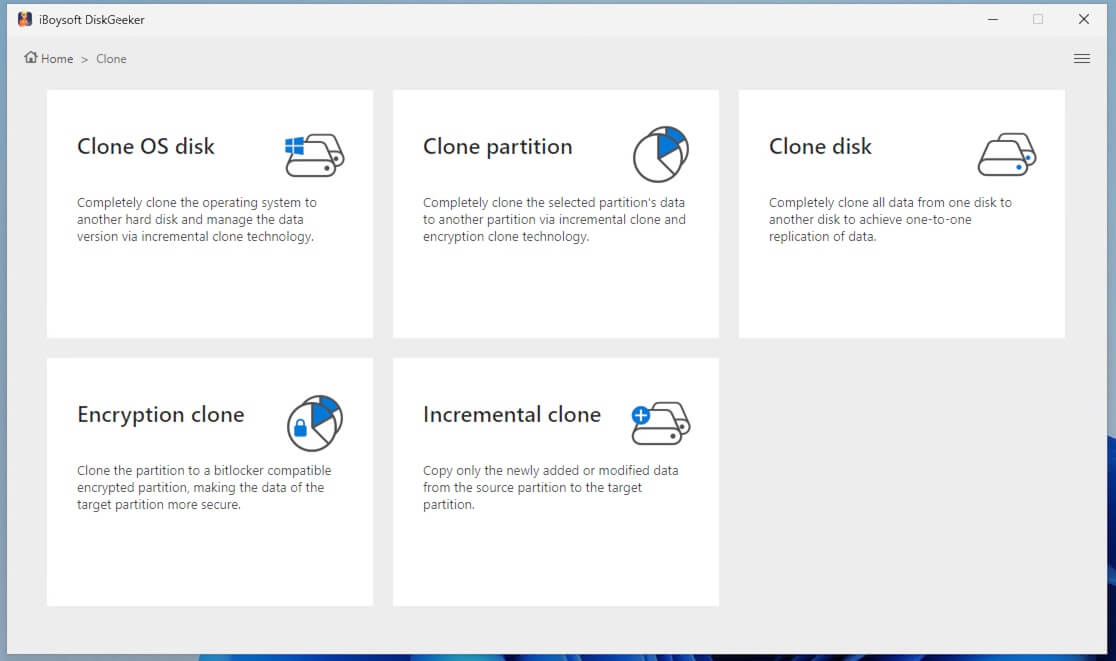
Bonus tool-iBoysoft DiskGeeker for Windows: Copy full disk/partition
Copy, Xcopy, and Robocopy (Robust File Copy) are all command-line based, lack GUI, and offer limited support for disk-level backup and system migration. This is where iBoysoft DiskGeeker for Windows shines as a professional, user-friendly alternative.
Unlike traditional commands, it provides a full-featured graphical interface that simplifies complex tasks like disk cloning, automatic partition-level backups, and bare-metal recovery. It supports higher-speed data migration. Here's how to use it:
Tutorial on incremental copy of a partition (automatic backup for NTFS)
The exclusive incremental clone feature compares the files/folders on the source partition and target partition first. It then syncs only the inconsistent parts of the data between the source partition and the target partition, which saves a lot of time.
Step 1: Install and launch iBoysoft DiskGeeker by clicking Free Download.
Step 2: You're in the Clone module now, select "Incremental clone".
Step 3: Choose the source partition.
Step 4: Hover over the Target partition area to select your destination partition.
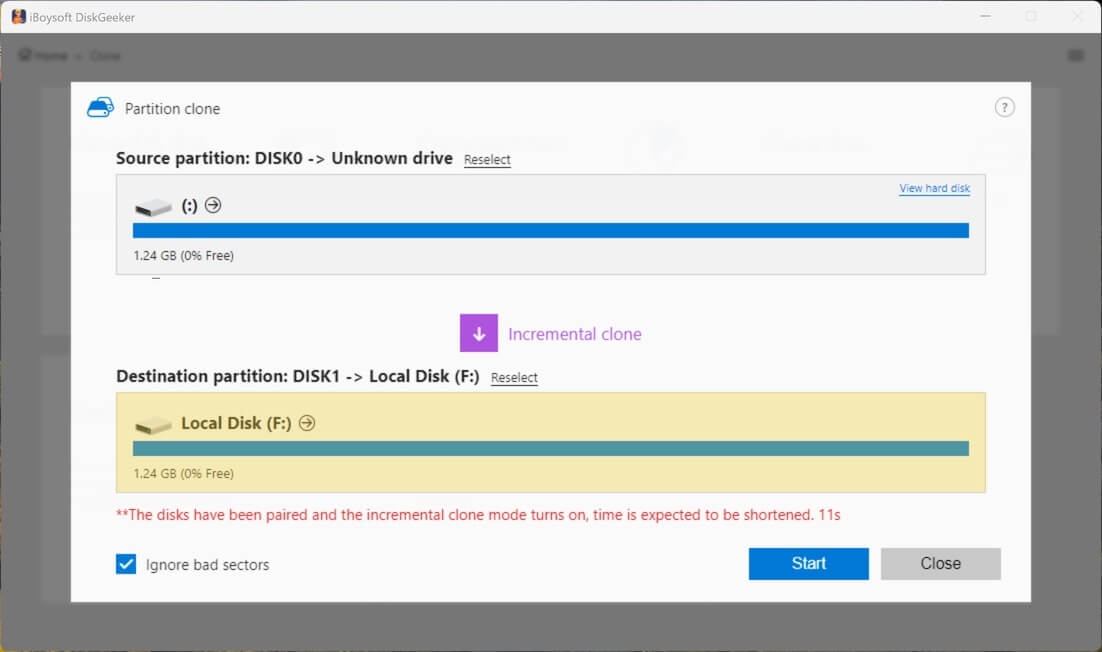
(Tick "Ignore bad sectors" if you want to bypass the possible bad sectors on the source partition.)
Step 5: Click "Start" and confirm, then wait for the incremental clone to complete.
Tutorial on full disk copy of Windows with iBoysoft DiskGeeker
Disk clone makes an exact copy of all partition information and files/folders on each partition on the target disk to a destination disk.
Step 1: Click "Clone disk" from the Clone module.
Step 2: Click "Source disk" to choose the source disk from the list.

(The selected source disk will be listed in the Source disk section. You can see all its partitions and their basic info here. If you want to change the source disk, click the Reselect button for a change. Also, there is a selection button on each partition of the disk. You can uncheck those you don't want to clone.)
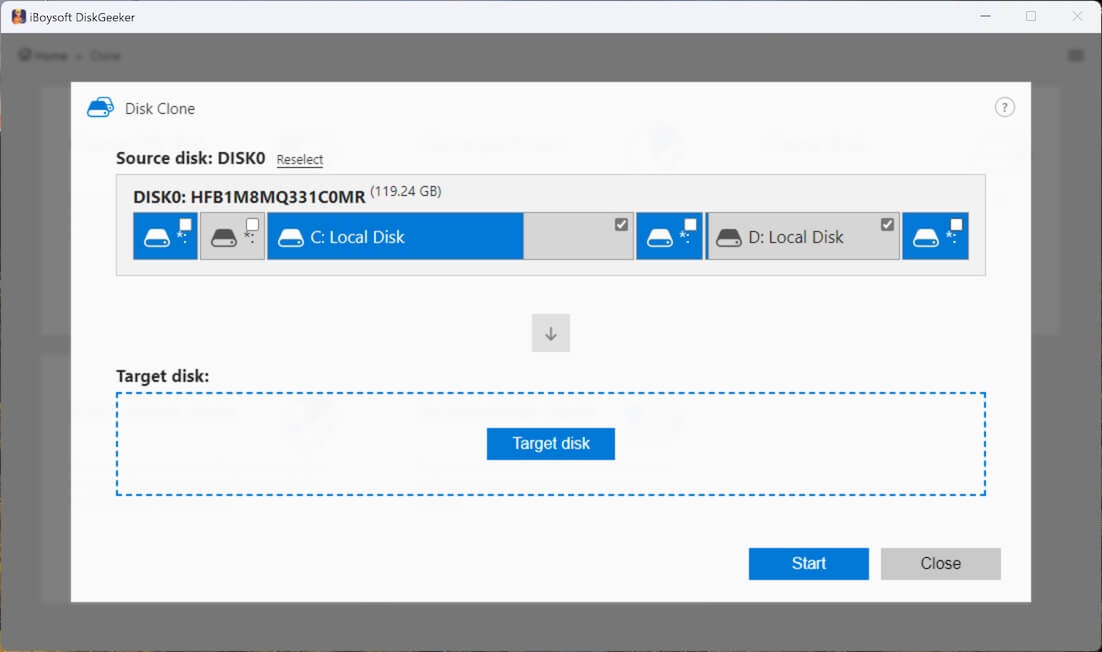
Step 3: Hover your cursor on "Target disk" to select the destination disk. (The storage capacity of the target disk must be larger than the source disk.)
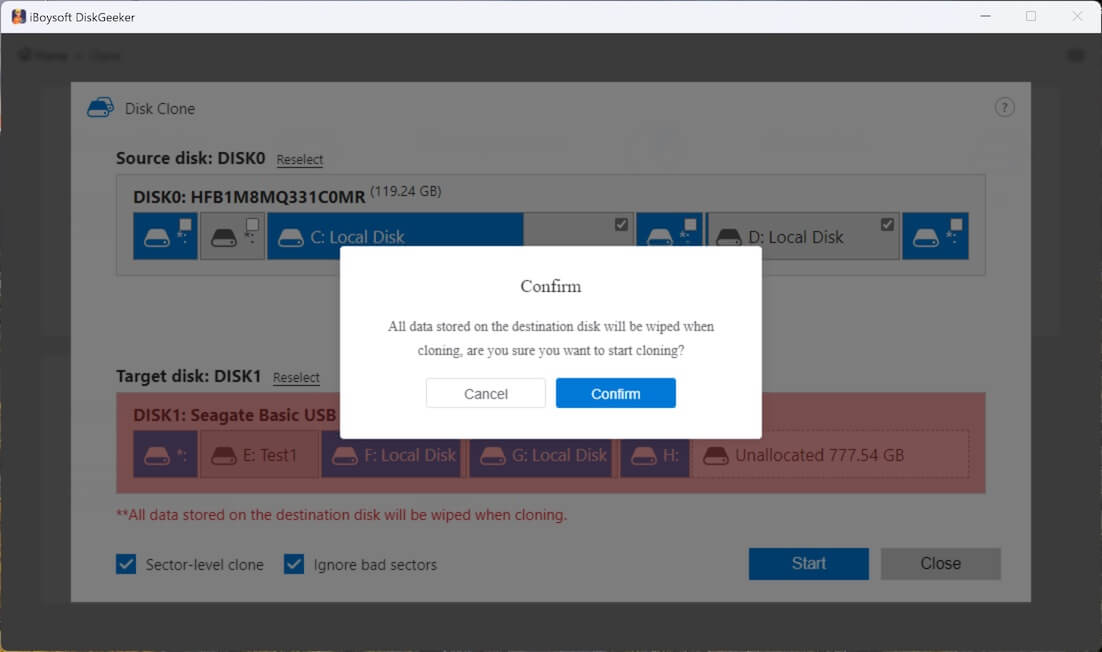
Step 4: Confirm the target disk and your settings.
(If you want to make a 1:1 copy of the source disk rather than only copy the files, check "Sector-level clone." A sector-level clone will take longer than a normal full clone. If you don't want the bad sectors on the source disk to interrupt the cloning process, choose "Ignore bad sectors.")
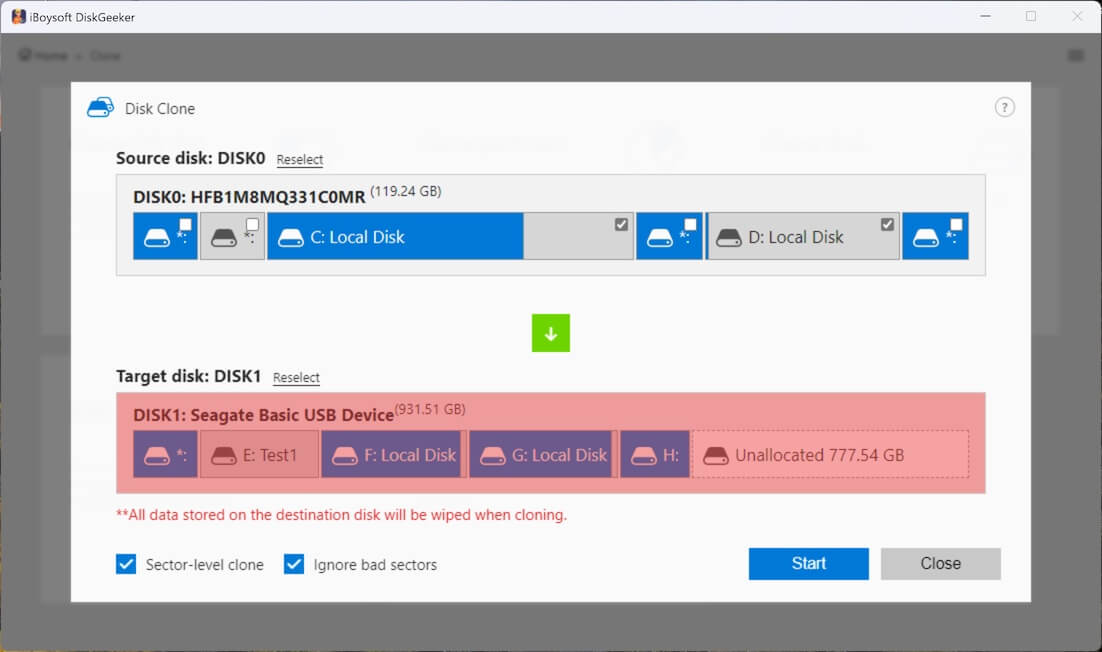
Step 5: Click "Start" > "Confirm" to start a disk clone.
Step 6: Wait for the disk clone to finish.
Seek higher-level security? Try the Encryption clone (Clone to BitLocker encrypted partition) option at the interface of the iBoysoft DiskGeeker.
Related articles
How to backup Windows 10/11 to an external hard drive
Winver command and its remote alternative
Help your techy and not-so-techy friends finally get the Copy, Xcopy, and Robocopy thing, just hit share.