
Written by
Wilsey YoungSummary: This post collects some common Windows 10 issues related to updates, performance, startup, and more. Proven solutions are also provided. iBoysoft Data Recover for Windows is recommended for restoring lost or deleted files. -From m3datarecovery.com
Issues or glitches with Windows 10 could severely affect system stability, security, and even put the precious data at risk. This article primarily discusses some frequently asked Windows 10 issues that Windows 10 users may encounter. At the same time, proven solutions with detailed steps are provided to fix Windows 10 issues or glitches.
Note: The quickest way to fix Windows 10 performance issues is to cleanly install Windows 10 on your PC. To perform a clean install, you should create a Windows 10 bootable USB installer.
Just follow these download hubs to download Windows 10 without Media Creation Tool and create a bootable USB installer:
Windows 10 ISO Download
Windows 10 update issues
Windows users encounter Windows 10 update issues when they try to update the system through the "Settings", but the update often ends with an error code or message, which prompts that the update can not be completed.
Tips: If you can't update Windows 10 from Settings, try downloading the Windows 10 update directly and then running the full installer.
Use the following methods when your Windows 10 is unable to update:
Solution 1 to Windows 10 update issues - Disable anti-virus software
Third-party anti-virus or security apps may interfere with the Windows update process. Therefore, you can temporarily disable these apps and see if the system update can resume working.
You can directly disable the application through the Taskbar. Alternatively, follow the steps below:
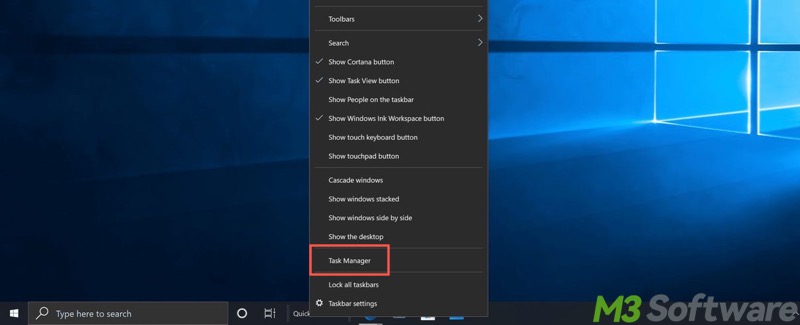
- Right-click on the "Start" menu button or taskbar to choose "Task Manager."
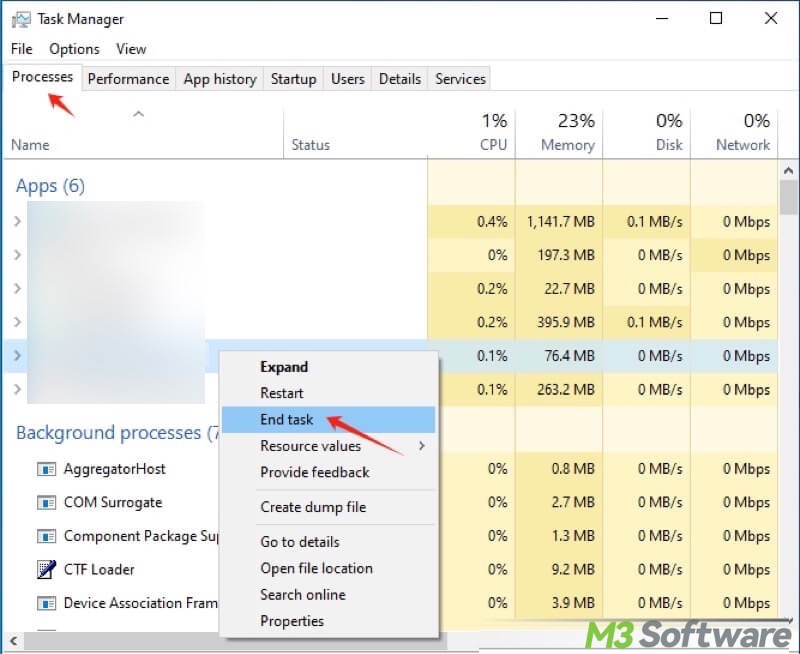
- Under the “Processes” tab, right-click on the anti-virus app and click "End task."
Solution 2 to Windows 10 update issues - Run an SFC scan
The System File Checker (SFC) is a built-in tool that scans and repairs corrupted or missing system files.
- Open the Windows search bar, type "cmd", and select "Run as administrator" to open Command Prompt.

- Input "sfc /scannow" in the command window and hit the "Enter" key on your keyboard.
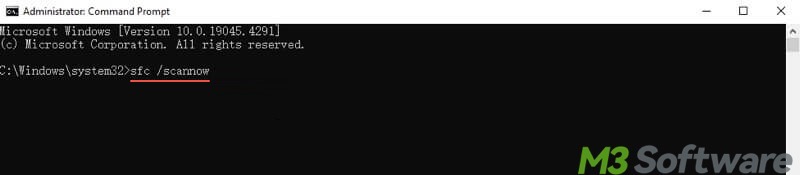
- Restart your PC after scanning and repair are finished.
Solution 3 to Windows 10 update issues - Run a troubleshooter
You can use Windows Troubleshooter, a built-in tool, to troubleshoot update issues.
- Press the "Windows+i" keys to open "Settings."
- Choose "Update & Security."
- Select "Troubleshoot" on the left, and then click "Additional troubleshooter" on the right.
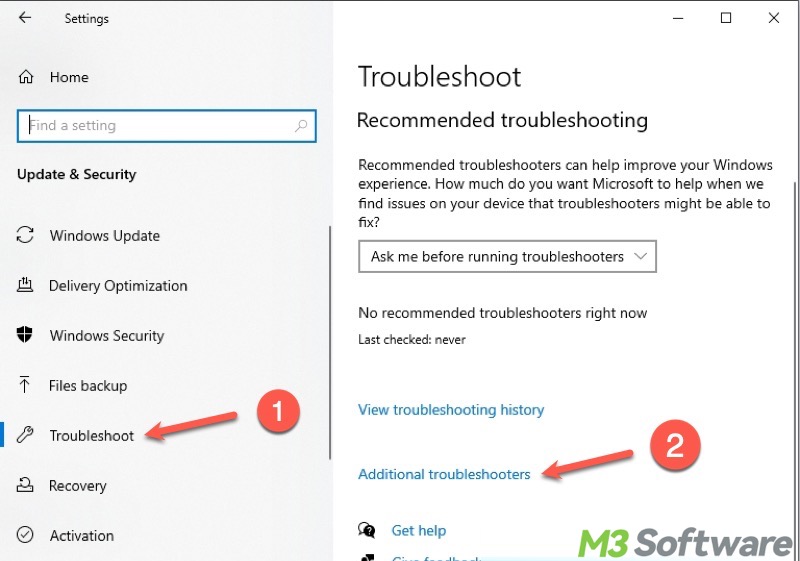
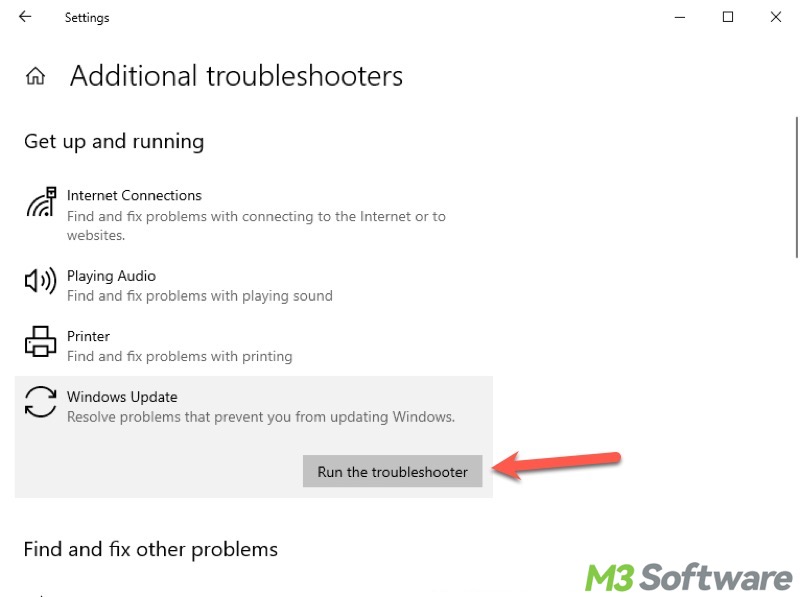
- Choose "Windows Update" and click "Run the troubleshooter."
Solution 4 to Windows 10 update issues - Reset update files
Resetting the Windows update files may help resolve the system update issues on Windows 10:
Type "cmd" in the Windows search bar and select "Run as administrator." Now, input the following commands and hit the "Enter" key after each:
- net stop wuauserv
- net stop cryptSvc
- net stop bits
- net stop msiserver
- ren C:\Windows\SoftwareDistribution SoftwareDistribution.old
- ren C:\Windows\System32\catroot2 catroot2.old
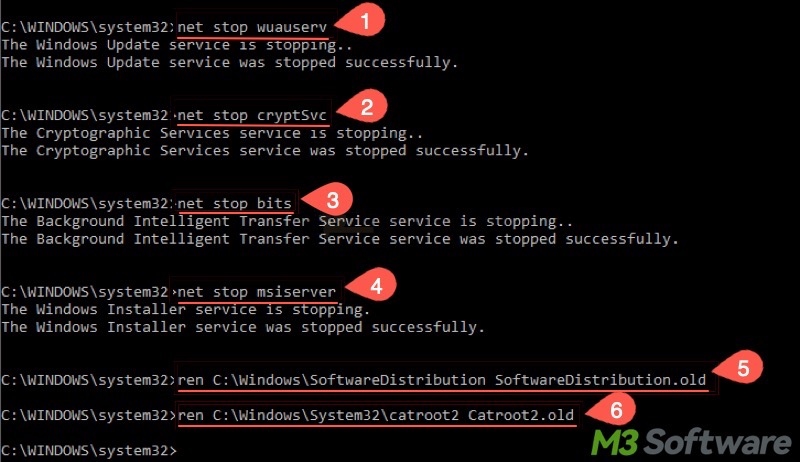
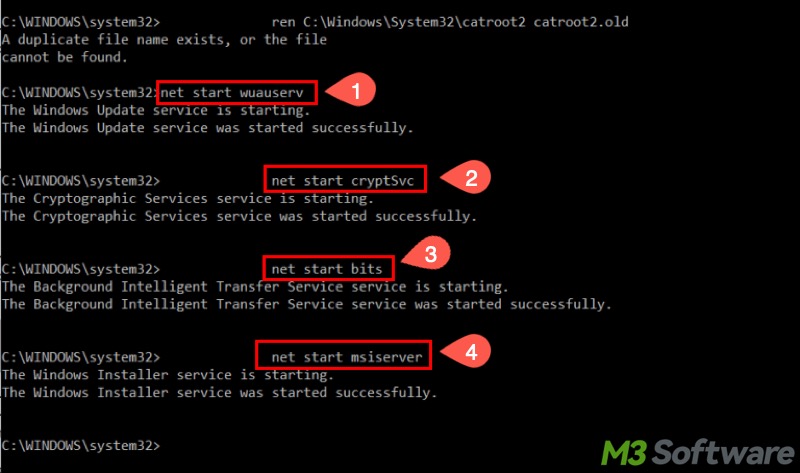
The commands above can stop the update services and reset the update files. Execute the commands below one by one to restart the services:
- net start wuauserv
- net start cryptSvc
- net start bits
- net start msiserver
To get more solutions to Windows update errors, please refer to: Windows Update Error 0x800f0922: Causes & 7 Solutions
You can share the post by tapping on the buttons below
Files are accidentally lost or deleted
Have you ever accidentally deleted or lost files due to various Windows 10 issues? Once the Recycle Bin is emptied, deleted files are typically unlikely to be restored. Formatting, file system corruption, or a RAW drive make it harder for you to retrieve lost files.
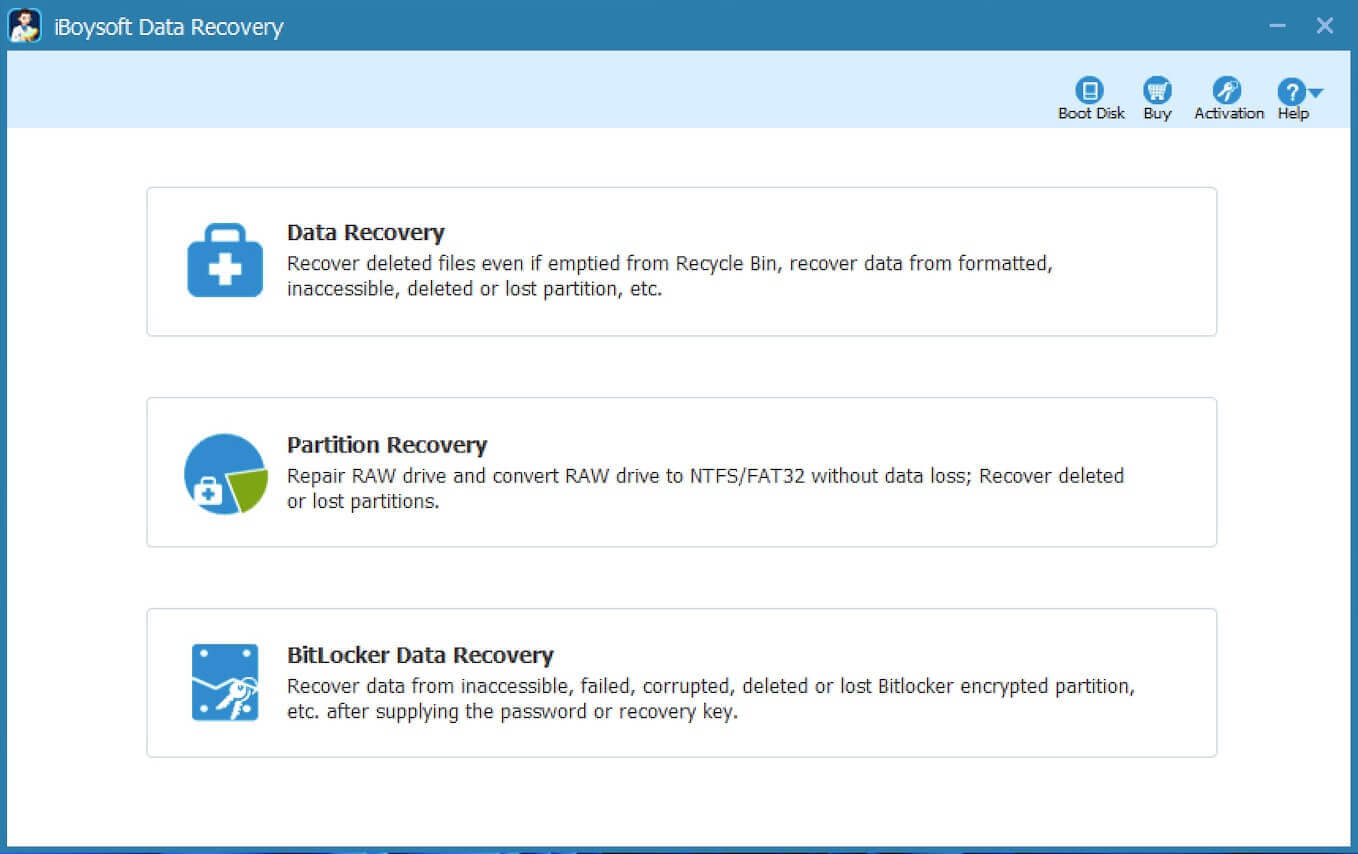
iBoysoft Data Recovery for Windows is a professional and easy-to-operate tool that can help quickly recover your deleted or lost files from an HDD, SSD, SD card, USB drive, or other storage devices on Windows.
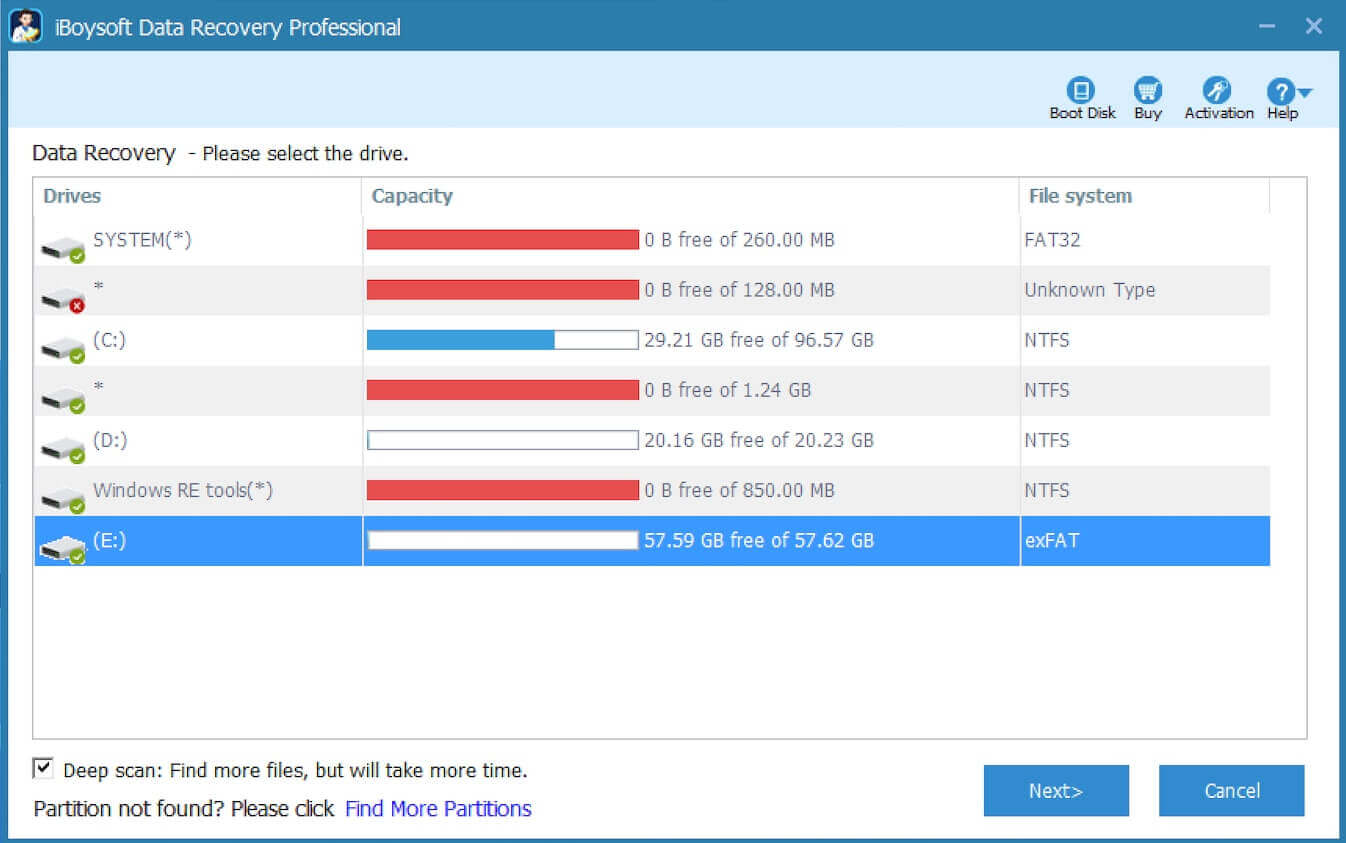
iBoysoft Data Recovery for Windows supports more than 1000 types and formats of files. In addition, this tool is also effective even when your storage device is formatted, corrupted, or inaccessible.
Here's how to recover deleted/lost files via iBoysoft Data Recovery for Windows:
- Download, install, and launch iBoysoft Data Recovery for Windows.
- Select the "Data Recovery" module from the main interface.
- Choose the storage device from the list and click the "Next" button.
- Preview the files in the scanning results and see if they are recoverable.
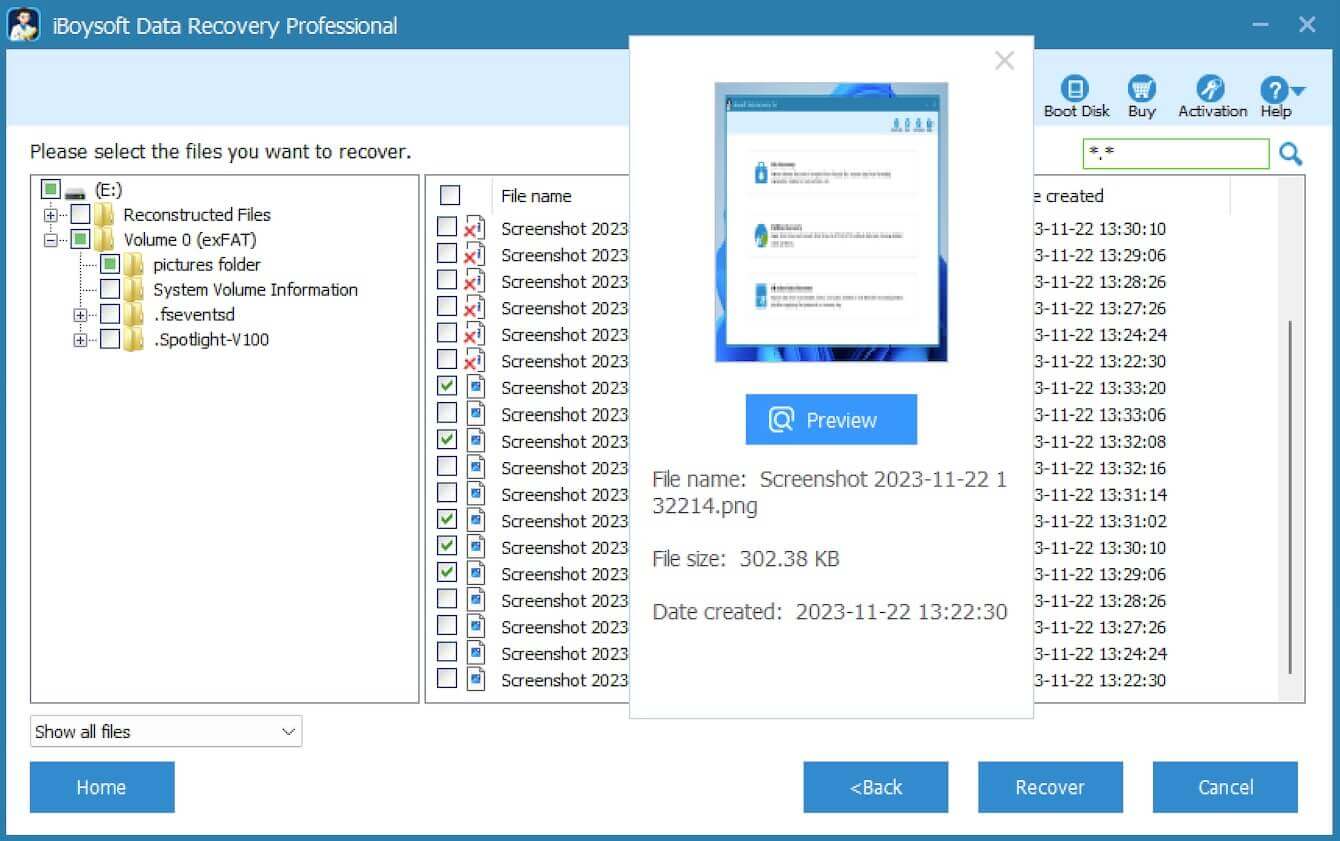
- Tick the files you want and tap on the "Recover" button.
Windows 10 is running slowly
Windows 10 may become sluggish for various reasons. Try the following ways if you run into this Windows 10 issue.
Solution 1 to slow Windows 10 - Run a virus scan
Viruses or malware could be the culprit for a slow Windows 10. You can run a virus scan using the built-in tool on Windows:
- Open "Settings."
- Select "Update & Security" and tap on "Windows Security."
- Choose "Virus & threat protection."
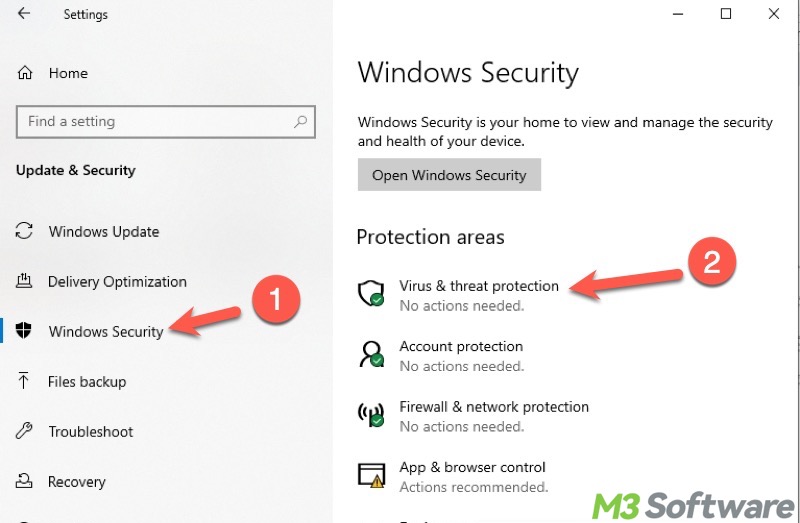
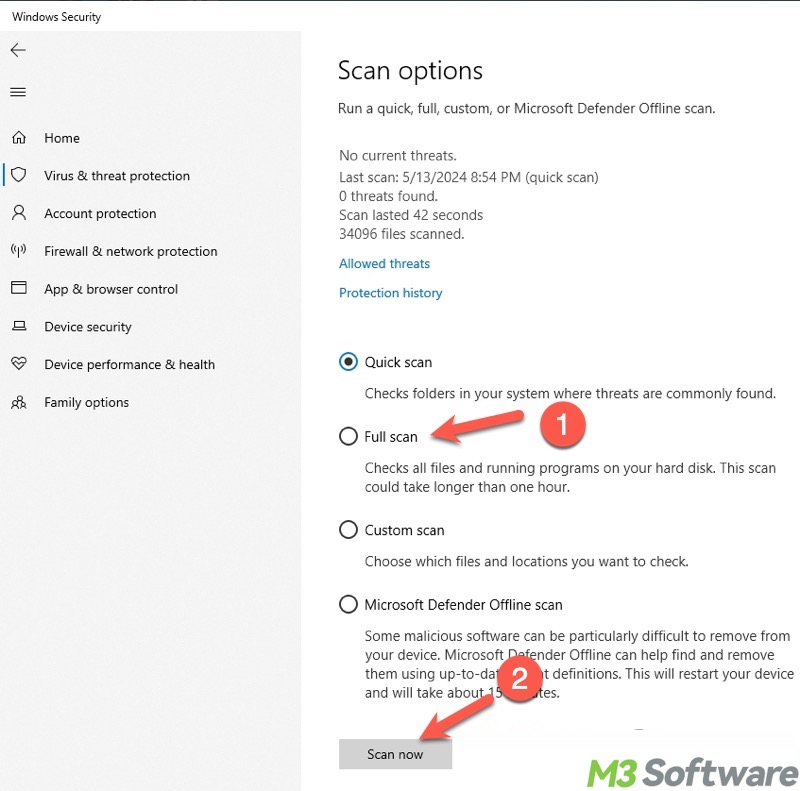
- Tap on "Scan options."
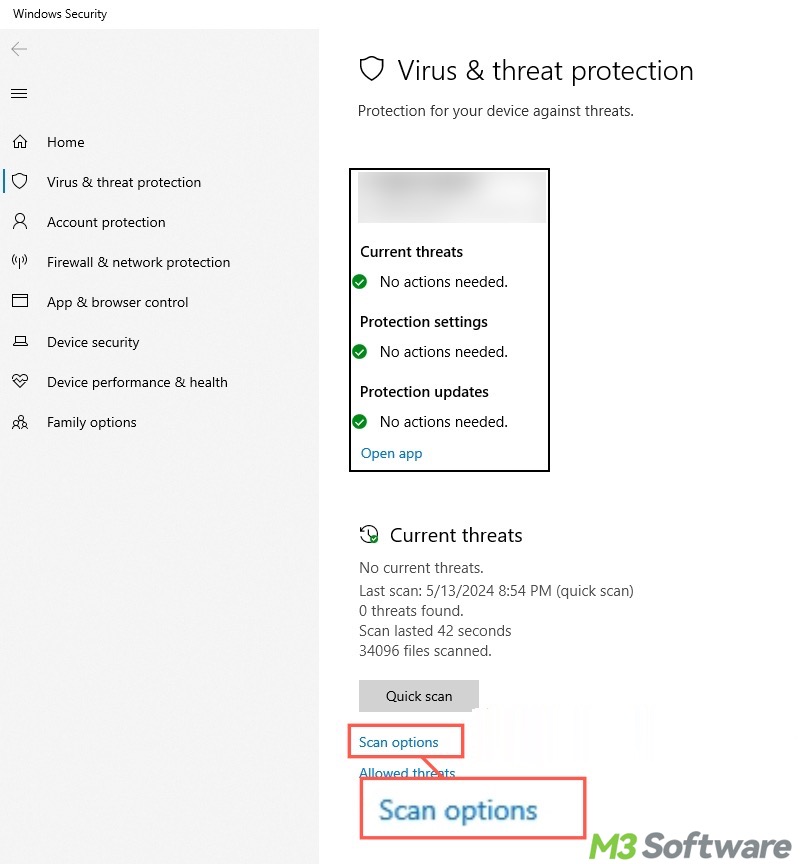
- Select "Full scan" and click the "Start now" button.
Solution 2 to slow Windows 10 - Clean up the hard disk
Here's how to clean up your hard disk on Windows 10 when your computer:
- Double-click "This PC" or "My Computer" to open "File Explorer."
- Right-click on "Local Disk C:", AKA System (C:) or System Drive, and select "Properties."
- Click the "Disk Cleanup" button under the "General" tab.
- Select the files, like Recycle Bin, Temporary Files, Thumbnails, and Previous Windows Installation(s).
- Click "OK" to delete them.

Solution 3 to slow Windows 10 - End excessive processes
Background apps and programs can retard Windows 10, as they often consume a significant amount of RAM. You can manually end these processes through the "Task Manager" to fix this common Windows 10 issue.
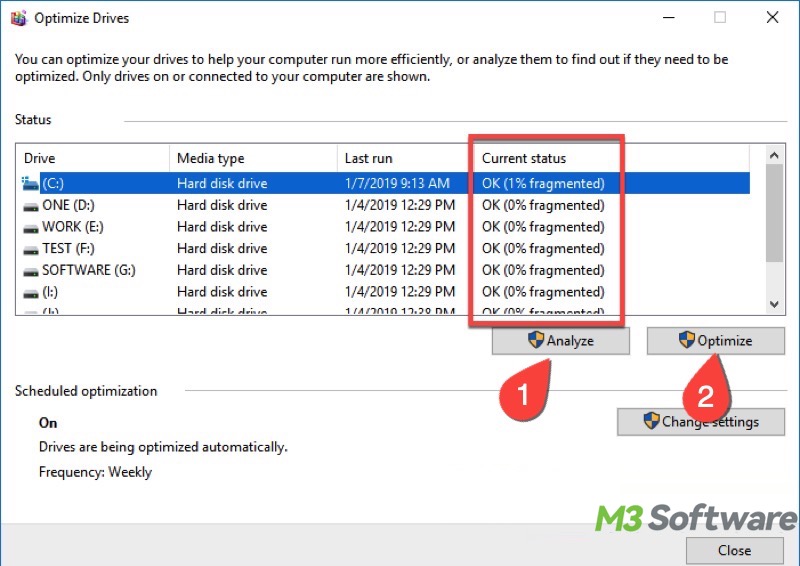
Solution 4 to slow Windows 10 - Defragment HDD
When a hard disk drive (HDD) becomes highly fragmented, it heavily slows down your Windows 10 performance. If your PC uses an HDD, follow the steps below to defragment it:
- Type "Defragment and Optimize Drive" in the Windows search bar and click the result.

- Check the status of the hard drives.
- Click the "Optimize" button if an HDD is highly fragmented.
For more methods to fix slow Windows 10, please refer to: (10 Solutions) Computer Running Slow after Windows Update
You can click the following buttons to share the post quickly
Windows 10 slow startup
Slow startup is one of the most frequent Windows 10 issues. If your Windows 10 is slow on startup, the solutions below may help.
Solution 1 to Windows 10 slow startup - Disable startup apps
If your Windows 10 encounters the slow startup issue, check the startup apps first and then disable them:
- Right-click on the "Start" menu button or press the "Windows+X" keys to select "Task Manager."
- Go to the "Startup" tab, right-click on the app, and click "Disable."
Solution 2 to Windows 10 slow startup - Disable fast startup
Fast Startup is a feature on Windows that allows your PC to boot up faster after a shutdown, but Fast Startup can make the Windows 10 startup slow for various unsubstantiated reasons.
Here's how to disable Fast Startup:
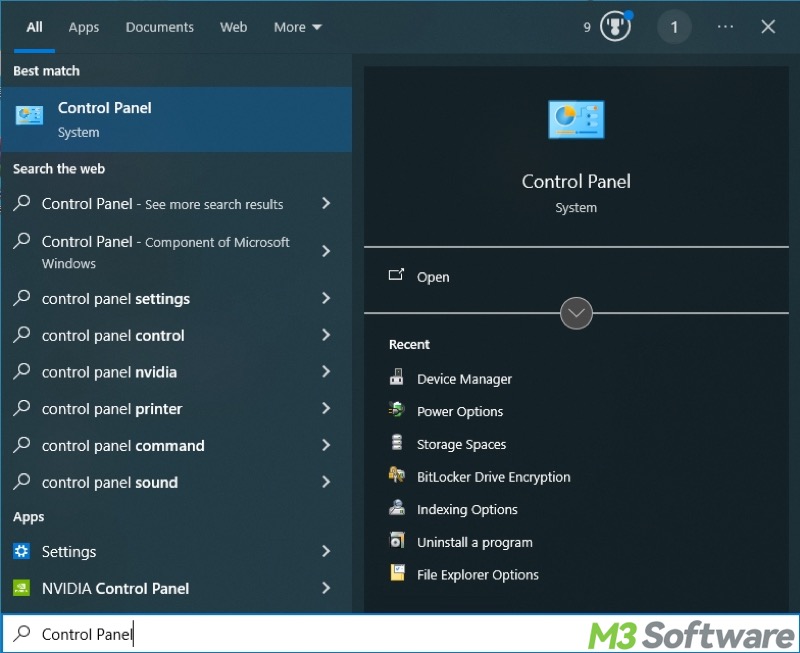
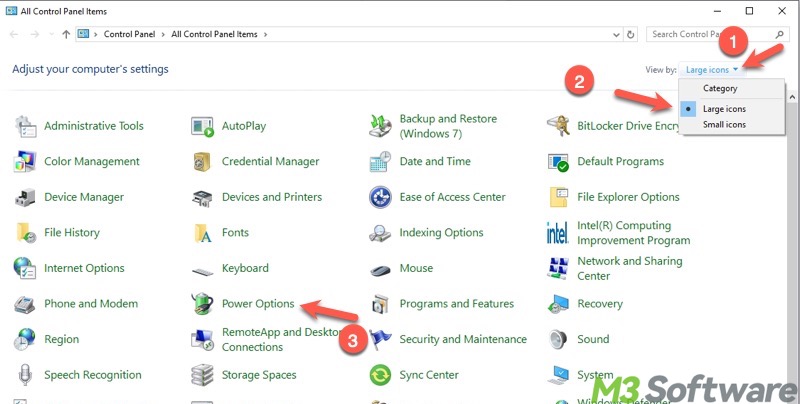
- Open "Control Panel" by searching for it in the Windows search bar.
- Select "Power Options" in the menu. If it's not visible, switch the "View by" option to “Large icons."
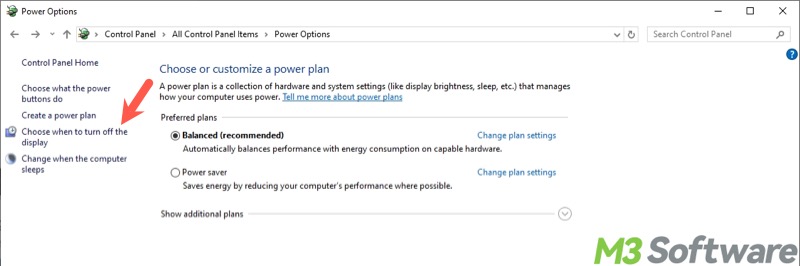
- Tap on "Choose what the power buttons do" on the left side panel.
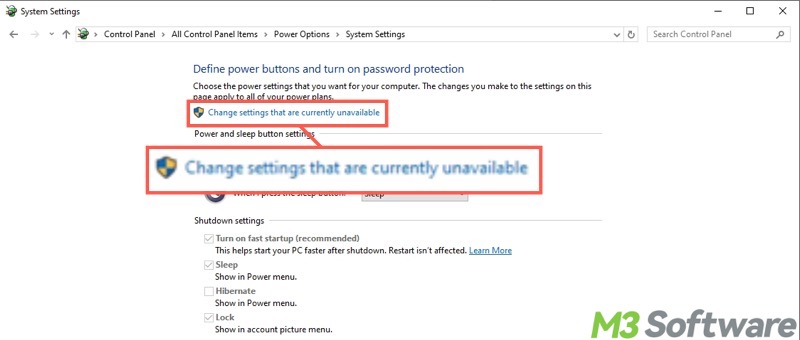
- Click "Change settings that are currently unavailable."
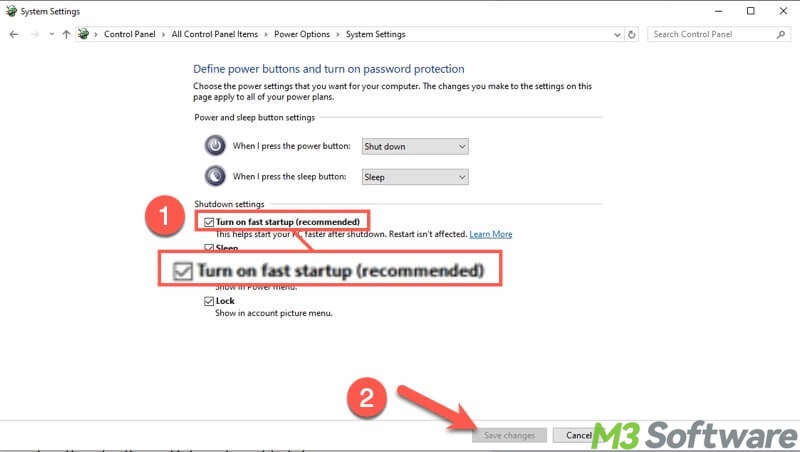
- Uncheck "Turn on fast startup(recommended)" and then click the "Save changes" button.
Solution 3 to Windows 10 slow startup - Set a proper Pagefile.sys size
Pagefile.sys is a system file that stores the virtual memory. System moves inactive processes to the page file, freeing up RAM for active tasks to ensure smooth system performance.
Improperly configured Pagefile.sys size can be to blame for the Windows 10 slow startup. Here's how to check and adjust the Pagefile.sys file size:
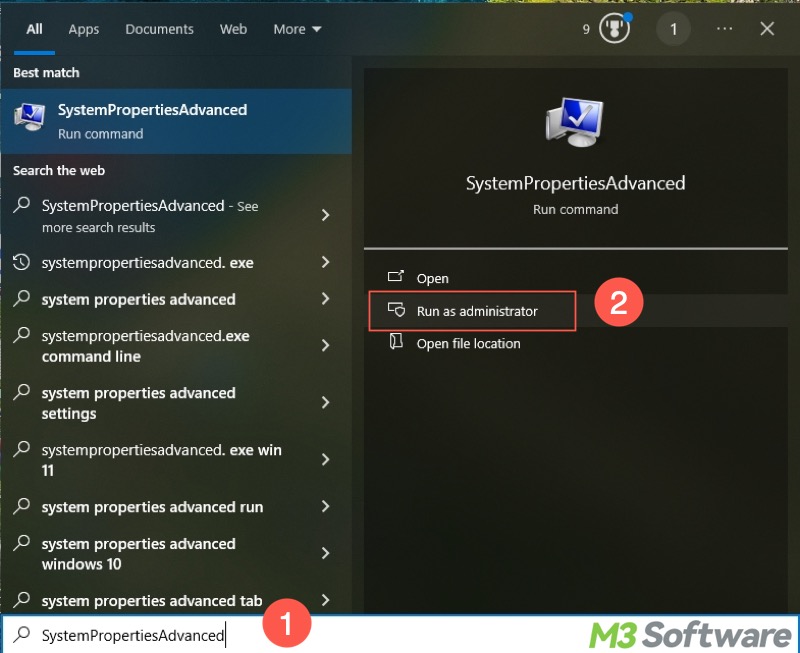
- Type "SystemPropertiesAdvanced" in the Windows search bar and choose "Run as administrator."
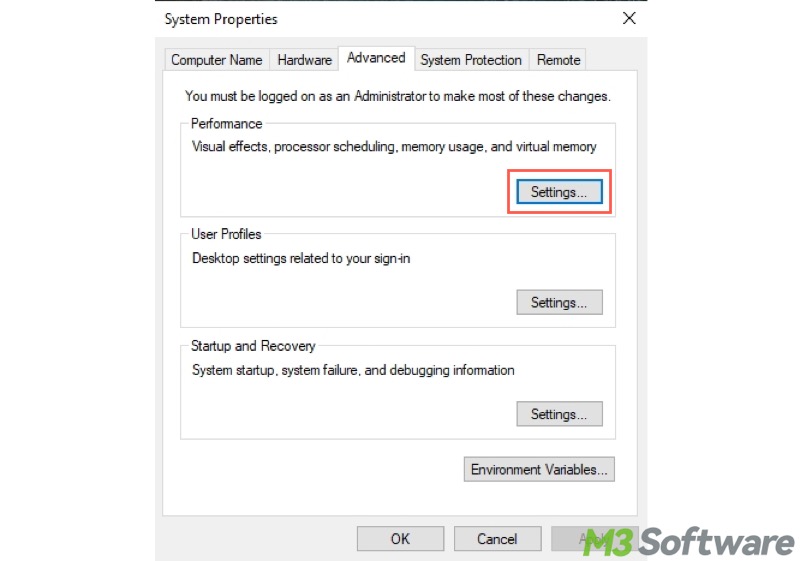
- Go to the "Advanced" tab and click "Settings" under the "Performance" section.
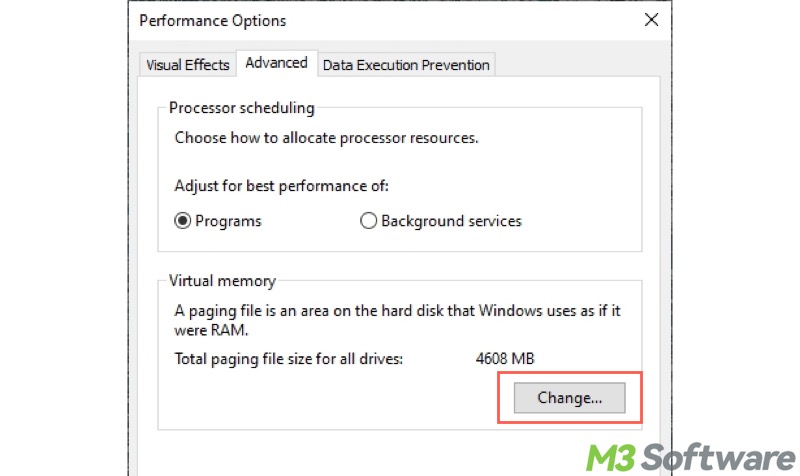
- Select the "Advanced" tab and click the "Change" button under the "Virtual memory" section.
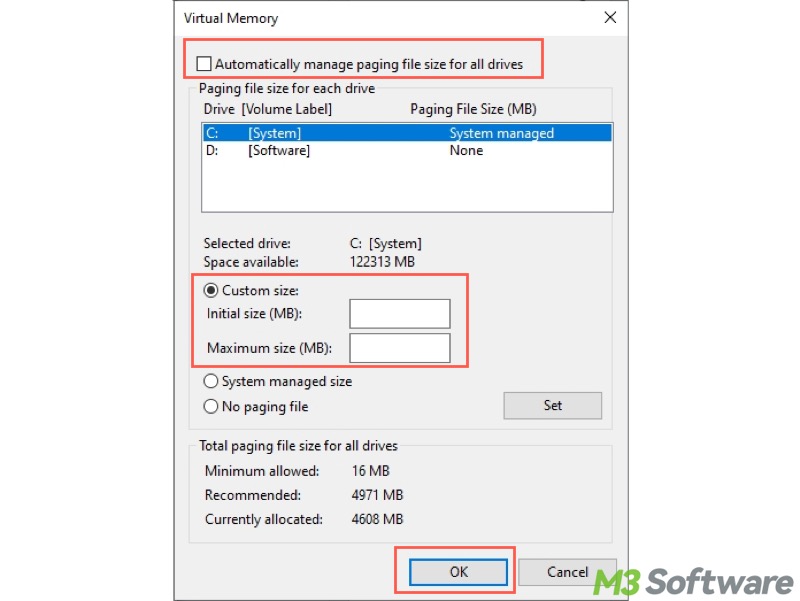
- Uncheck "Automatically manage paging file size for all drives."
- Choose "Custom size", input the recommended value, and click the "Set" button.
- Click "OK."
Look for more solutions to slow Windows 10 startup: (Best Solutions) How to Fix Slow Windows 10 Startup?
Windows 10 slow shutdown
Slow shutdown is another one of the most common Windows 10 issues. Here are the methods you can take when your PC shuts down slowly.
Solution 1 to Windows 10 slow shutdown - Remove peripherals
We suggest unplugging some unnecessary peripherals, especially the USB devices, when your Windows 10 PC shuts down slowly, as these peripherals may interfere with the shutdown processes.
Solution 2 to Windows 10 slow shutdown - Disable Fast Startup
When you shut down your Windows 10 PC, the Fast Startup feature works by saving the system state to the hiberfil.sys. On the next system boot, Windows can load the saved state instead of initializing everything from scratch.
Therefore, disabling the Fast Startup feature may help you resolve the Windows 10 slow shutdown issue. Detailed steps are mentioned above.
Solution 3 to Windows 10 slow shutdown - Adjust registry value
You can fix the Windows 10 slow shutdown issue by adjusting the following registry value:
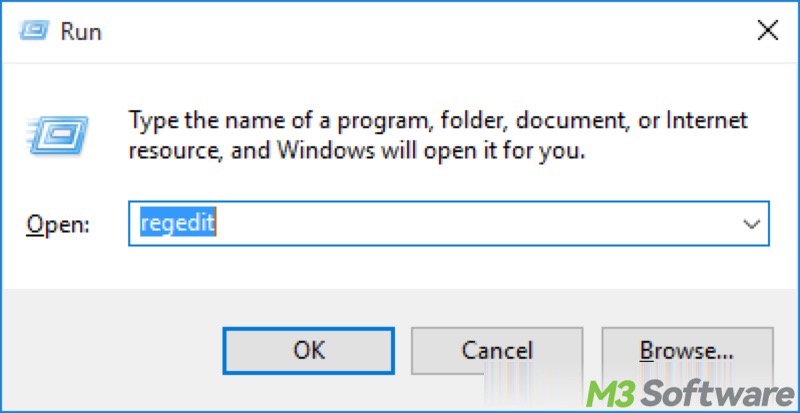
- Press the "Windows+R" keys to open the "Run" dialog box.
- Open "Registry Editor" by inputting "regedit" and clicking "OK."
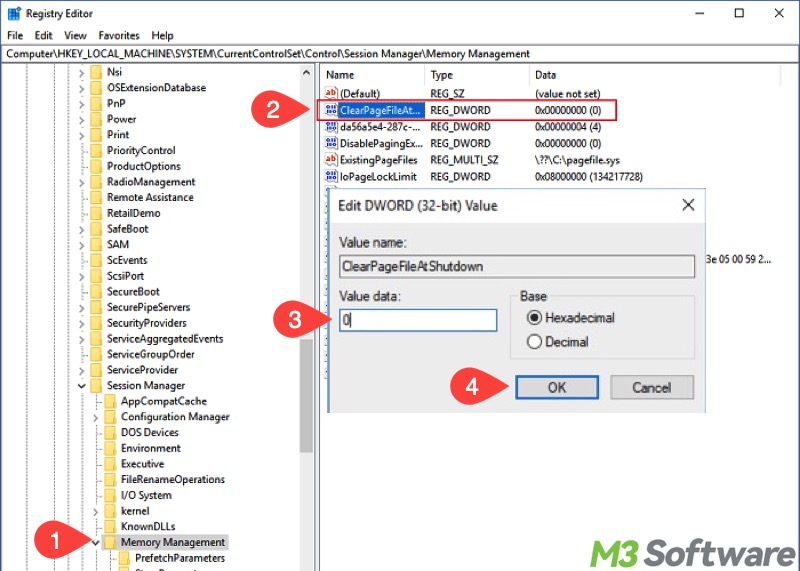
- Locate the folder by following the path: Computer\HKEY_LOCAL_MACHINE\SYSTEM\CurrentControlSet\Control\Session Manager\Memory Management
- Look for "ClearPageFileAtShutdown" in the right pane, double-click on it, change the value data to 0, and click "OK."
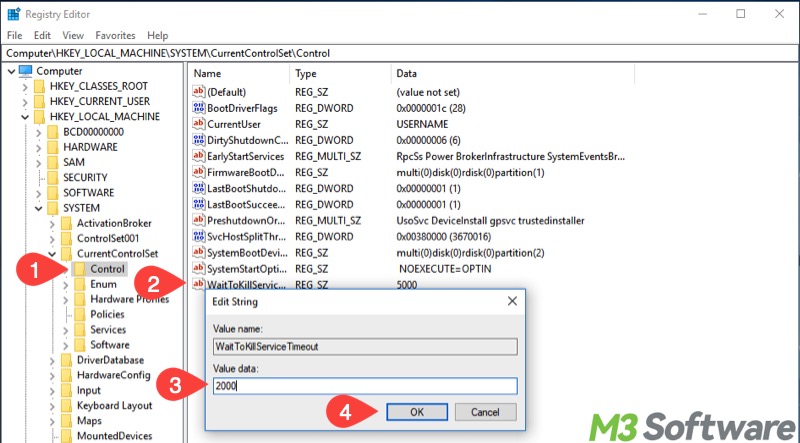
- Then locate the folder by following the path: Computer\HKEY_LOCAL_MACHINE\SYSTEM\CurrentControlSet\Control
- Double-click "WaitToKillServiceTimeout" in the right panel, change the value data to 2000, and click "OK."
- Restart your PC.
Windows 10 File Explorer not responding
When the File Explorer on Windows 10 frequently freezes or does not respond, please refer to the solutions below to fix the Windows 10 issue:
Solution 1 to Windows 10 File Explorer not responding - Restart File Explorer
Follow the steps below to end and restart File Explorer:
- Open "Task Manager."
- Locate and right-click on "File Explorer" (or Windows Explorer) under the "Processes" tab, and click "End task."
- Click the "File" tab and select "Run new task."
- Input "explorer.exe" in the box and click "OK."
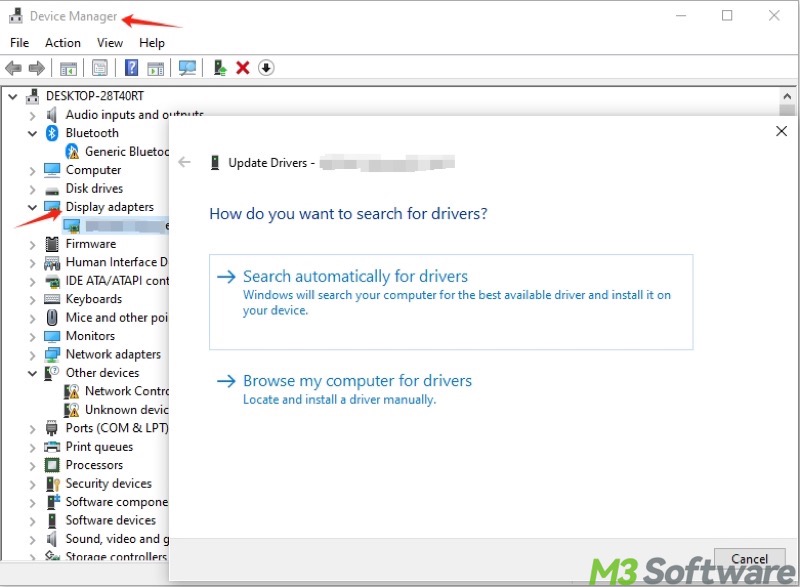
Solution 2 to Windows 10 File Explorer not responding - Update video driver
Updating the video driver on your PC could repair the File Explorer not responding issue on Windows 10.
- Open "Device Manager" by searching for it in the Windows search bar.
- Expand "Display adapters."
- Right-click on the video adapter and select "Update Driver."
- Choose "Search automatically for drivers."
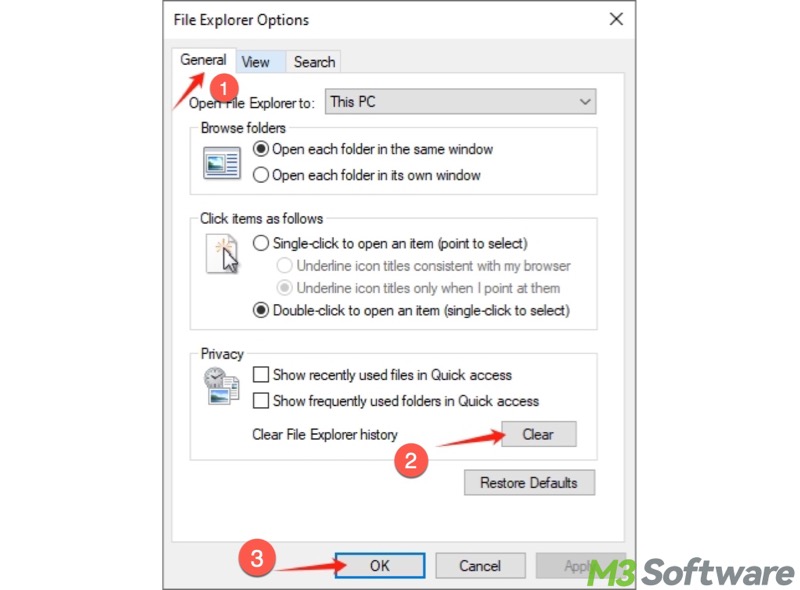
Solution 3 to Windows 10 File Explorer not responding - Clear File Explorer history
Clearing the File Explorer history may help you solve this Windows 10 issue.
- Type File Explorer Options in the Windows search bar and click on it.
- Under the "General" tab, click the "Clear" button, and tap on "OK" to clear the File Explorer history.
More methods to fix the File Explorer not responding issue, please read: Solved! Windows File Explorer Not Responding on Windows 10
Windows 10 Blue Screen of Death
The Blue Screen of Death (BSOD) is one of the most severe Windows 10 issues. It is a critical system error that displays an error message on the blue screen, prompting "Your PC ran into a problem and needs to restart..."
Here are some common methods you can use to fix the Blue Screen of Death:
Solution 1 to Windows 10 Blue Screen of Death - Check hardware connections
When a BSOD occurs, check the hardware connections.
- Power off the PC and disconnect the power source.
- Check all the hardware connections to ensure all the key hardware is firmly seated.
- Unplug all USB devices.
- Restart your PC.
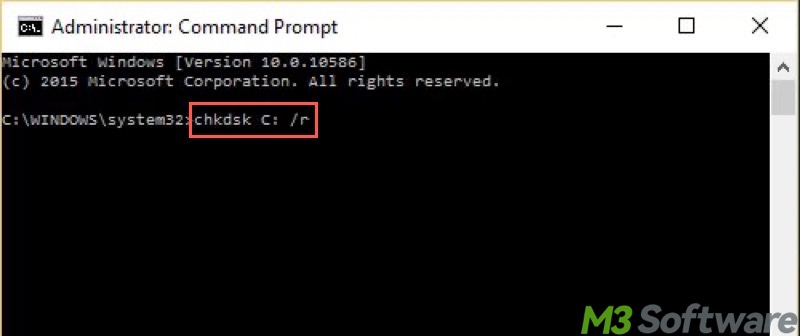
Solution 2 to Windows 10 Blue Screen of Death - Run a CHKDSK scan
CHKDSK is a built-in tool that can scan and fix bad sectors and many other disk errors in hard drives.
- Run Command Prompt as an administrator.
- Type “chkdsk X: /r” in the command window, replace X with the actual drive letter, and press the "Enter" key on your keyboard.
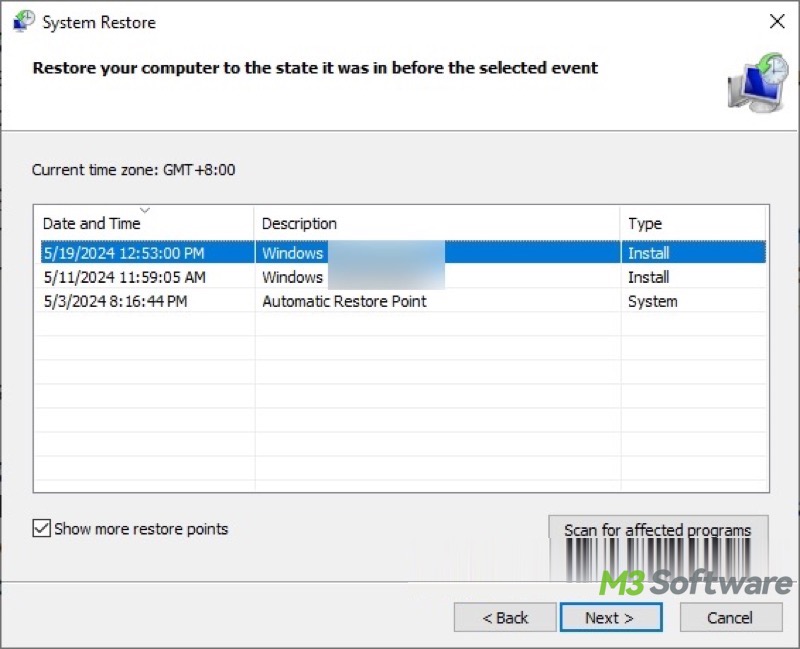
Solution 3 to Windows 10 Blue Screen of Death - Perform a System Restore
System Restore is a built-in feature that reverts your PC's system files, installed apps, Windows Registry, and system settings to a previous working state without affecting personal files.
- Type "Create a system restore" in the Windows search bar and click the result.
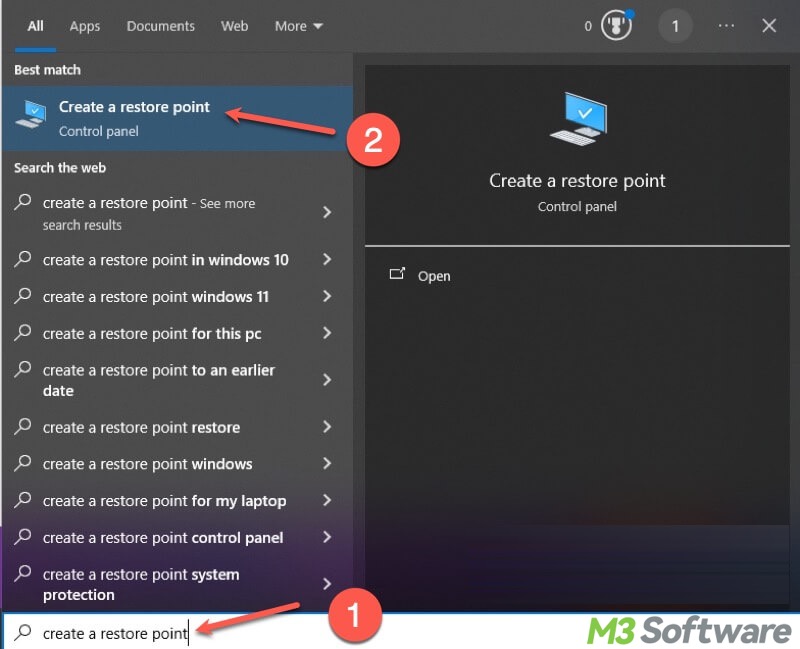
- Tap on the "System Restore" button.
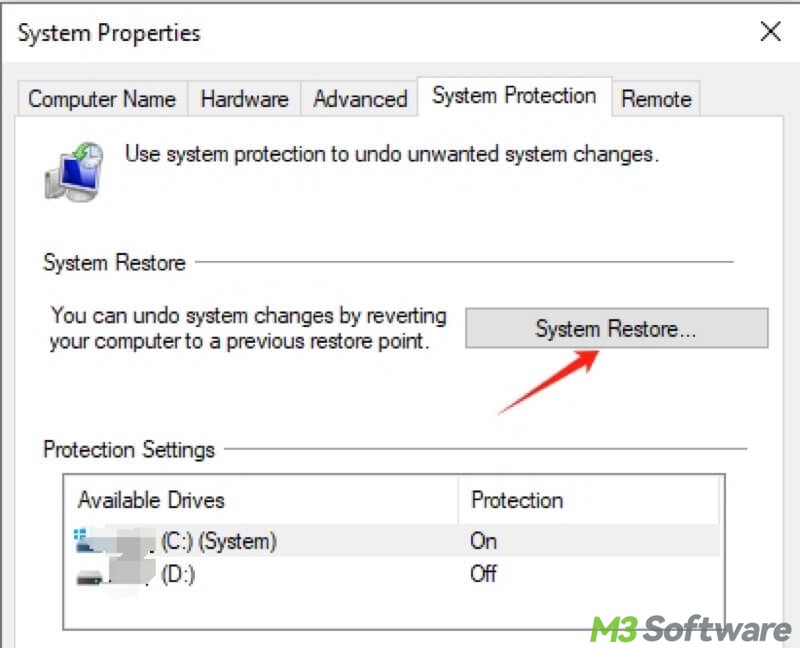
- Choose a restore point and click "Next" to continue.
There are many other ways to solve the Blue Screen of Death on Windows 10. Please refer to: Kernel Data Inpage Error Windows 10: Causes & Solutions!
By the way, if your PC is compatible with Windows 11, consider downloading Windows 11 and installing it on your computer.
Besides the problems we listed above, Windows 10 users can experience other common Windows 10 issues as follows:
- Fix Computer Screen Randomly Goes Black (11 Solutions)
- How to Delete Junk Files in Windows 11/10? (8 Methods)
- Best Solutions to Windows Crashed after Wake Up from Sleep
- Delete Files That Cannot Be Deleted on Windows (8 Ways)
- Recycle Bin Is Corrupted on Windows: Why & How to Fix?
- (8 Solutions) Copy and Paste Not Working in Windows 10
- Solved! Hard Drive Shows in Disk Management but Not Explorer
- Let's Fix Windows 10 Desktop Keeps Refreshing! 8 Solutions!
- Icons Missing from Start Menu Windows 10: Here's How to Fix!
What do you make of this article? Please share it with your friends if you find it helpful!
FAQs about Windows 10 issues
A
Firstly, you can open Task Manager and end excessive running processes. Secondly, right-click on your system drive, choose Properties, and click the Disk Cleanup button to perform a disk cleanup. Thirdly, run a virus scan in Windows Settings to check if there's a virus or malware.
A
First of all, check if the lost files are in the Recycle Bin or a backup copy. If not, you need a professional and user-friendly tool, such as iBoysoft Data Recovery for Windows, to retrieve accidentally lost or deleted files easily, even if the storage devices are corrupted, inaccessible, or formatted.
A
If the common solutions cannot repair the Windows 10 issues for you, you can reset Windows 10 by following the steps: 1. Open Settings and choose Update & Security. 2. Choose Recovery from the left side panel. 3. Tap on the Get started button under the Reset This PC section. 4. Choose Keep my files for a non-destructive reinstallation.