
You can do more than just analyze folder sizes. Folder size analysis is only the first step—the real goal is to free up disk space. Once you know what's taking up the most space, you have four cleanup options to choose from. Check the quick comparison and summary table below to find the one that best suits your needs.
| WinDirStat | iBoysoft DiskGeeker for Windows | FolderSizes | WizTree | |
| Best For | Ordinary users who want a truly free tool to visualize folder sizes and clean up space hogs. | Most users who want an all-in-one tool for analyzing, searching, exporting, and cleaning up files, with AI-powered recommendations to help identify what's safe to remove. | Advanced users who are comfortable with its cluttered, complex interface and value its powerful analysis, search, and file export features. | Beginners who prioritize fast folder size analysis and search over advanced cleanup features. |
| Price | Free | Free + Paid | Free + Paid | Free for personal use Paid for commercial/business use |
| Analyze Mode | Details | Directory structure | 5 modes: Details, Pie, Bar, Sunburst chart, Folder Map | Details and Tree Map |
| Search | Largest files | Largest files, duplicate files, temp files | Largest files, duplicate files, temp files | Largest files, duplicate files |
| Export | No | Yes, export to snapshot file | Yes, export to Excel, PDF, TXT file | Yes, export to CSV file |
| Clean Up | Delete permanently, remove empty folders, empty folders, run Windows Disk Cleanup Utility, component store cleanup | Clean up system junk files, remove caches, clear temp files, delete large files/duplicate files, app cleanup, app residuals removal… | Only a Delete option available from the right-click menu | Only a Delete option available from the right-click menu |
Take a few minutes to read the full review of each Windows folder size analyer based on my hands-on experience.
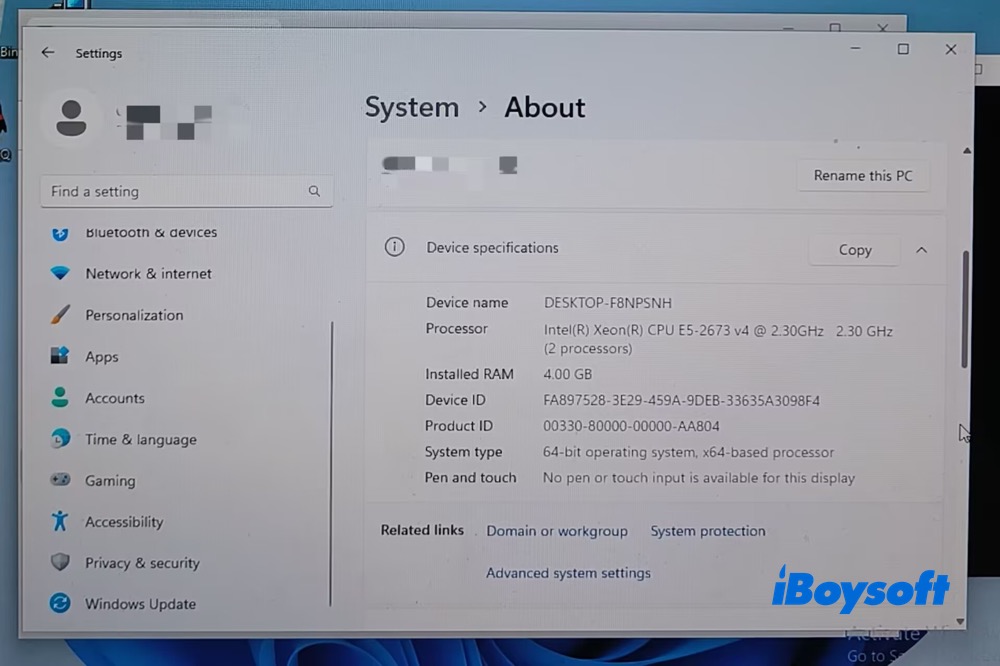
I'm running on an x64-based Intel(R) Xeon(R) CPU E5-2673 v4 @2.30 GHz 2.30 GHz (2 processors) Windows 11 PC with 4GB RAM. And I'll share with you my personal experience analyzing folder sizes visually on Windows 11 using WizTree, WinDirStat, iBoysoft DiskGeeker, and FolderSizes.
WinDirStat
- Best for: users who want to free visualize folder sizes in Details mode and clean up files in Windows
- Key features: folder sizes analysis; largest files search; large selection of cleanup options
WinDirStat does its core job—analyzing folder sizes—extremely well, and it's completely free. The scan speed is also quite satisfactory, with results appearing almost instantly. What impresses me most, though, is the wide range of cleanup options available after the analysis.
It comes packed with useful cleanup features, including permanently deleting files, moving them to the Recycle Bin, removing empty folders, running the Disk Cleanup utility, cleaning up the component store, and more.
That said, WinDirStat still has some limitations. For example, it offers only one analysis mode, has no export feature, and only provides a search option for finding the largest files.
Overall, WinDirStat is a highly regarded tool for visually analyzing folder sizes and cleaning up space-hogging files at the same time.
How to Visualize My Folder Sizes in WinDirStat
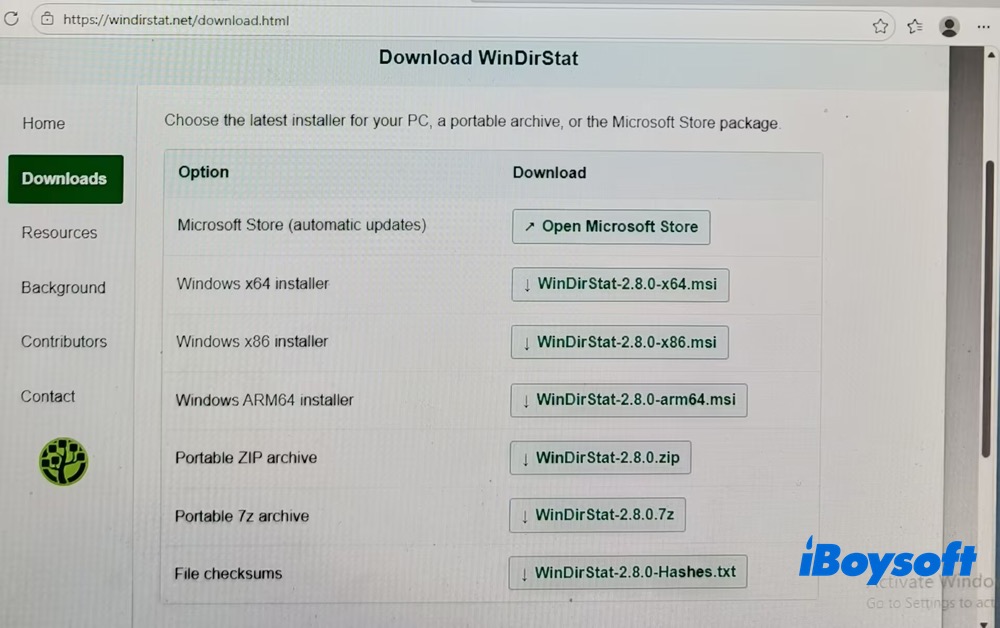
Step 1. I open the WinDirStat official website for the installer downloads. I choose the WinDirStat Windows x64 installer based on my Windows 11 configuration.
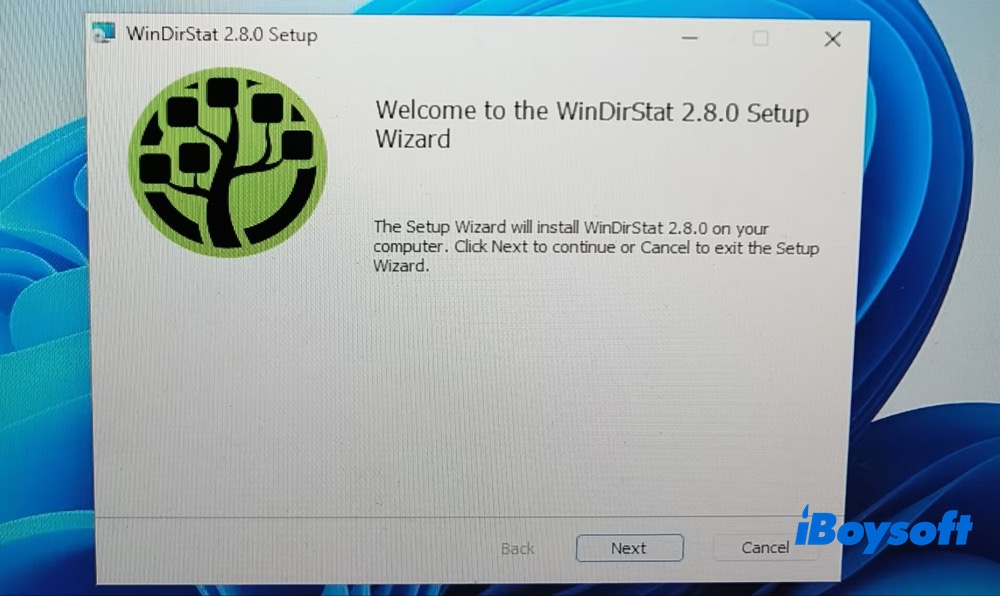
Step 2. Follow its setup instructions to install the latest WinDirStat 2.8.0 version on my Windows 11 PC.
Step 3. I go to the Start menu, and type WinDirStat to locate it after the installation is completed. Launch it and choose Yes on the pop-up message.
Step 4. Select Drives. This free disk space analyzer for Windows supports me in analyzing all local drives, individual drives or individual folder. I opt for "Individual Drives" here and select C: drive.
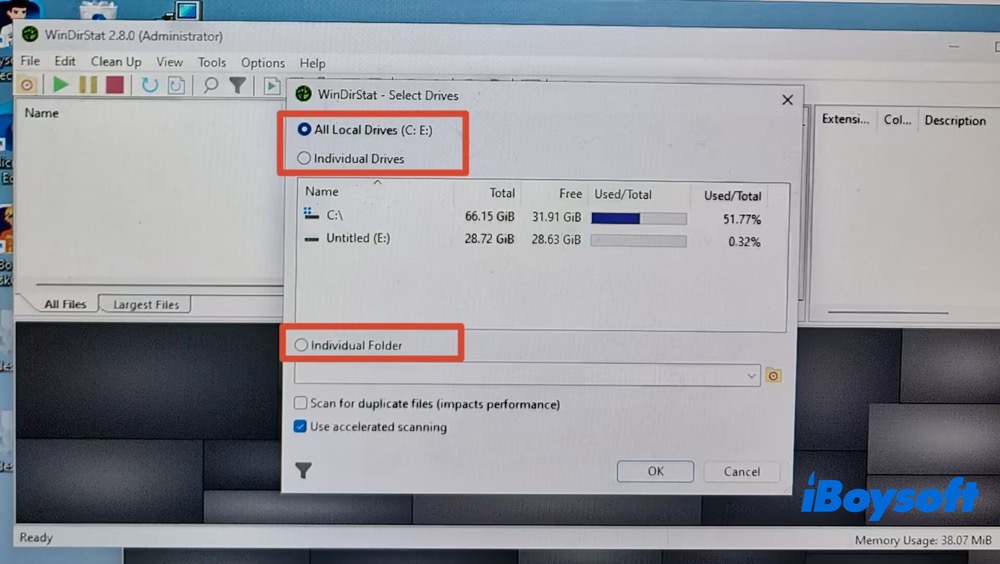
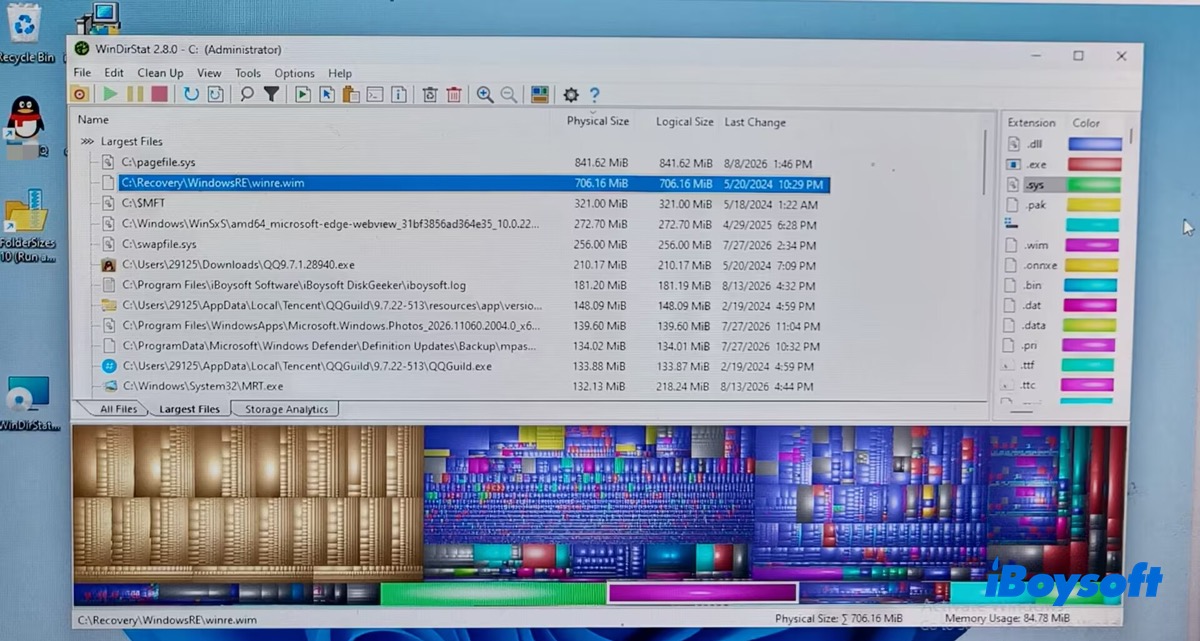
Step 5. WinDirStat completes my C: drive scanning instantly, even faster than WizTree. Now my C: drive folders' structures are listed with size percentage, physical size, logical size, file count, and last change time.
I can clearly see each folder and subfolder space usage. Meanwhile, the displayed physical size and logical size are the key factors for WinDirStat to help me find duplicate files.
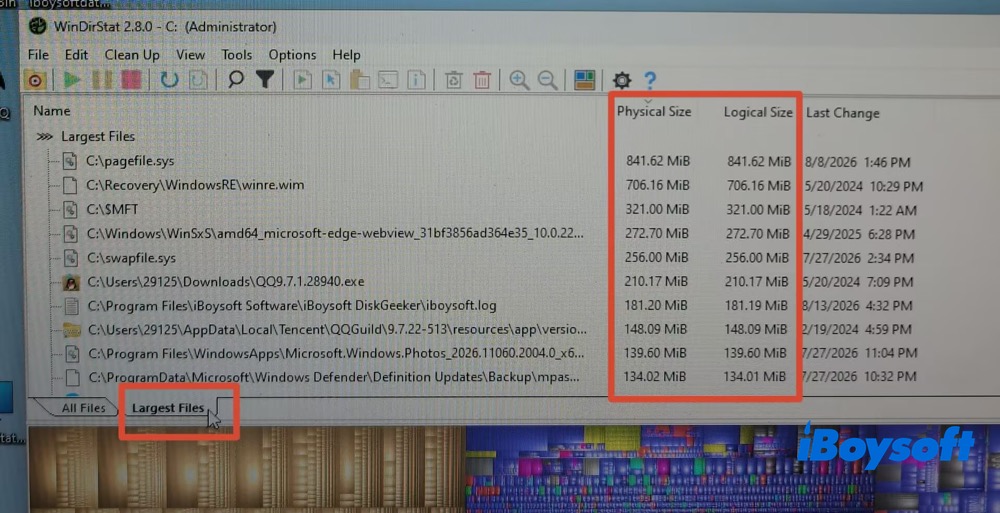
Step 6. Switch the option from All files to Largest Files, which displays the large files in descending order. This helps me quickly identify which files are taking up the most storage space.
See, the pagefile.sys consumes the most, up to 841.62 MB, and winre.wim under the WindowsRE subfolder comes as the runner-up, 706.16MB in total.
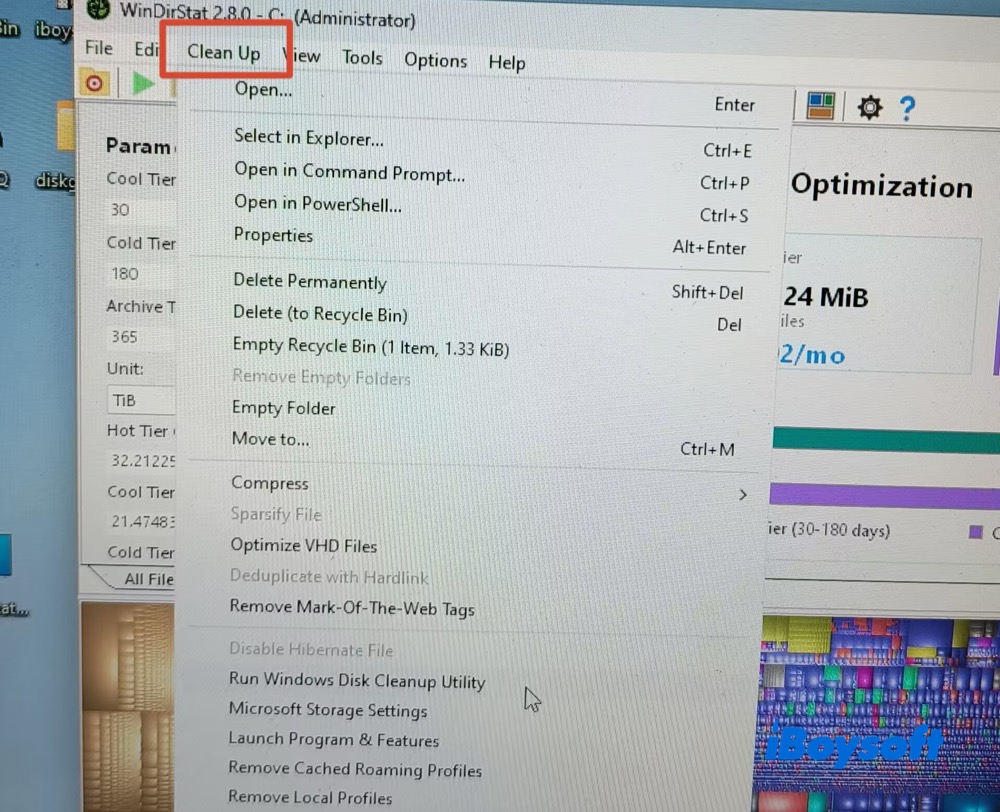
I wanted to delete some large files, and I was surprised to find that WinDirStat has built-in Clean Up options, including Delete Permanently, Delete (to Recycle Bin), Run Windows Disk Cleanup Utility, and Component Store Cleanup.
For a free, open-source disk space analyzer, having these cleanup tools built right in is a really nice touch.
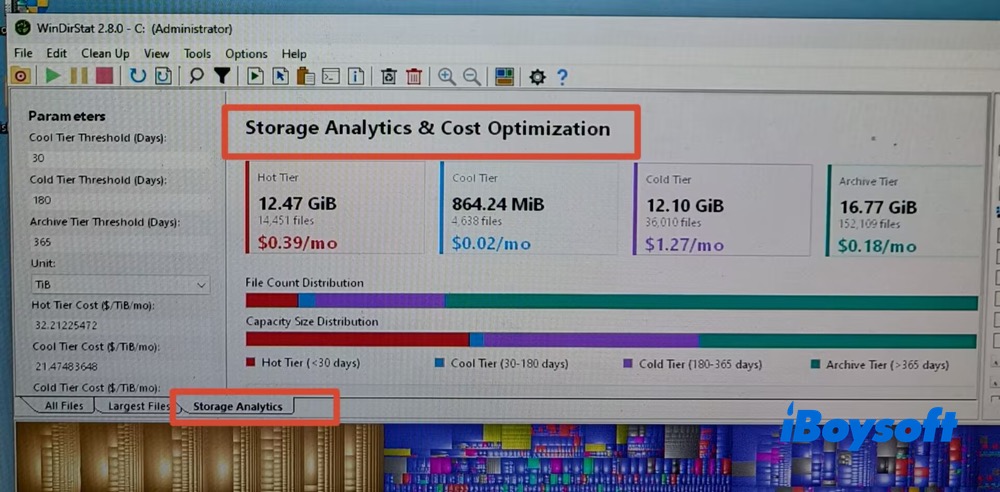
That's not the whole story. I click the Tools option at the top menu and find Storage Analytics & Cost Optimization, which reviews how much data I have and lowers cloud and server storage bills. This is helpful for reducing bills if you plan to store your Windows file data in the cloud service.
iBoysoft DiskGeeker for Windows
- Best for: users who need a feature-rich solution with “analyze, search, cleanup, AI recommendations, export” features covered
- Key features: folder sizes analysis; largest/duplicate/temp files search; AI cleanup advice, large selection of cleanup options
I find iBoysoft DiskGeeker for Windows easy to use, thanks to its clean, modern, and user-friendly interface. The folder size scanning and analysis are also completed quickly, so I don't wait long to get an overview of what's taking up my drive space.
Compared with the other three folder size analyzers, iBoysoft DiskGeeker for Windows is the only one that brings all the relevant features together in a single tool. It's also the only one to offer AI-powered cleanup recommendations, helping users free up Windows disk space while avoiding the accidental removal of important system files.
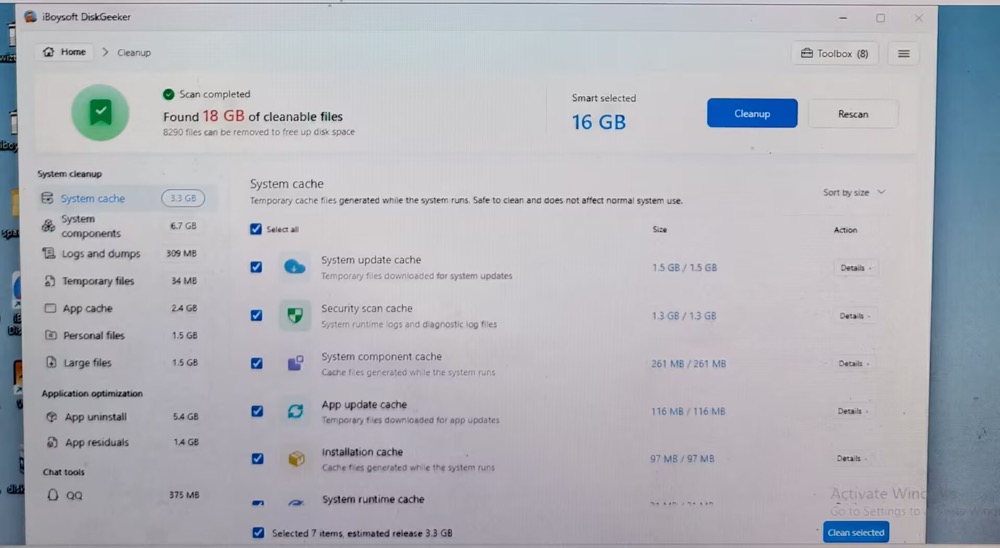
Compared with WinDirStat in particular, iBoysoft DiskGeeker presents cleanup categories in a much clearer and more organized way. It divides the cleanup options into two main categories: System Cleanup and Application Optimization, each with several detailed cleanup types.
For example, System Cleanup covers system cache, system components, junk files, logs and dumps, temporary files, app cache, large files, and duplicate files. This makes it much easier for ordinary users to identify what can be safely removed without having to figure out the purpose of each file themselves.
Overall, iBoysoft DiskGeeker for Windows is worth trying if you're looking for an all-in-one Windows cleanup solution with intelligent, AI-powered cleanup recommendations.
How to Analyze Folder Sizes Visually in iBoysoft DiskGeeker?
Step 1. I download and install the latest version 2.0 of iBoysoft DiskGeeker for Windows. Launch it.
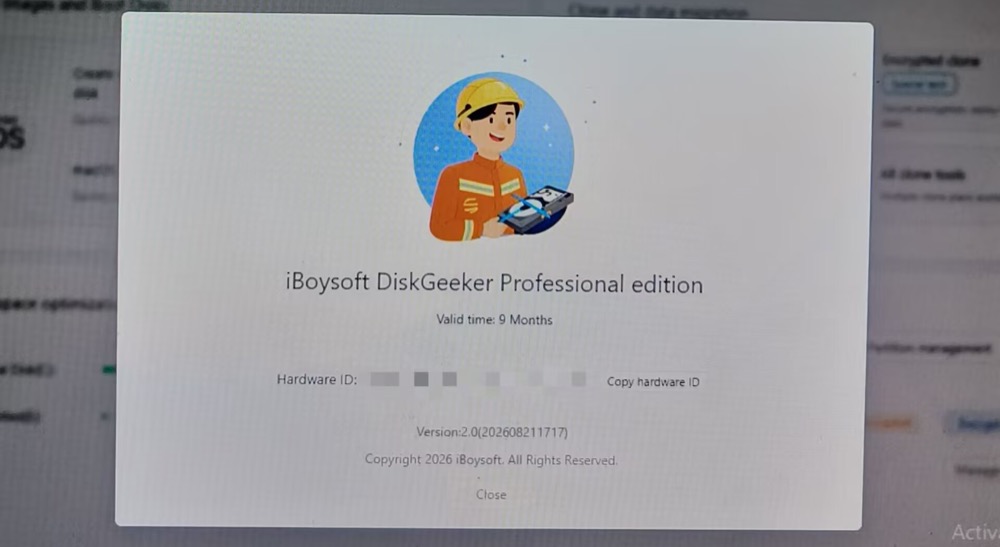
Step 2. Click "Optimize tools" in AI disk space optimization section.
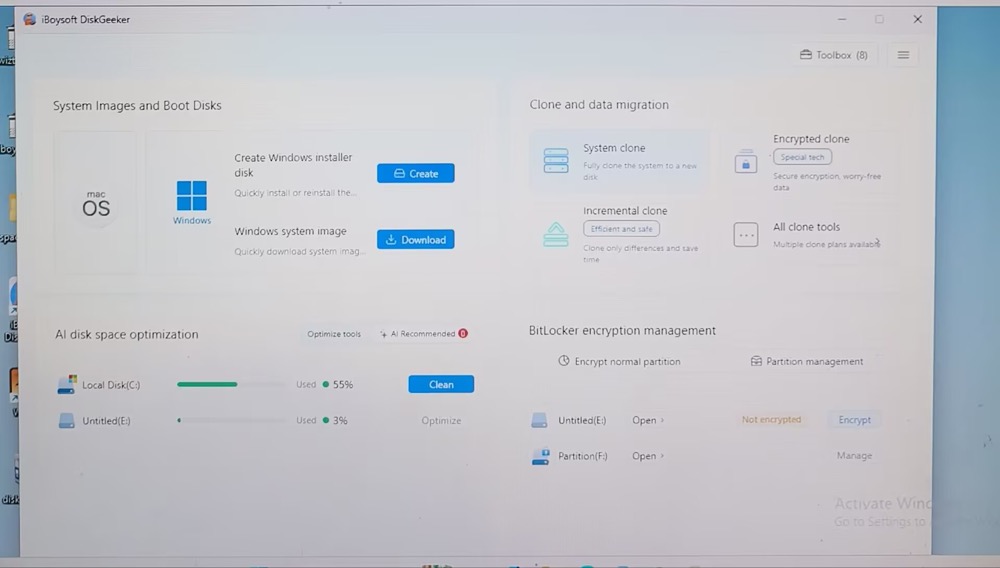
Step 3. Choose "User Folder Analysis", and this Windows folder size analyzer quickly scans all the folders on my drive and shows me how much space they're using. The entire scan takes only a few seconds.
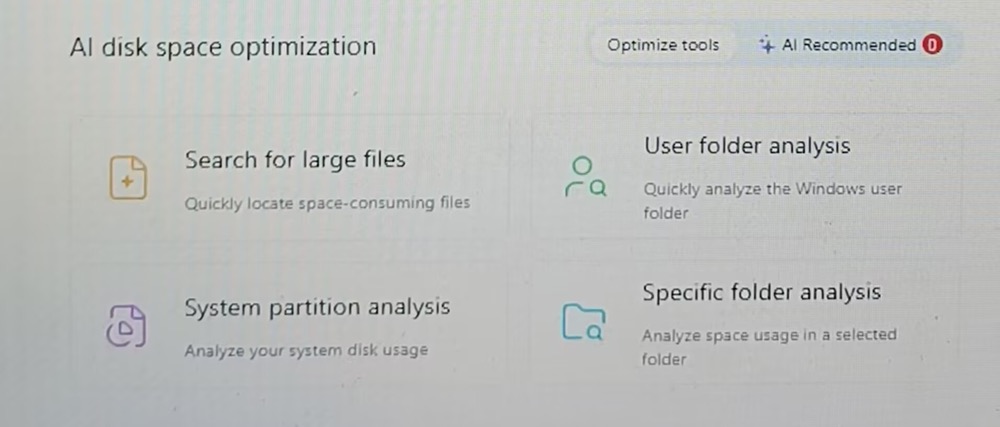
If you only want to check the size of a specific folder, select "Specific Folder Analysis". It scans only the folder you choose, so the analysis is much faster than scanning the entire drive.
The tool also provides "System Partition Analysis" and "Search for Large Files" options for more targeted storage analysis.
Step 3. The folder sizes are displayed in a directory tree, making it easy to see how much space each folder takes up at a glance.
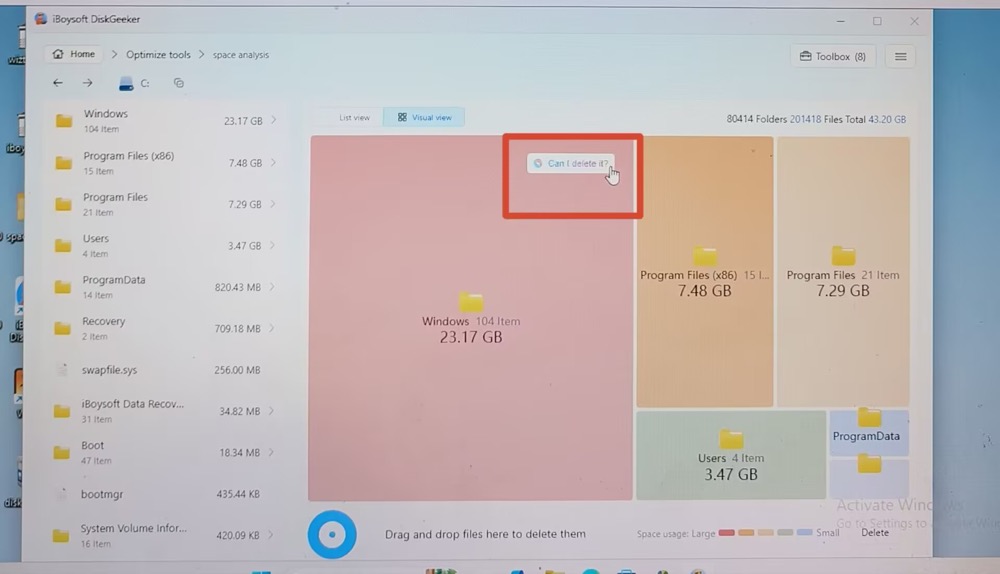
Then, I can focus on the largest folders and clean up the space they're taking up. However, some folders may contain system files, making it difficult to tell which files are safe to delete. That's where the tool's AI-powered cleanup suggestions come in handy.
Just click "Can I delete it?" to get an instant AI assessment of whether the files are safe to remove.
Optional: if your local disk C is almost full and you need to remove unnecessary files to free up storage, simply click the Clean option next to the C: drive. You'll then be taken to the cleanup window, where the tool automatically identifies files that are safe to remove—in this case, about 18 GB of cleanable files. Click the blue Cleanup button to clear 18GB of removable files at one click - simple and highly efficient.
FolderSizes
- Best for: advanced users who are okay with its cluttered yet complicated interface, and prefer folder size analysis to file cleanup
- Key features: folder size analysis with 5 modes; largest/duplicate/temp files search; export to various formats
As its name suggests, FolderSizes focuses primarily on folder size analysis and offers 5 visualization modes: Details, Pie, Bar, Sunburst, and Folder Map.
Personally, I prefer the Pie and Bar views because they let me see what's eating up space on my drive at a glance. The other visualization modes feel a bit too busy, with lots of text, icons, and colors that can be visually overwhelming.
One feature that particularly stands out to me is FolderSizes' wide range of export formats. I can export folder analysis reports to Excel, PDF, TXT, and other popular file formats. It's a small but useful touch, especially if you need to save, share, or further analyze the results.
In a nutshell, FolderSizes excels at folder size analysis, offering solid analysis, search, and export capabilities. If you don't mind its somewhat visually overwhelming interface and don't need built-in cleanup features, FolderSizes is definitely worth considering.
How to Display Folder Sizes in FolderSizes
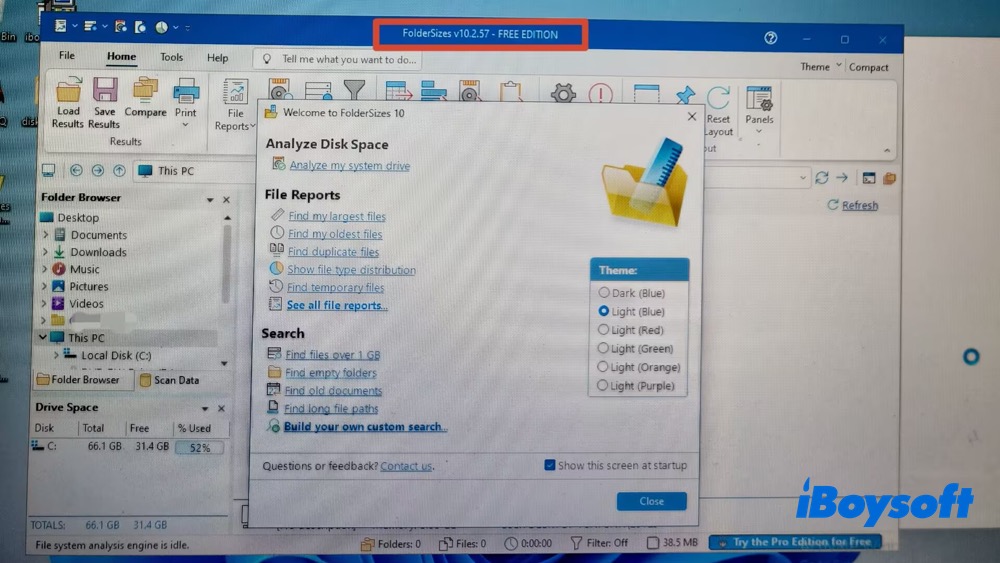
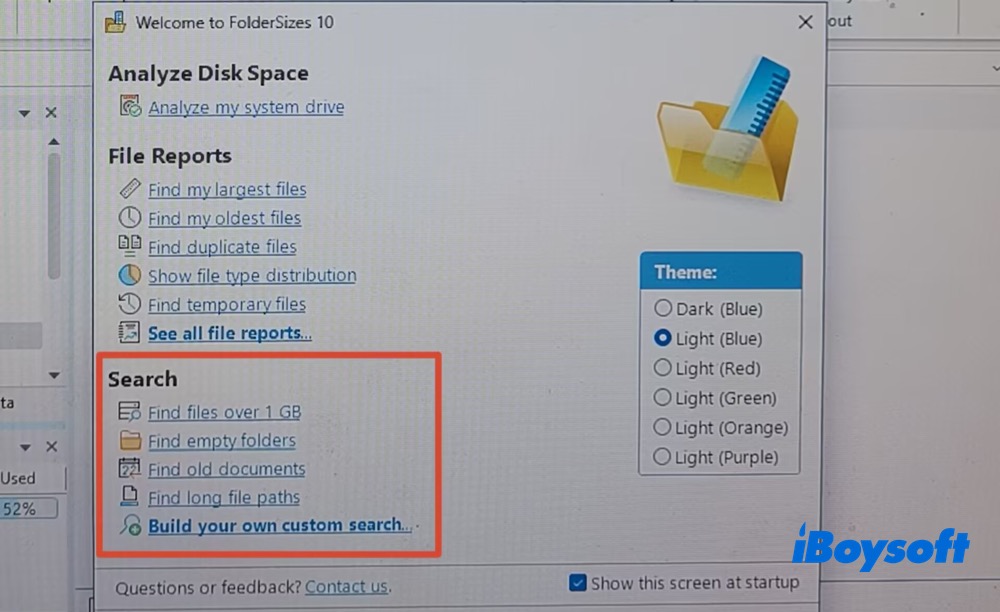
Step 1. Download FolderSizes the latest version 10.2.57 (24 MB file size) on my Windows 11. Launch the free edition after setup.
I find the interface a little cluttered. There are a lot of options competing for attention, and the abundance of colorful icons makes the overall design feel somewhat overwhelming. A cleaner, more streamlined interface would make it much easier and more pleasant to use.
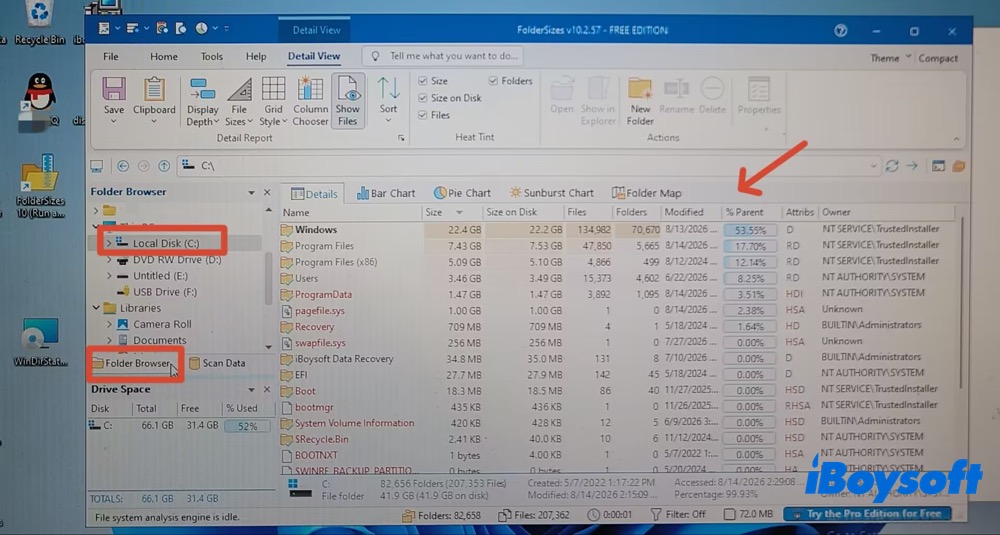
Step 2. Click Folder Browser in the left-hand panel and choose Local Disk (C:) (choose a specific folder at your disposal). This folder size analyzer also instantly completes the scan and displays the detailed info, including folder size, files, attributes, modification time, % parent, owner, etc.
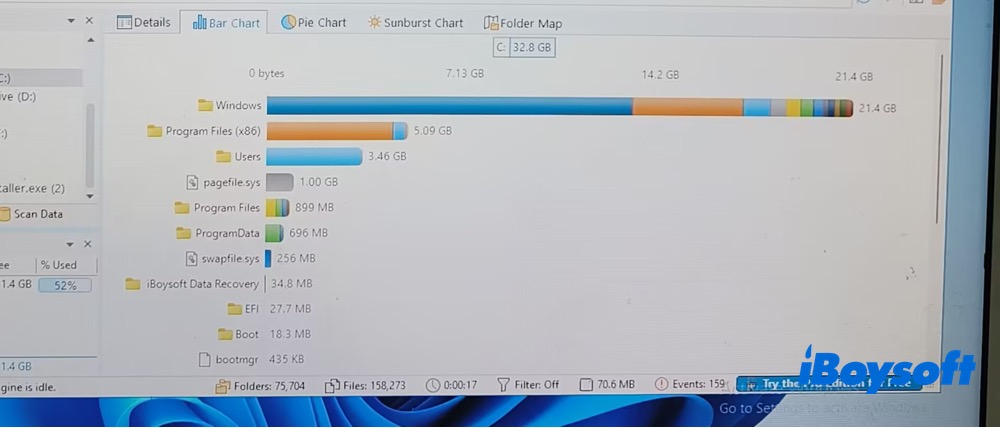
Step 3. Select disk space visualization mode. There are a couple of view modes available, including details, bar, pie, sunburst chart, and treemap.
Bar chart:
Pie chart:
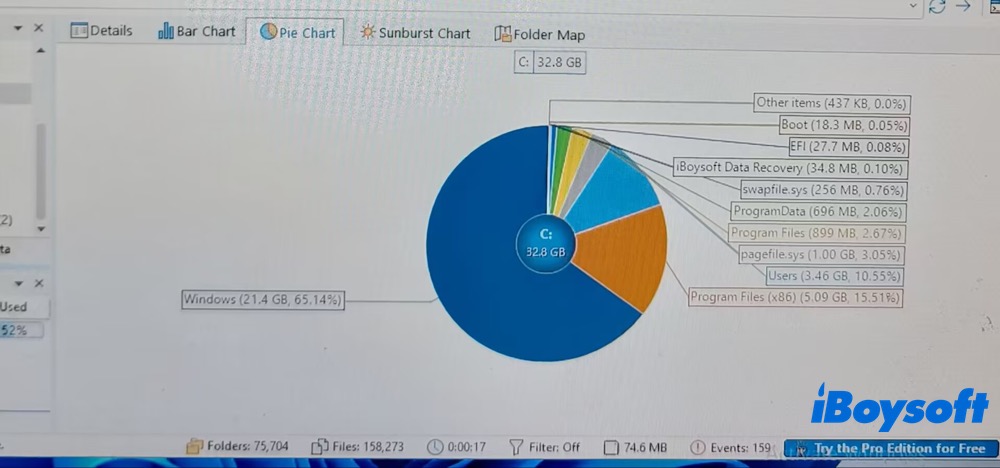
I prefer the bar chart and pie chart views because they give me a quick, clear picture of how much storage each folder is using without overwhelming me with text and icons. By comparison, the Details and Treemap views feel much more cluttered and are harder on the eyes.
Step 4. It supports other features like isolating large files, oldest files, duplicate files, and temp files. Meanwhile, it allows me to export reports to Excel, PDF, TXT, etc. file formats. Some features require upgrading to its paid Pro version.
WizTree
- Best for: beginners who seek a simple way to visualize folder sizes at high speed
- Key features: visual folder size analysis; large/duplicate files search; export to CSV file
WizTree is beginner-friendly, thanks to its simple, self-explanatory interface with no unnecessary frills. It also claims to be the fastest disk space analyzer, reportedly up to 46× faster than WinDirStat. However, in my own testing, I didn't find it noticeably faster than the other three analyzers.
This may be because my C: drive is relatively small at just 66.15 GB, rather than hundreds of gigabytes. Your results may vary depending on the size and type of your drive, so it's worth testing the scan speed on your own system.
Like FolderSizes, WizTree focuses primarily on folder size analysis rather than cleanup. However, it offers fewer visualization options than FolderSizes, with only Details and Tree Map views. Its report export options are also limited, with CSV being the only supported format.
In short, WizTree is a good choice if you simply want a straightforward way to see what's taking up space on your drive without needing a lot of extra features.
How to View Folder Sizes in WizTree
Step 1. Open WizTree on my Windows 11. Go to the WizTree official website to download and install this disk space analyzer software if you haven't installed it before.
I choose to run it with administrator privileges, so it can perform a complete scan of my drive.
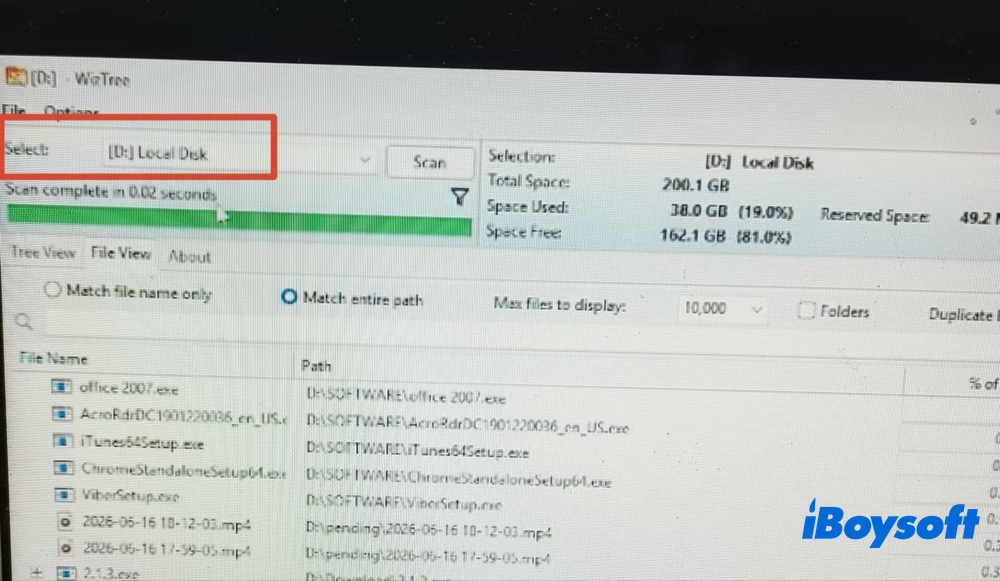
Step 2. I select D: drive from the drop-down menu at the top > tap the Scan button to scan my drive D > wait for the scan to complete.
WizTree finishes scanning my D: drive in just a few seconds. It then displays the folder in details mode, showing each folder's name and size, along with its path, modification time, and percentage of the drive's storage space it occupies.
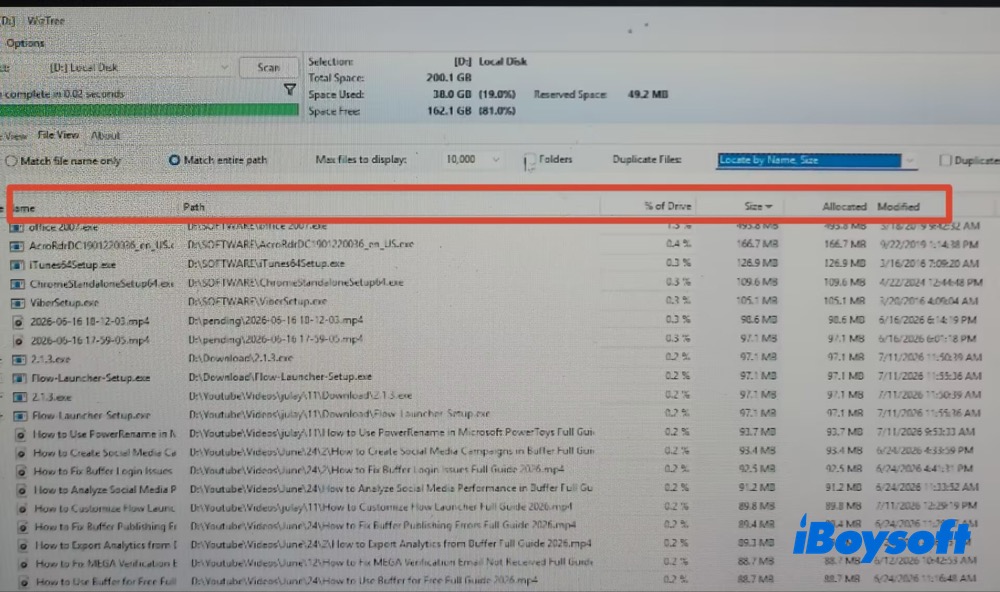
Step 3. I expand subfolders to see exactly how my D: drive space is being used.
The Size column shows how much disk space each folder occupies, making it easy to spot the largest folders at a glance. To quickly find the biggest space hogs, I simply click the Size column header to sort the folders by size.
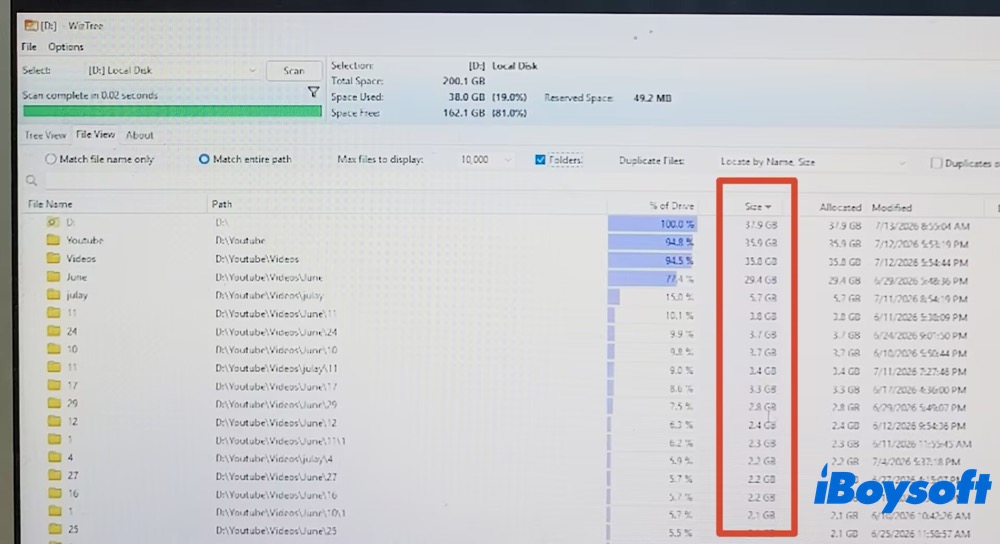
Once I've identified the largest folders, I carefully review the folder contents before deleting anything. You're also suggested reviewing your folders first, which will help you free up space on your Windows drive without accidentally removing significant files. That's it! It's easy to use, and you can follow my steps to try it yourself.
Final Thoughts
WinDirStat and iBoysoft DiskGeeker for Windows offer similar functionality (analyze + search + cleanup), while FolderSizes and WizTree take a more similar approach (analyze + visual modes).
That said, each tool has its own strengths and areas of focus. If you want to compare their differences at a glance, go back and check out the quick comparison table at the beginning of this post.
FAQs
- Q1. How to view folder sizes in Windows?
-
A
You can use File Explorer or command lines.
Use File Explorer: Right-click the folder, choose Properties, and read the Size field.
Use Command Prompt: Type dir /s C:\path\to\folder and check the total bytes listed at the end.
- Q2. How do I see the size of multiple folders on Windows PC?
-
A
There are multiple ways to go. You can turn to dedicated disk space analyzers for Windows like WizTree, WinDirStat, iBoysoft Cleaner, FolderSizes, etc.
- Q3. How do I check folder size in GB on Windows?
-
A
Follow the instructions:
1. Open File Explorer and locate the folder you want to check.
2. Right-click the folder and select Properties.
3. Wait a moment while Windows calculates the folder size.
4. Check the Size field to see the folder's exact size in bytes, MB, or GB.
Alternatively, hover your mouse pointer over the folder and wait a moment for a pop-up window displaying its size.